I once tried to make a classic chicken pot pie on a rainy Tuesday, only to end up with a soggy bottom that clung to the pan like a bad breakup. The broth leaked, the crust flopped, and I was left staring at a sad, mushy mess while the thunder roared outside. That disaster sparked a dare from my roommate: “Make a pot pie that can survive a hurricane and still taste like a hug.” I accepted, and after countless trials, I finally nailed a version that makes the kitchen feel like a cozy cabin in the woods, even when the weather outside is a total nightmare.
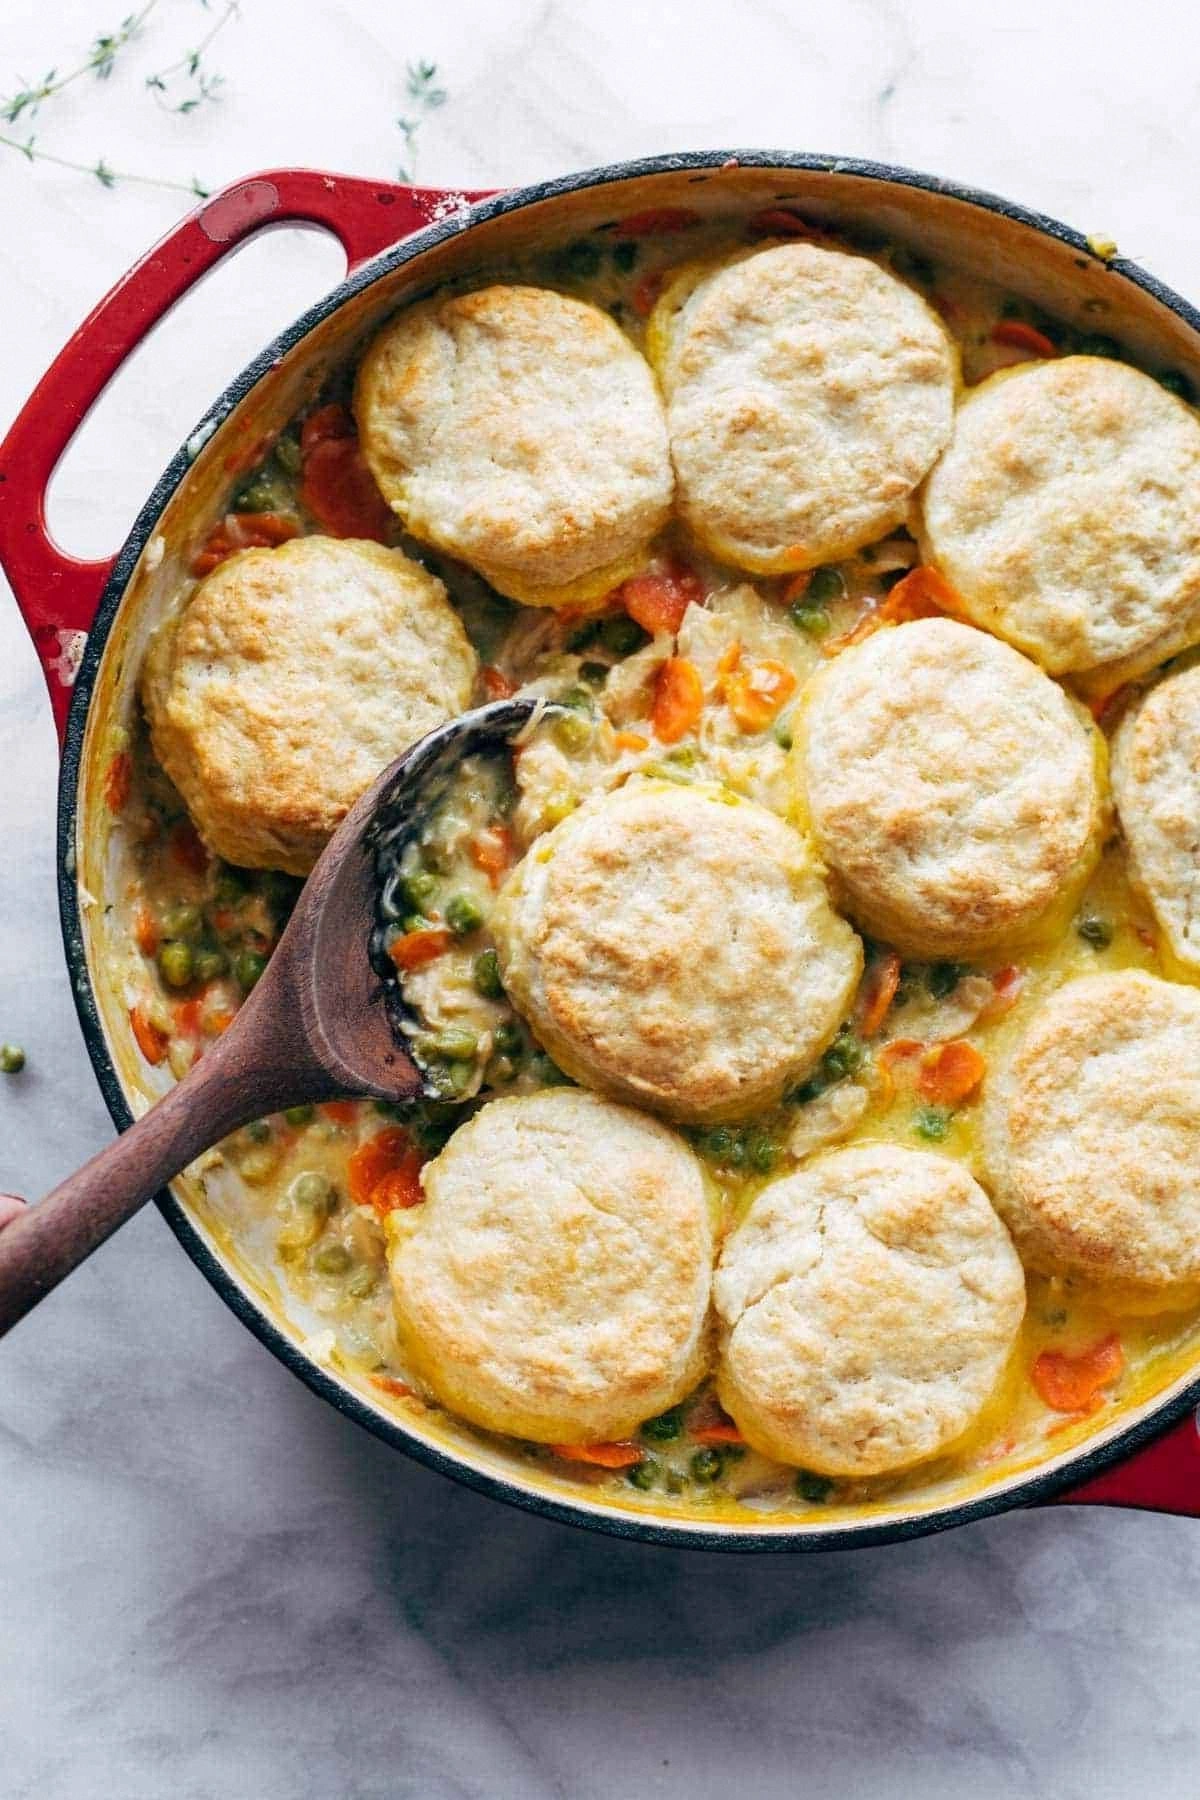
Picture this: the oven timer dings, and you pull out a golden dome of buttery biscuits perched atop a bubbling sea of creamy chicken, carrots, peas, and a velvety sauce that clings to the vegetables like a silk scarf. The aroma hits you first—a warm, buttery perfume mixed with rosemary and thyme that makes your nose do a happy dance. As you cut into it, the biscuit crust cracks with a satisfying snap, revealing a steaming interior that whispers of comfort and home. The first bite? A perfect harmony of tender chicken, sweet carrots, and a sauce that coats every morsel like velvet, while the biscuit topping fluffs up like a cloud that just might float away.
What makes this version truly stand out is the secret weapon: a biscuit topping that’s light, airy, and irresistibly buttery, crafted from a simple mix of flour, baking powder, sugar, salt, chilled butter, and whole milk. Most pot pie recipes rely on a flaky pastry that can be overly dense or dry, but these biscuits rise like a sunrise, delivering a texture contrast that feels like a surprise party in your mouth. I’ll be honest—once the biscuits are in the oven, I ate half the batch before anyone else got a chance to try it, because that golden crust is pure, unadulterated joy.
I’m about to spill every detail, from the moment you whisk the biscuit dough to the exact moment you coax the sauce to thicken without turning into a gluey mess. There’s a technique involving a cold butter block that will make your biscuits rise like they’ve been kissed by a wizard, and a tip for achieving a sauce so smooth you could use it as a mirror. Let me walk you through every single step — by the end, you’ll wonder how you ever made it any other way.
What Makes This Version Stand Out
- Flavor Explosion: The combination of chicken, herbs, and a creamy roux creates a depth that feels like a hug from grandma, with each bite delivering layers of savory goodness.
- Texture Contrast: The biscuit topping offers a fluffy, slightly crisp edge that shatters like thin ice, while the filling stays luxuriously smooth and velvety.
- Simplicity: You only need a handful of pantry staples for the biscuits, and the filling comes together in one pan—no fancy equipment required.
- Unique Twist: Most pot pies use pastry; these biscuits bring an unexpected lightness that turns the dish into a comfort-food masterpiece.
- Crowd Reaction: I dare you to taste this and not go back for seconds; even the pickiest eaters will be begging for more.
- Ingredient Quality: Using very cold butter and whole milk for the biscuits ensures a tender crumb that melts in your mouth.
- Cooking Method: Baking the biscuits directly on the filling lets the steam rise, marrying the flavors and creating a golden, bubbly crust.
- Make‑Ahead Potential: Assemble the pie the night before, refrigerate, and bake fresh in the morning for a stress‑free brunch.
Inside the Ingredient List
The Flavor Base
Chicken is the heart of this dish, and using bone‑in, skinless thighs adds both richness and moisture. The bones release gelatin that thickens the sauce naturally, while the meat stays juicy. If you’re short on time, boneless breast works, but expect a slightly thinner broth. I always recommend seasoning the chicken with salt, pepper, and a pinch of thyme before browning it—this builds a flavor foundation that can’t be rushed.
The Texture Crew
Carrots and peas bring a sweet crunch that balances the savory sauce. Slice the carrots into uniform half‑coins so they cook evenly, and add the peas at the very end to keep their bright pop. For a deeper flavor, you can toss the carrots in a little butter before they hit the pan; they’ll caramelize just enough to add a whisper of sweetness. Frozen peas work fine, but fresh peas give a burst of garden‑fresh brightness that takes this pie from good to unforgettable.
The Unexpected Star
The biscuit topping is the secret weapon. The recipe calls for a simple blend of flour, baking powder, sugar, salt, very cold butter, and whole milk. The magic lies in the temperature contrast—cold butter creates layers, while the whole milk adds just enough liquid for a tender crumb. If you’re dairy‑free, try oat milk and a plant‑based butter; the texture changes slightly but the flavor remains luscious.
The Final Flourish
Fresh herbs—parsley, thyme, and a dash of sage—are sprinkled on top just before baking, adding a fragrant green note that lifts the whole dish. A final drizzle of melted butter over the biscuits before they go into the oven creates those coveted golden speckles. When you pull the pie from the oven, the aroma of buttered herbs will fill the kitchen, making everyone wonder if they’re about to eat a simple dinner or a five‑star entrée.
Everything's prepped? Good. Let's get into the real action...
The Method — Step by Step
Start by heating a large, heavy‑bottomed skillet over medium heat and adding a splash of olive oil. Once shimmering, drop in the seasoned chicken pieces, letting them sizzle until they develop a deep golden crust—about 4 minutes per side. This searing locks in juices, and you’ll hear a satisfying pop that tells you the flavor base is forming. Remove the chicken and set aside; the pan will retain all those caramelized bits for the next step.
Kitchen Hack: Deglaze the pan with a splash of chicken broth or white wine to dissolve the browned bits; this is flavor gold.Add a diced onion, a couple of minced garlic cloves, and the carrot coins to the same skillet. Sauté until the onions turn translucent and the carrots start to soften—about 5 minutes. You’ll notice the kitchen filling with a sweet, earthy perfume that makes you want to taste the sauce right then and there. Stir occasionally to prevent sticking; the goal is a gentle caramelization, not a burn.
Sprinkle in 2 tablespoons of flour (you can use the same flour from the biscuit mix) and stir vigorously for a minute to create a roux. This step is crucial: the flour will absorb the fat and later thicken the sauce without clumping. If the mixture looks too dry, splash in a splash of broth; it should form a smooth paste that coats the veggies like a glossy veil.
Gradually whisk in 2 cups of low‑sodium chicken broth, followed by 1 cup of whole milk. Keep the heat at medium‑low and watch as the mixture transforms from a thin liquid into a luscious, creamy sauce. This is the moment of truth—if the sauce is too runny, let it simmer a little longer; if it thickens too fast, add a splash more broth. The sauce should coat the back of a spoon and have a gentle sheen.
Return the browned chicken to the skillet, along with any juices that collected on the plate. Add a cup of frozen peas and let everything simmer together for 8‑10 minutes, allowing the flavors to meld. You’ll hear a faint bubbling that signals the sauce is reaching its perfect consistency. Taste and adjust seasoning with a pinch more salt or a grind of black pepper.
While the filling simmers, whisk together the biscuit ingredients: 2 cups flour, 1 ablespoon baking powder, 1 ablespoon sugar, 1/2 teaspoon salt, 6 ablespoons very cold salted butter (cut into cubes), and 3/4 cup whole milk. Use a pastry cutter or fingertips to blend the butter until the mixture resembles coarse crumbs—tiny pea‑size pieces are the goal. Then stir in the milk just until the dough comes together; overmixing will make the biscuits tough.
Preheat your oven to 400°F (200°C). Transfer the chicken filling into a 9‑inch deep dish or a cast‑iron skillet, spreading it out evenly. Drop spoonfuls of the biscuit dough over the top, spacing them out so they can expand without merging. Sprinkle chopped fresh parsley and a drizzle of melted butter over the biscuits for that golden finish.
Watch Out: Do not over‑space the biscuits; if they’re too far apart, they’ll bake into flat, crispy tops instead of fluffy domes.Slide the dish into the preheated oven and bake for 25‑30 minutes, or until the biscuit tops are a deep golden brown and the filling is bubbling at the edges. You’ll see the biscuits puff up dramatically, their tops cracking gently—those cracks are your visual cue that they’re perfectly cooked.
Remove the pie from the oven and let it rest for 5 minutes before serving. This brief pause lets the sauce settle, making each slice neat and tidy. Grab a spoon, dig in, and watch the steam rise—picture yourself pulling this out of the oven, the whole kitchen smelling incredible. That first bite? It’s a buttery, creamy, chicken‑laden dream that will have you reaching for seconds without a second thought.
That's it — you did it. But hold on, I've got a few more tricks that'll take this to another level...
Insider Tricks for Flawless Results
The Temperature Rule Nobody Follows
Never bake biscuits at a temperature lower than 400°F; the high heat creates steam that expands the dough quickly, giving you that airy interior. If you bake at 350°F, the biscuits will spread and become flat, losing that coveted puff. I once tried a lower temperature to avoid burning, and the result was a dense, soggy topping that ruined the whole pie. Trust the heat, and you’ll get a crisp, golden crown every time.
Why Your Nose Knows Best
Your sense of smell is a hidden cooking gauge. When the sauce starts to emit a rich, buttery scent, it’s signaling that the roux has fully incorporated the liquid. If you smell a raw flour aroma, you’ve either under‑cooked the roux or added the liquid too quickly. Let the fragrance guide you; it’s a reliable indicator that the flavor base is ready for the next step.
The 5‑Minute Rest That Changes Everything
After baking, allow the pot pie to rest for exactly five minutes. This short pause lets the steam redistribute, preventing the biscuits from collapsing when you cut into them. Skipping this rest makes the biscuits soggy on the bottom, as the hot filling continues to steam into them. Trust the timer, and the texture will stay perfect from edge to center.
Butter‑Boosted Crust
A brush of melted butter on the biscuit tops before they go into the oven creates those gorgeous caramelized speckles. It also adds a layer of flavor that makes the biscuits taste like they’ve been kissed by a pastry chef. If you’re feeling decadent, mix in a teaspoon of grated Parmesan with the butter for a subtle umami kick.
Freezer‑Friendly Prep
Assemble the entire pie the night before, cover tightly, and store in the refrigerator. When you’re ready to bake, simply add an extra 5‑10 minutes to the cooking time. This method is a lifesaver for busy weekdays, and the flavors actually deepen overnight, making the filling richer.
Creative Twists and Variations
This recipe is a playground. Here are some of my favorite ways to switch things up:
Cheesy Bacon Biscuits
Fold shredded cheddar and crumbled cooked bacon into the biscuit dough for a smoky, melty twist. The cheese melts into the crust, creating pockets of gooey goodness that pair beautifully with the creamy chicken filling.
Mushroom Medley
Swap half of the chicken for a mix of sautéed shiitake, cremini, and oyster mushrooms. Their earthy depth adds a umami boost, making the dish feel more sophisticated while still comforting.
Spicy Southwest
Add a teaspoon of chipotle powder to the filling and toss in corn kernels and black beans. Top with a biscuit blend that includes a pinch of cumin, and you’ve got a pot pie that brings a fiesta to the table.
Herb‑Infused Biscuits
Incorporate fresh rosemary, thyme, and a dash of sage directly into the biscuit dough. The herbs bake into the crust, giving each bite a fragrant lift that complements the savory filling.
Vegan Version
Replace chicken with hearty tempeh cubes, use plant‑based butter, and swap whole milk for oat milk. The biscuits still rise beautifully, and the sauce thickens with a splash of coconut cream for richness.
Storing and Bringing It Back to Life
Fridge Storage
Cool the pie to room temperature, then cover tightly with foil or a lid and refrigerate for up to 3 days. Reheat in a 350°F oven for 15‑20 minutes, adding a splash of water to the bottom of the dish to create steam and revive the biscuit’s fluffiness.
Freezer Friendly
Wrap the assembled, uncooked pie in plastic wrap and then aluminum foil. Freeze for up to 2 months. When ready, bake from frozen at 400°F, adding 10‑15 minutes to the cooking time. The biscuits will still rise beautifully, and the filling will thaw and thicken as it bakes.
Best Reheating Method
For leftover slices, place them on a baking sheet, cover loosely with foil, and heat in a 375°F oven for 10 minutes. Add a teaspoon of water or broth to the bottom of the pan; the steam will prevent the biscuits from drying out and keep the sauce silky.