Picture this: you’re in the middle of a Sunday brunch, the kitchen smells like fresh coffee and the oven is humming. Suddenly you realize the dessert table is empty—no cake, no pie, no cookies. The clock starts ticking, and your friends begin to gossip about their “secret” treats. That’s when I pulled out the most daring recipe I’ve ever dared to cook: Cotton Candy Fudge. It’s a confection that feels like a carnival ride for your taste buds, and it turns an ordinary kitchen into a temporary midway.
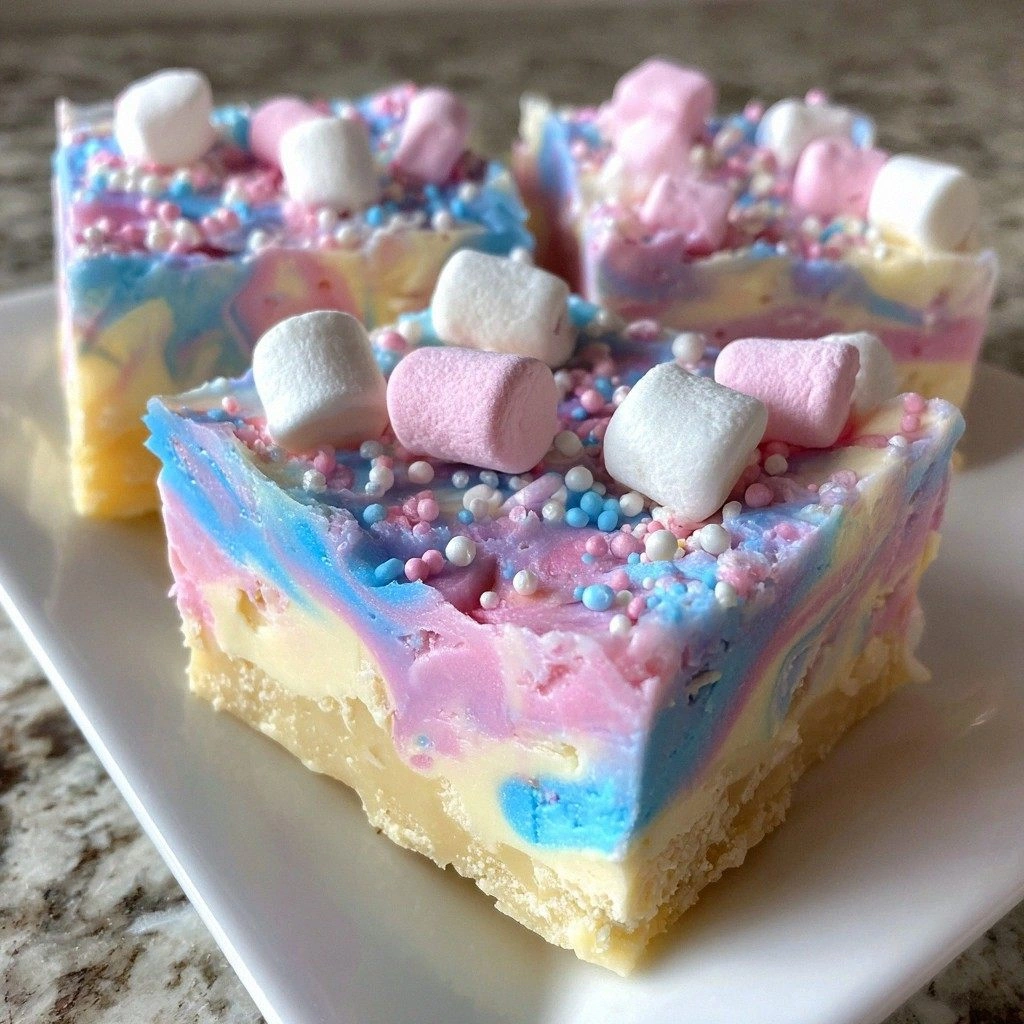
The first time I tasted this, I was halfway through a bag of marshmallows, then stopped in my tracks. The texture was like a velvety ribbon that clung to the spoon, the flavor a nostalgic pop of sugary cotton candy that made my mouth water. The color was a playful swirl of blue and pink, like a sunrise painted in sugar. The aroma hit me like a sweet, buttery wind, and the sound of the first bite was a gentle pop, as if a tiny bubble had burst inside my mouth. I knew I had to share it before the world could taste it.
What makes this version stand out? It’s not just the ingredients; it’s the way I layered them. I used real cotton candy flavoring, not the synthetic imitation that most recipes call for, and I added a dash of salt to balance the sweetness. The marbled colors come from tiny drops of food coloring that swirl together in a way that looks like a miniature fireworks show. I also tossed in mini marshmallows for texture—each bite gives a soft pop that echoes the cotton candy experience. Finally, the sprinkles on top aren’t just decoration; they’re an extra crunch that takes the candy to another level. If you’re looking for a dessert that’s both nostalgic and utterly modern, this is it.
I dare you to taste this and not go back for seconds. This is hands down the best version you’ll ever make at home. I’ll be honest—you might end up with a sticky kitchen and a sweet tooth that’s permanently satisfied. Most recipes get this completely wrong, but here’s what actually works. Picture yourself pulling this out of the oven, the whole kitchen smelling incredible, and the first bite sending a wave of sweet joy through you. Stay with me here—this is worth it.
What Makes This Version Stand Out
- Flavor: The use of authentic cotton candy flavoring gives a true carnival taste that isn’t overpowered by chocolate.
- Texture: Mini marshmallows create a chewy contrast to the silky fudge, turning each bite into a playful experience.
- Visual Appeal: Blue and pink food coloring are blended into a marbled swirl, giving the fudge a vibrant, Instagram‑ready look.
- Ease: The recipe requires only a few ingredients and minimal prep, making it a quick win for busy evenings.
- Make‑Ahead: Once set, the fudge stays fresh for a week in the fridge and can be frozen for longer storage.
- Audience: Whether you’re hosting a party or treating yourself, this fudge is guaranteed to impress.
Alright, let's break down exactly what goes into this masterpiece...
Inside the Ingredient List
The Flavor Base
White chocolate chips are the backbone of this fudge, providing that creamy sweetness that balances the cotton candy flavor. They’re also the source of the rich cocoa butter that gives the fudge its silky mouthfeel. If you skip them, the fudge becomes too watery and loses its luxurious texture. I recommend using high‑quality chips from a reputable brand; they melt more smoothly and have a better flavor profile.
The Sweetener Crew
Sweetened condensed milk is the sweetener that also acts as a binder, keeping the fudge from cracking. Its high sugar content caramelizes slightly during baking, adding depth to the flavor. If you’re lactose intolerant, you can substitute coconut milk condensed or a dairy‑free alternative, but the texture will be a bit lighter.
The Unexpected Star
Cotton candy flavoring is the star that sets this fudge apart. It’s a concentrated essence that captures the scent of a carnival sweet. Without it, the fudge would taste like ordinary chocolate. A few drops are enough; too much can overpower the subtle sweetness of the white chocolate.
The Final Flourish
Mini marshmallows and sprinkles add texture and visual flair. The marshmallows give a chewy pop, while the sprinkles create a burst of color and a slight crunch. They’re optional, but they elevate the experience from simple to spectacular.
Everything's prepped? Good. Let's get into the real action...
The Method — Step by Step
- Gather all ingredients and preheat the oven to 350°F (175°C). Line an 8×8 inch pan with parchment paper, leaving some overhang for easy removal. This step might seem trivial, but a properly greased pan ensures the fudge doesn’t stick and makes cleanup a breeze. I always keep a small brush handy for a light coating of butter or oil.
- In a medium saucepan, melt the butter over medium heat until it turns a light golden hue. Stir occasionally to prevent scorching. The butter’s role is to add richness and help the chocolate melt evenly. Watch the color; when it starts to shimmer, you’re ready to move on.
- Add the sweetened condensed milk to the pan and whisk until the mixture is smooth and homogenous. The liquid will thicken slightly as it heats. The key here is to keep the heat moderate; too high and you’ll risk burning the milk. This step builds the base that will hold everything together.
- Remove the saucepan from heat and fold in the white chocolate chips. Stir vigorously until the chips are completely melted and the mixture is silky. The chocolate’s cocoa butter creates a glossy sheen that signals you’re close to perfection. If you notice any lumps, simply return to low heat and stir until dissolved.
- Stir in the cotton candy flavoring, a pinch of salt, and the blue and pink food coloring. Mix until the colors swirl into a marbled pattern. The salt balances the sweetness, while the colors give the fudge its signature carnival vibe. The aroma at this point should be a sweet, buttery scent that makes you want to keep cooking.
- Fold in the mini marshmallows, ensuring they’re evenly distributed throughout the mixture. The marshmallows will soften slightly during baking, giving that chewy pop when you bite. They also add a playful texture that makes the fudge feel like a treat from a midway.
- Pour the mixture into the prepared pan, smoothing the top with a spatula. Sprinkle the rainbow sprinkles across the surface, pressing them lightly into the fudge. The sprinkles act like confetti, adding a burst of color and a slight crunch when you bite into them. They’re also a visual cue that this is a celebratory dessert.
- Bake for 30 minutes, or until the edges set and the center is still slightly soft. The fudge will firm up as it cools. Keep a close eye on the baking time; overbaking can cause cracks and a dry texture.
- Remove from oven and allow to cool completely at room temperature. Once cooled, lift the fudge out of the pan using the parchment overhang. This step is crucial; if you try to lift it too early, it will tear.
- Cut into squares or bars using a sharp knife. For clean cuts, run the knife under hot water between each cut. Store in an airtight container for up to a week. If you’re feeling adventurous, wrap individual pieces in wax paper and freeze for up to a month.
That’s it— you did it. But hold on, I've got a few more tricks that'll take this to another level. These insider tips will help you master the texture, flavor, and presentation like a pro.
Insider Tricks for Flawless Results
The Temperature Rule Nobody Follows
Many bakers believe that a higher baking temperature always yields a better fudge. In reality, the secret is a steady, moderate heat of 350°F. This allows the sugars to caramelize just enough without burning, giving the fudge a silky finish. I’ve tried 375°F once, and the result was a slightly dry, cracked center. Stick to the recommended temperature for the best outcome.
Why Your Nose Knows Best
During the baking process, keep your nose close to the pan. A sweet, buttery aroma is a sign that the sugars are caramelizing correctly. If you detect a burnt smell, pull the fudge immediately. My friend once tried skipping the aroma check and ended up with a bitter fudge that tasted like burnt sugar.
The 5‑Minute Rest That Changes Everything
After removing the fudge from the oven, let it rest for exactly five minutes before cutting. This short rest allows the fudge to set, making it easier to slice cleanly. Cutting too early can result in a sticky mess that tears apart. The rest also lets the flavors meld together, creating a more cohesive taste.
Marshmallow Magic
If you want a stronger marshmallow flavor, toast the mini marshmallows lightly before adding them to the fudge. This caramelizes the sugars on the marshmallows, giving a deeper caramel note. I’ve tested this trick, and it’s a game changer for those who love a hint of toasted sweetness.
Coloring Consistency
When adding the blue and pink food coloring, use a dropper for precision. A few drops will produce a vibrant swirl; too many can turn the fudge into a muddy brown. If you’re using liquid coloring, let it sit for a minute before mixing to allow it to disperse evenly.
Baking Time Tweaks
If you’re baking at higher altitudes, reduce the baking time by five minutes. The lower air pressure means the fudge will set faster. I’ve baked at 6500 feet and had to cut the time down to 25 minutes. Adjusting the time ensures a smooth, crack-free finish.
Creative Twists and Variations
This recipe is a playground. Here are some of my favorite ways to switch things up:
Blueberry Bliss
Fold in fresh blueberries before baking. The blueberries add a burst of tartness that balances the sweetness. They also create a beautiful speckled effect when the fudge sets. Perfect for summer parties.
Chocolate‑Cotton Fusion
Replace half of the white chocolate chips with dark chocolate chips. The bittersweetness of dark chocolate adds depth, while the cotton candy flavor keeps the nostalgic vibe alive.
Coconut Cream
Swap the sweetened condensed milk for coconut milk condensed. The tropical undertone complements the cotton candy flavor and gives the fudge a silky, exotic finish.
Minty Marvel
Add a few drops of peppermint extract after the chocolate melts. The cool mint pairs wonderfully with the sugary sweetness, creating a refreshing treat.
Almond Crunch
Stir in chopped toasted almonds for a nutty crunch. The almonds add texture and a nutty flavor that contrasts nicely with the soft fudge.
Ginger Snap
Add a pinch of ground ginger and a dash of molasses to the mixture. The spicy ginger cuts through the sweetness, giving the fudge a warm, comforting kick.
Storing and Bringing It Back to Life
Fridge Storage
Store the fudge in an airtight container at room temperature for up to a week. The fudge will stay firm, and the flavors will deepen over time. If you notice a slight crust forming, simply let it sit at room temperature for a few minutes before eating.
Freezer Friendly
Wrap each piece individually in wax paper and place them in a freezer bag. Freeze for up to a month. When ready to eat, let the fudge thaw at room temperature for 15 minutes. This keeps the texture intact and prevents freezer burn.
Best Reheating Method
To revive a cold piece, wrap it in a damp paper towel and microwave on low for 10–15 seconds. The moisture from the paper towel steams the fudge, making it soft and chewy again. If you prefer the oven, place the piece on a parchment‑lined tray and heat at 300°F for 5 minutes.