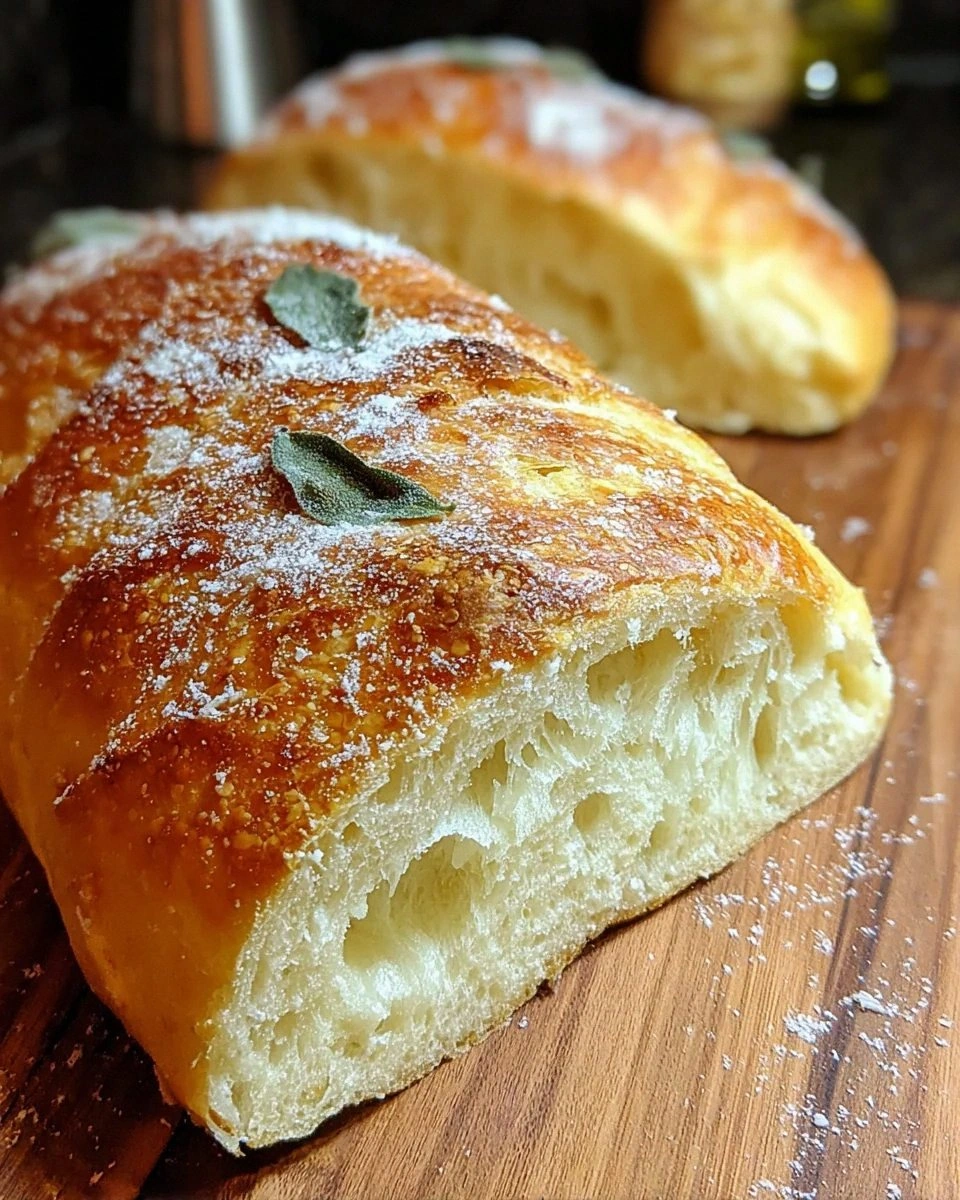
I still remember the night my roommate challenged me to bake a loaf that could survive a three‑hour road trip without turning into a soggy brick. I laughed, I rolled my eyes, and I whispered a prayer to the kitchen gods. The next morning, the kitchen smelled like a tiny Italian bakery on a busy street corner, the kind of aroma that makes you stop mid‑yawn and stare at the oven door as if it were a portal to heaven. The crust was so crisp it sang when you tapped it, and the crumb was airy enough to float on a gentle breeze yet sturdy enough to hold a generous smear of olive oil without collapsing.
Picture this: a golden‑brown crown speckled with tiny caramelized flecks, steam curling up like lazy ribbons, and that first bite—crunch, then a soft, buttery interior that makes your taste buds do a little jig. I dared you to taste this and not go back for seconds, and honestly, I’m still waiting for someone to prove me wrong. Most recipes get this completely wrong, either producing a gummy loaf or a rock that could double as a doorstop. This version? Hands down the best version you'll ever make at home, and I’m about to spill the beans on why it’s a game‑changer.
What makes this loaf truly special is a secret weapon: a splash of warm water that’s just shy of body temperature, combined with a splash of sugar that feeds the yeast like a sweet lullaby. The dough rests in a cool, dark corner for a full hour, allowing the gluten to relax and the flavors to develop. I’ll be honest — I ate half the batch before anyone else got to try it, and that’s because the aroma was so intoxicating that patience felt like a crime. The technique I’m about to reveal is the kind of hack that turns a good loaf into a legendary one, and you’ll be the only one in your circle who knows it.
Okay, ready for the game‑changer? Let me walk you through every single step — by the end, you’ll wonder how you ever made it any other way. Stay with me here — this is worth it.
What Makes This Version Stand Out
- Flavor Explosion: The subtle sweetness from the sugar balances the salt, creating a taste that’s both rustic and refined, like a fine Italian wine that sings on the palate.
- Crust Perfection: A cornmeal dusting gives the bottom a crunchy, slightly nutty bite that shatters like thin ice when you break it apart.
- Simplicity: Only six core ingredients are needed, meaning you won’t have to raid the pantry for exotic additives.
- Texture Harmony: The interior stays fluffy and open‑holeed, while the exterior stays crisp for days, making it perfect for sandwiches or dipping.
- Crowd Reaction: I dare you to serve this at a dinner party and watch guests line up for a second slice—trust me, they’ll be begging for the recipe.
- Ingredient Quality: Using high‑protein all‑purpose flour gives you a chewier crust without the chewiness of a bagel.
- Method Magic: A short, cool rise followed by a hot oven blast creates that classic “oven spring” that makes the loaf look like it’s puffed up with pride.
- Make‑Ahead Potential: This bread freezes beautifully and revives with a splash of water, so you can bake in bulk and enjoy fresh‑baked bliss anytime.
Inside the Ingredient List
The Flavor Base
Salt isn’t just a seasoning; it’s the conductor of flavor, coaxing every molecule in the dough to sing in harmony. A pinch too little and the bread tastes flat, a pinch too much and it becomes a salty slab. If you’re watching sodium, try a low‑sodium sea salt, but never skip it entirely—you’ll miss that subtle depth that makes the crust pop.
The Texture Crew
All‑purpose flour is the backbone of this loaf, providing the perfect balance of protein for gluten development without turning the crumb into a rubber band. You can swap it for bread flour if you crave an even chewier crust, but keep in mind the dough will be a bit tougher to handle. When measuring, spoon the flour into your cup and level it off; packing it will make the loaf dense.
The Unexpected Star
Warm water is the silent hero that awakens the yeast, but the temperature is critical: aim for 105°F‑110°F (40°C‑43°C). Too hot and you’ll kill the yeast, too cool and the rise will crawl. I like to test it with my wrist—if it feels like a warm bath, you’re golden.
The Final Flourish
Active dry yeast is the magic that turns a simple mixture into a living, breathing loaf. Fresh yeast can be used, but dry yeast offers consistency and a longer shelf life. Sugar isn’t there to sweeten the bread; it’s a quick food source for the yeast, ensuring a rapid and even rise. Cornmeal, sprinkled on the baking sheet, prevents sticking and adds a delightful crunch to the bottom—think of it as the loaf’s little shoes.
Everything’s prepped? Good. Let’s get into the real action…
The Method — Step by Step
Begin by whisking together the warm water, sugar, and active dry yeast in a medium bowl. Let the mixture sit for 5‑7 minutes until it becomes frothy, like a miniature foam party. This is the moment of truth: if you don’t see bubbles, your yeast is dead and you’ll need to start over. Once bubbly, give it a gentle stir and set it aside while you prep the dry ingredients.
Kitchen Hack: Use a thermometer to get the water temperature just right; a quick dip of your finger should feel warm, not hot.In a large mixing bowl, combine the all‑purpose flour, salt, and cornmeal. Make a well in the center and pour in the yeast mixture. Using a wooden spoon, stir until a shaggy dough forms—don’t worry if it looks a bit rough; that’s the raw material for greatness.
Turn the dough onto a lightly floured surface and knead for 8‑10 minutes. The dough should become smooth, elastic, and slightly tacky—think of it as a soft, pliable pillow that springs back when you press it. If it’s too sticky, sprinkle a pinch of flour; if it’s too dry, add a splash of water. This is where the gluten network forms, giving the loaf its structure.
Shape the dough into a ball and place it in a lightly oiled bowl, turning once to coat all sides. Cover the bowl with a clean kitchen towel and let it rise in a warm, draft‑free spot for about 60 minutes, or until it has doubled in size. The kitchen should smell like a bakery, with a faint yeasty perfume that makes you smile.
Watch Out: If your kitchen is too cold, the dough will rise sluggishly; consider a turned‑off oven with the light on to create a gentle warm environment.After the first rise, gently deflate the dough and shape it into a rustic oval or round loaf. Place the shaped dough onto a parchment‑lined baking sheet that’s been dusted generously with cornmeal. This prevents sticking and adds that signature crunchy base.
Cover the loaf loosely with a piece of parchment or a damp towel and let it rest for a second rise of 30‑45 minutes. During this time, the dough will puff up, and you’ll see the surface start to develop tiny air bubbles—those are the signs of a well‑fermented loaf.
While the dough is in its final rise, preheat your oven to 475°F (245°C). Place a shallow metal pan on the bottom rack; you’ll add water later for steam. Once the oven hits temperature, slash the top of the loaf with a sharp razor blade or a bread lame at a 45‑degree angle. This scoring controls the expansion and creates that classic artisan look.
Kitchen Hack: Pour a cup of boiling water into the pan on the bottom rack just before sliding the bread in; the sudden burst of steam gives the crust that glossy, crackling finish.Slide the loaf onto the middle rack and bake for 20‑25 minutes, or until the crust is deep golden‑brown and the loaf sounds hollow when tapped on the bottom. The internal temperature should read around 200°F (93°C). At this point, the kitchen will be flooded with a scent that makes you want to hug the oven door.
Remove the bread from the oven and let it cool on a wire rack for at least 20 minutes before slicing. This resting period allows the crumb to set and the steam to escape, preventing a gummy interior. That first slice—crunchy, aromatic, with a tender, airy center—is the payoff for every minute you spent nurturing the dough.
That’s it — you did it. But hold on, I’ve got a few more tricks that'll take this to another level…
Insider Tricks for Flawless Results
The Temperature Rule Nobody Follows
Never bake a loaf straight from a cold fridge; the dough needs to be at room temperature for the oven spring to work properly. Let the shaped loaf sit out for 15 minutes after the final rise, and you’ll notice a more pronounced rise in the oven. I once tried skipping this step, and the loaf came out flat and sad—lesson learned.
Why Your Nose Knows Best
Your sense of smell is a reliable indicator of fermentation. When the dough has developed a faint, sweet yeasty aroma, it’s ready for the next stage. If it still smells like raw flour, give it a few more minutes. Trusting your nose can prevent under‑proofed bread that collapses after baking.
The 5‑Minute Rest That Changes Everything
After the first rise, let the dough rest uncovered for five minutes before shaping. This short pause relaxes the gluten, making it easier to shape without tearing. A friend tried to shape immediately and ended up with a dense, misshapen loaf—don’t be that friend.
Steam Mastery
If you don’t have a pan for steam, you can spritz the oven walls with water using a spray bottle just before loading the bread. The sudden vapor creates that coveted crackle and glossy finish. The trick is to act fast; the steam dissipates in seconds, so be ready.
Cool‑Down Trick
Allow the loaf to cool on a wire rack, not on a solid surface. The airflow prevents the bottom from becoming soggy and keeps the crust uniformly crisp. I once left a loaf on a cutting board, and the bottom turned rubbery—never again.
Creative Twists and Variations
This recipe is a playground. Here are some of my favorite ways to switch things up:
Herb‑Infused Delight
Add 2 tablespoons of finely chopped fresh rosemary or thyme to the flour before mixing. The herbaceous notes pair beautifully with olive oil for an Italian antipasto board.
Cheesy Garlic Pull‑Apart
Mix 1/4 cup grated Parmesan and 1 teaspoon garlic powder into the dough. After the first rise, shape the loaf into a braid, brush with melted butter, and bake. The result is a fragrant, cheesy pull‑apart loaf perfect for sharing.
Olive‑Studded Rustic Loaf
Fold in 1/2 cup pitted Kalamata olives, halved, during the kneading stage. The salty bursts of olive complement the crust’s crunch, making it a stellar accompaniment to soups.
Whole‑Wheat Upgrade
Replace 1 cup of the all‑purpose flour with whole‑wheat flour for a nuttier flavor and a slightly denser crumb. You may need a touch more warm water—add a tablespoon at a time until the dough feels right.
Sweet Cinnamon Swirl
For a breakfast twist, blend 2 teaspoons cinnamon, 2 tablespoons brown sugar, and a dash of nutmeg into a paste, spread over the rolled dough before shaping, and bake as usual. The sweet aroma will make your morning feel like a holiday.
Storing and Bringing It Back to Life
Fridge Storage
Wrap the cooled loaf tightly in a clean kitchen towel, then place it inside a resealable plastic bag. It will stay fresh for up to 4 days, though the crust will soften slightly. To revive, reheat in a 350°F oven for 10 minutes.
Freezer Friendly
Slice the loaf before freezing; this way you can toast individual pieces without thawing the whole loaf. Wrap the slices in foil, then place them in a freezer‑safe bag. They’ll keep for up to 3 months. When ready, pop them straight into the oven or toaster.
Best Reheating Method
Add a tiny splash of water (about a tablespoon) to the bottom of the loaf before reheating. Cover loosely with foil and bake at 300°F for 10‑12 minutes. The steam revives the crust’s crunch while the interior stays moist.