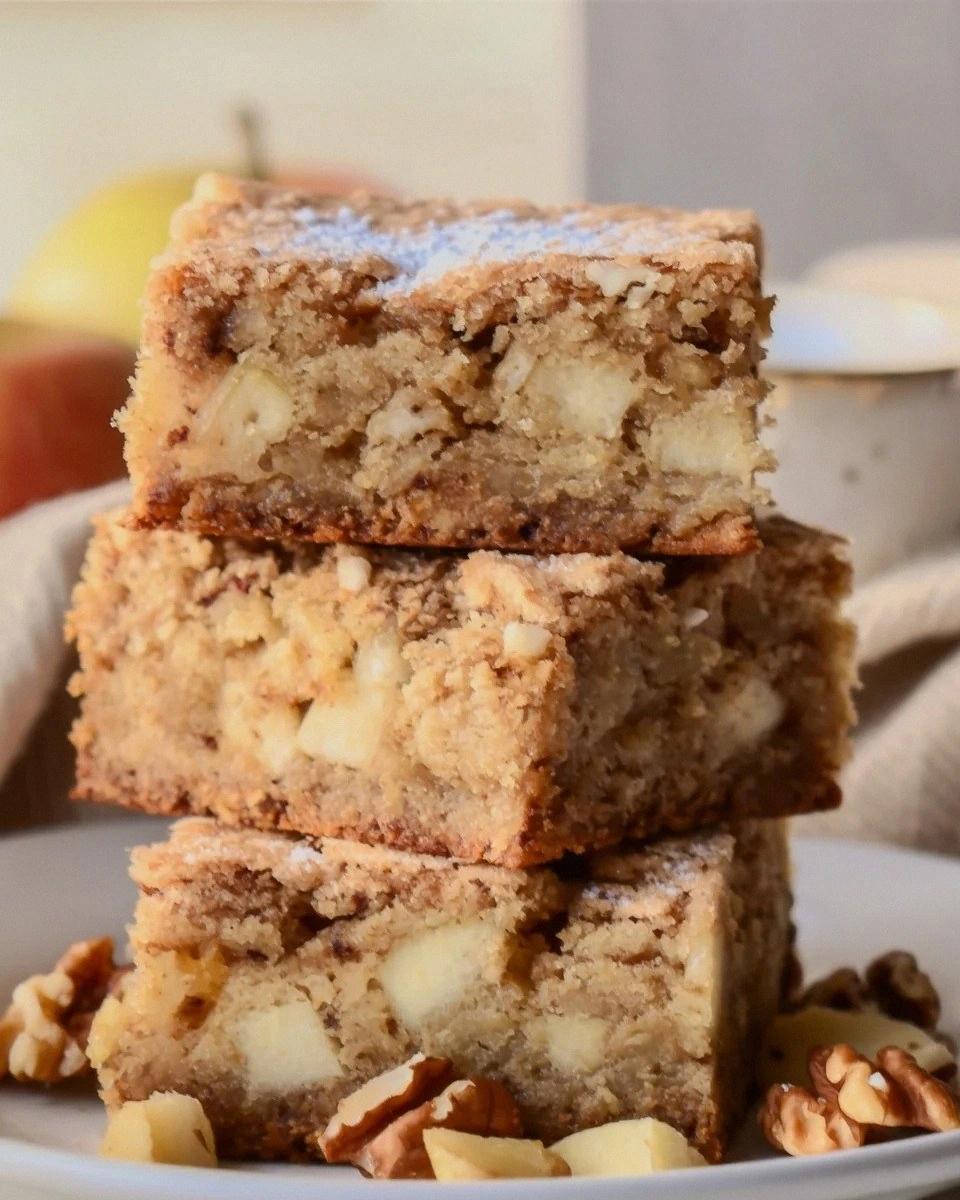
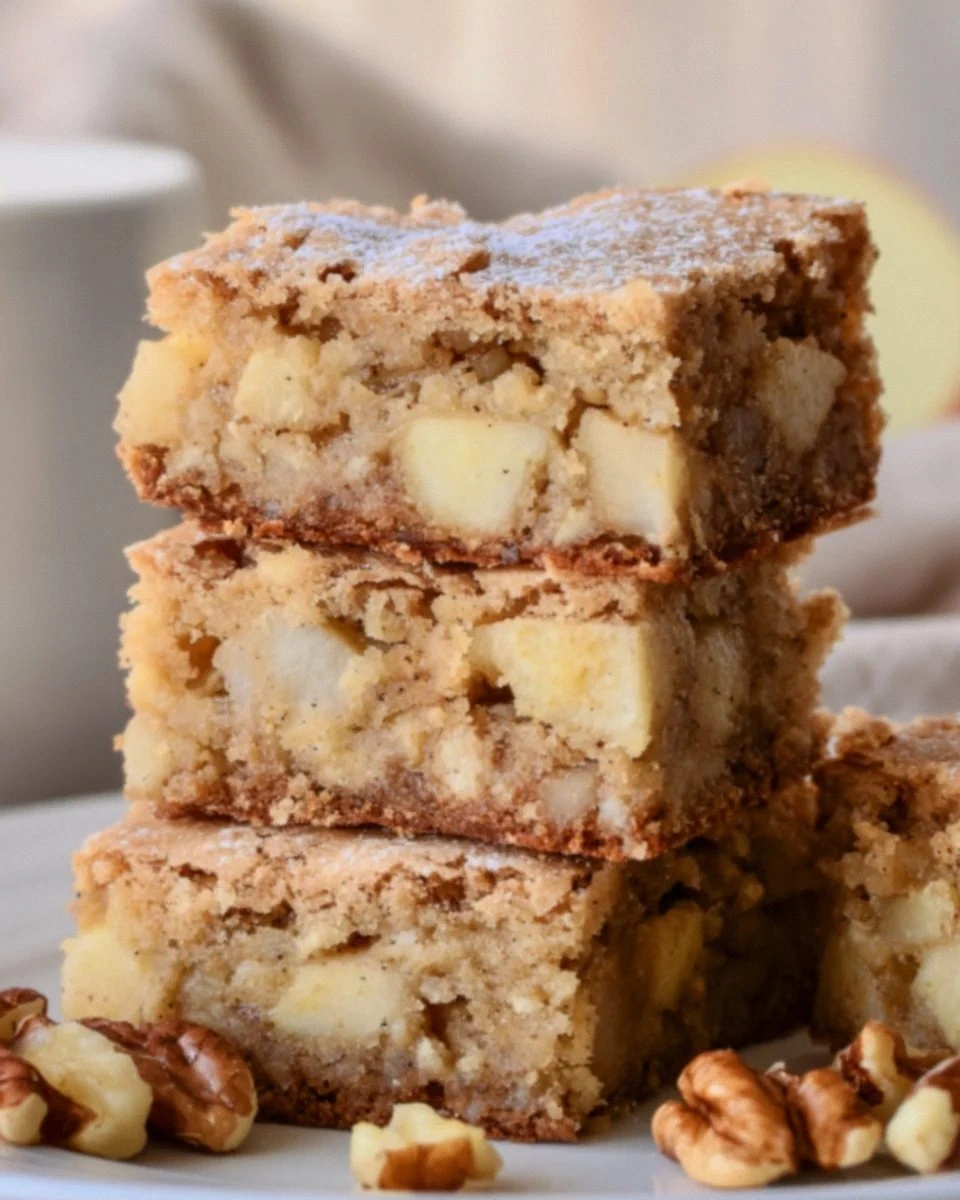
I still remember the exact moment these apple brownies ruined my life—in the best possible way. It was a Tuesday evening that smelled like wet leaves and possibility, my kitchen windows fogged from the October chill outside, and I was supposed to be making a sensible apple crisp for book club. Instead, I got cocky. I thought, "What if apples wanted to be brownies instead of wallflowers in oatmeal?" Thirty-five minutes later I pulled out a pan that hissed like autumn itself, the top glossy like a just-raked pile of leaves after rain, and the smell—oh, the smell—was apple cider wearing a leather jacket. One bite and I cancelled the book club, texted everyone "mysterious stomach bug," and ate four squares standing at the counter in my socks. I am not proud. I am, however, completely unwilling to live in a world where these don't exist.
Here's the thing: most apple desserts play it safe. They're polite, cardigan-wearing treats that taste like grandma's couch. These brownies? They show up late, bring bourbon, and flirt with your ex. The edges shatter like thin ice over a lake of fudgy crumb, while chunks of tart apple stay cheek-bitingly firm, suspended in batter that's somehow both cake and truffle. Cinnamon gets top billing, but it's the whisper of cardamom that makes people stop mid-chew and stare into the middle distance. I dare you to taste this and not go back for seconds. Actually, I dare you to stop at thirds.
What makes this version the uncontested champion is the technique nobody else teaches you. Instead of folding in naked apples that weep water like sad sponges, we're going to give them a quick sizzle in brown butter until they develop those caramelized edges that taste like apple cider doughnuts at the state fair. The batter itself is a one-bowl wonder that thinks it's ganache—melted chocolate and butter make it richer than a tech bro, but a hit of espresso powder keeps it from cloying. Picture yourself pulling this out of the oven, the whole kitchen smelling incredible, and the top crackling like a fireplace while the center stays molten. Stay with me here—this is worth it.
Let me walk you through every single step—by the end, you'll wonder how you ever made it any other way.
What Makes This Version Stand Out
Before we get our hands deliciously dirty, let me brag properly. This isn't just another "add apples to box mix" cop-out. This is the recipe that'll make you the designated fall baker for every potluck until you're eighty.
- Taste Explosion: We're talking deep, dark chocolate that makes cocoa taste like kid stuff, punctuated by bright pockets of apple that taste like they were kissed by autumn itself. The brown butter brings nutty, toasted notes that make people ask if you used hazelnuts.
- Texture Wizardry: The top forms a glossy, tissue-thin crust that cracks like crème brûlée, while the interior stays fudgy and dense like truffle filling. Apple pieces stay tender but never mushy—think apple pie filling with backbone.
- One-Bowl Simplicity: No stand mixer, no separating eggs, no folding in meringue like you're performing surgery. One bowl, one whisk, one pan. You could make this at midnight with one eye open and still nail it.
- Curveball Ingredient: A quarter-teaspoon of ground cardamom makes the chocolate taste more chocolaty and the apples taste like they spent a semester abroad in Stockholm. Most recipes get this completely wrong. Here's what actually works.
- Crowd Shock Factor: People expect apple pie; they get brownie. They expect cinnamon; they get cardamom. They expect sweet; they get complex. The looks on their faces? Pure magic.
- Make-Ahead Champion: These taste better the next day, when the flavors meld into something that'll make you question basic physics. Bake on Sunday, serve on Wednesday, watch people propose marriage.
Alright, let's break down exactly what goes into this masterpiece...
Inside the Ingredient List
Every ingredient here pulls double duty. Nothing's just sitting around looking pretty; everyone's working the room like it's prom night. Let's meet the cast.
The Flavor Base
Bittersweet Chocolate (70%): This is the backbone, the bass line, the dark mysterious stranger. Don't you dare reach for milk chocolate unless you want brownies that taste like a candy bar melted in your backpack. The 70% gives us that grown-up edge—bitter enough to make the apples sing sweet, rich enough to carry the brown butter. If you can only find 60%, drop the sugar by two tablespoons and thank me later.
Unsalted Butter: We're browning half of it until it smells like toasted hazelnuts and looks like liquid caramel. This isn't optional; this is the flavor equivalent of switching from standard to high-def. The other half stays cold and cubed, melting into the warm chocolate to create that glossy emulsion that makes pastry chefs weep.
Granulated Sugar & Dark Brown Sugar: The white sugar gives us those shiny, crackly tops. The brown sugar brings molasses notes that hug the apples like a favorite sweater. Together they create that chewy edge that'll have you fighting people for corner pieces.
The Texture Crew
All-Purpose Flour: Just enough to give structure, not so much that we venture into cake territory. We're making brownies, not apple-scented bricks. Spoon and level it like your life depends on it; packed flour is the enemy of fudgy.
Eggs: Two whole eggs plus one yolk. The extra yolk is the secret handshake that makes the crumb luxuriously tender. Room temperature, please—cold eggs will seize your chocolate faster than you can say "lumpy disaster."
Apples: Go firm and tart. Granny Smith if you want puckery contrast, Honeycrisp if you want honeyed pockets, Pink Lady if you want to feel fancy at the orchard. Peel them or don't—I like the pop of red skin like confetti in the chocolate.
The Unexpected Star
Cardamom: This is the plot twist. Just 1/4 teaspoon, ground fresh if you're feeling extra, makes people ask "what is that?" in the best way. It bridges chocolate and apple like a diplomatic translator, making both taste more like themselves.
Espresso Powder: Not coffee flavor—just depth. Like adding salt to cookies, it makes the chocolate taste more chocolatey without announcing itself. Skip it and the whole thing tastes flat, like a joke without a punchline.
The Final Flourish
Flaky Sea Salt: Sprinkle it on top before baking. As the brownies bake, the salt melts into tiny pockets of salinity that make the sweet parts taste sweeter. It's the culinary equivalent of turning up the contrast on a photo.
Everything's prepped? Good. Let's get into the real action...
The Method — Step by Step
- Preheat your oven to 350°F (175°C) with the rack in the center. This isn't negotiable—too high and the edges burn before the center sets, too low and we lose that glossy crust. While it's heating, line an 8x8-inch metal pan with parchment paper, leaving wings like you're gift-wrapping a very important present. Metal conducts heat better than glass, giving us those chewy edges that people fight over. If you've ever struggled with brownies that bake unevenly, you're not alone—and I've got the fix.
- Now for the game-changer: brown your butter. Cut 6 tablespoons into chunks and melt over medium heat in a light-colored pan. Swirl constantly—this is not the time to answer texts. First it'll foam, then it'll snap and pop like popcorn, then suddenly it smells like toasted nuts and looks like liquid gold. This takes about 5 minutes, and the moment it turns amber, pour it into a heatproof bowl to stop the cooking. Those brown bits at the bottom? Liquid flavor. Scrape every speck.
- While the butter cools slightly, dice your apples into 1/2-inch pieces. Not bigger, or they'll sink. Not smaller, or they'll disappear into applesauce. Toss them into the still-warm pan with a tablespoon of the brown butter and let them sizzle for 2 minutes. You're not cooking them through—just sealing the edges so they stay perky in the batter. That sizzle when they hit the pan? Absolute perfection.
- Chop your chocolate and combine it with the remaining 2 tablespoons of cold butter. Pour the warm brown butter over the top and let it sit for 30 seconds. This is the magic moment—warm butter gently melts chocolate without seizing it. Whisk slowly, watching it transform into glossy satin. If you see any stubborn chunks, microwave the bowl for 10 seconds and whisk again. Patience here pays off in texture later.
- Whisk in both sugars until the mixture looks like wet sand at the beach—thick, shiny, and begging for a footprints. Add the eggs one at a time, whisking like you mean it. The batter should lighten slightly and fall off the whisk in thick ribbons. Add the yolk and vanilla, then whisk for a full 30 seconds. This is where we incorporate air for that crackly top, so don't wimp out.
- In a small bowl, combine flour, cocoa powder, espresso powder, cardamom, and salt. Whisk them together—this distributes the leavening and prevents cocoa bombs in your teeth. Sprinkle the dry ingredients over the chocolate mixture like you're dusting crime scene evidence. Fold with a spatula, not the whisk, scraping the sides and bottom like you're folding laundry. Stop when you still see a few streaks of flour—over-mixing makes tough brownies, and we're not here for that drama.
- Fold in those gorgeous apple pieces, reserving a few for the top. Pour the batter into your lined pan and smooth the top with an offset spatula. Dot the remaining apples on top—they'll bake into little caramelized jewels. Sprinkle flaky salt across the surface like you're seasoning a steak. This next part? Pure magic.
- Bake for 28-32 minutes. Don't walk away from the oven here—ovens lie, brownies deceive. Start checking at 25 minutes. You're looking for edges that have pulled slightly from the sides, a top that's lost its wet shine, and a center that wobbles like a gentle wave when you shimmy the pan. A toothpick inserted 1 inch from the edge should come out with a few moist crumbs. If it's clean, you've gone too far.
- Cool in the pan for 10 minutes, then use the parchment wings to lift the whole slab onto a cutting board. This is the hardest part: wait another 20 minutes before cutting. I know, I know—I've burned my mouth more times than I'll admit. But cutting hot brownies is like slicing jello with a chainsaw. Let them set and they'll cut into Instagram-perfect squares with sharp edges and gooey centers.
That's it—you did it. But hold on, I've got a few more tricks that'll take this to another level...
Insider Tricks for Flawless Results
The Temperature Rule Nobody Follows
Room temperature isn't just chef-speak for "lazy." Cold eggs seize chocolate, creating little flecks of scrambled egg that look like freckles on your brownies. Set your eggs in a bowl of warm tap water for 5 minutes while you prep. Same with your butter—cold cubes melt more evenly into warm chocolate, creating that glossy emulsion that separates amateurs from legends. A friend tried skipping this step once—let's just say it didn't end well. Her brownies looked like they had measles.
Why Your Nose Knows Best
Don't trust timers; trust your senses. When the brownies are done, your kitchen will smell like chocolate-dipped apples with a whisper of caramel. If you still smell raw cocoa, give it two more minutes. If you smell toasty edges and deep vanilla, yank them out. That aroma shift happens fast—miss it and you're in dry brownie territory. I'll be honest—I ate half the batch before anyone else got to try it, all because I trusted my nose over the clock.
The 5-Minute Rest That Changes Everything
After baking, rap the pan firmly on the counter. This collapses the air bubbles that make cakey brownies and forces the molten center to settle into fudgy perfection. It's like burping a baby, but for chocolate. Let them rest 5 minutes before lifting out. This prevents the dreaded sinkhole in the center. I learned this from a pastry chef who swore by it, and now my brownies look like they came from a Brooklyn bakery instead of my tiny oven.
The Salt Timing That Makes or Breaks
Add flaky salt before baking for pockets of salinity that burst like tiny flavor fireworks. Add it after baking and it stays crunchy, giving you savory crunch against sweet chocolate. Can't decide? Do both. I call it the "salt sandwich" and it's why people remember my brownies but forget my birthday.
Storage That Actually Improves Them
Tuck a slice of bread in the container with cooled brownies. The bread goes stale, the brownies stay moist for days. It's like a moisture hostage negotiation, and the bread always loses. Replace the bread every day—your brownies will taste like they were baked this morning, even on day four.
Creative Twists and Variations
This recipe is a playground. Here are some of my favorite ways to switch things up:
Bourbon Caramel Swirl
Replace 1 tablespoon of butter with bourbon, then drizzle homemade caramel over the top before baking. The alcohol bakes off, leaving smoky depth that makes people ask if you used smoked chocolate. Swirl with a toothpick for marbled tops that look like tree rings.
Cheddar Apple Madness
Fold in 1/2 cup of sharp white cheddar cubes with the apples. Sounds weird, tastes like Wisconsin autumn in the best way. The cheese melts into salty pockets that contrast with sweet apples. Serve warm and watch skeptics become converts.
Salted Maple Bacon
Crisp 4 slices of bacon, crumble, and fold in with apples. Replace 2 tablespoons of sugar with maple syrup. The smoky-salty-sweet combo tastes like Saturday morning at the farmer's market. Pro tip: reserve some bacon fat and brush the parchment with it before adding batter. You're welcome.
Ginger Pear Party
Swap apples for firm pears and add 1 teaspoon grated fresh ginger. The pears bake into honeyed pockets while ginger gives a spicy kick that clears your sinuses. Perfect for when you want to feel sophisticated but still eat brownies for dinner.
Tahini Marble
Swirl 1/4 cup tahini with 2 tablespoons honey and drop spoonfuls over the top. Use a skewer to marble. The tahini bakes into sesame halva-like pockets that taste like Middle Eastern candy shops. It's nutty, earthy, and completely addictive.
Spiked Eggnog Glaze
Mix 1 cup powdered sugar with 2 tablespoons eggnog and 1 tablespoon rum. Pour over cooled brownies and let set. Tastes like Christmas morning if Christmas morning were a brownie. The glaze crackles when you cut, giving you bakery-style squares that disappear at office parties.
Storing and Bringing It Back to Life
Fridge Storage
Wrap individual squares in plastic wrap, then stash in an airtight container. They'll keep 5 days in the fridge, though they've never lasted more than 2 in my house. The cold makes them fudgier—some people prefer them chilled. Bring to room temp for 20 minutes if you want that just-baked softness back.
Freezer Friendly
Freeze squares on a baking sheet until solid, then transfer to a zip-top bag with parchment between layers. They'll keep 3 months, but honestly, you'll eat them all by December. Thaw overnight in the fridge or microwave for 20 seconds for that fresh-from-the-oven gooeyness. Add a tiny splash of water before reheating—it steams back to perfection.
Best Reheating Method
Warm in a 300°F oven for 5 minutes or microwave 10 seconds max. Any longer and you lose the fudgy center. For the full experience, top with vanilla ice cream and watch it melt into the cracks like rivers of cream into chocolate canyons. The contrast of warm brownie and cold ice cream is what dessert dreams are made of.