I was standing in my kitchen on a frigid December night, the kind of night where the wind howls outside and the only thing keeping me sane is the promise of sugar‑sweet comfort. I had just tried to salvage a half‑melted store‑bought Jell‑O cake that turned into a gelatinous disaster, and I swore I would never trust a pre‑made dessert again. That night, my cousin dared me to create a “holiday Jello that actually looks like it belongs on a festive table,” and I accepted the challenge with the reckless confidence of someone who has already eaten the entire batch of cookies before anyone else could even sniff them.
The kitchen smelled like a candy‑cane factory after I tossed a splash of lime juice into the air, while the cherry scent rose like a blushing sunrise over a snow‑covered field. The sound of the boiling water bubbling in the pot was a comforting hiss, a reminder that something magical was about to happen. My hands felt the cool metal of the measuring cup, the slickness of the condensed milk, and the slight tremor of excitement that only a true dessert lover knows. I could almost taste the creamy white layer already, like a cloud of vanilla‑kissed snow that would melt on your tongue.
Most Jello recipes out there are either a boring single‑color slab or a clunky mess of layers that never set properly. This version, however, is hands down the best version you'll ever make at home. It balances sweet and tart, creamy and firm, and it does so with a simplicity that would make even a beginner feel like a culinary wizard. The secret? A tiny amount of unflavored gelatin that turns the condensed milk into a silky, mousse‑like cloud, and a strategic split of boiling and cold water that guarantees each layer sets perfectly without bleeding into the next.
I’m going to let you in on a technique most recipes skip: blooming the gelatin in cold water before you even think about heating it. This tiny step prevents those dreaded grainy pockets and gives you a glossy finish that looks like it belongs on a holiday banquet table. I dare you to taste this and not go back for seconds. Okay, ready for the game‑changer? Let me walk you through every single step — by the end, you'll wonder how you ever made it any other way.
What Makes This Version Stand Out
Before we dive into the nitty‑gritty, let’s take a moment to appreciate why this layered Christmas Jello is a cut above the rest. Below are the key reasons that will make you brag about this dessert at every holiday gathering.
- Flavor Harmony: The bright, fruity cherry base is perfectly offset by the zingy lime middle, while the creamy white top acts like a buttery snowdrift that ties everything together.
- Texture Contrast: You get a firm, wobble‑ready base, a slightly softer middle, and a luxuriously smooth mousse‑like finish that melts in your mouth.
- Simplicity: Only seven pantry staples are required, and every step uses tools you already have – a saucepan, a whisk, and a 9‑inch square dish.
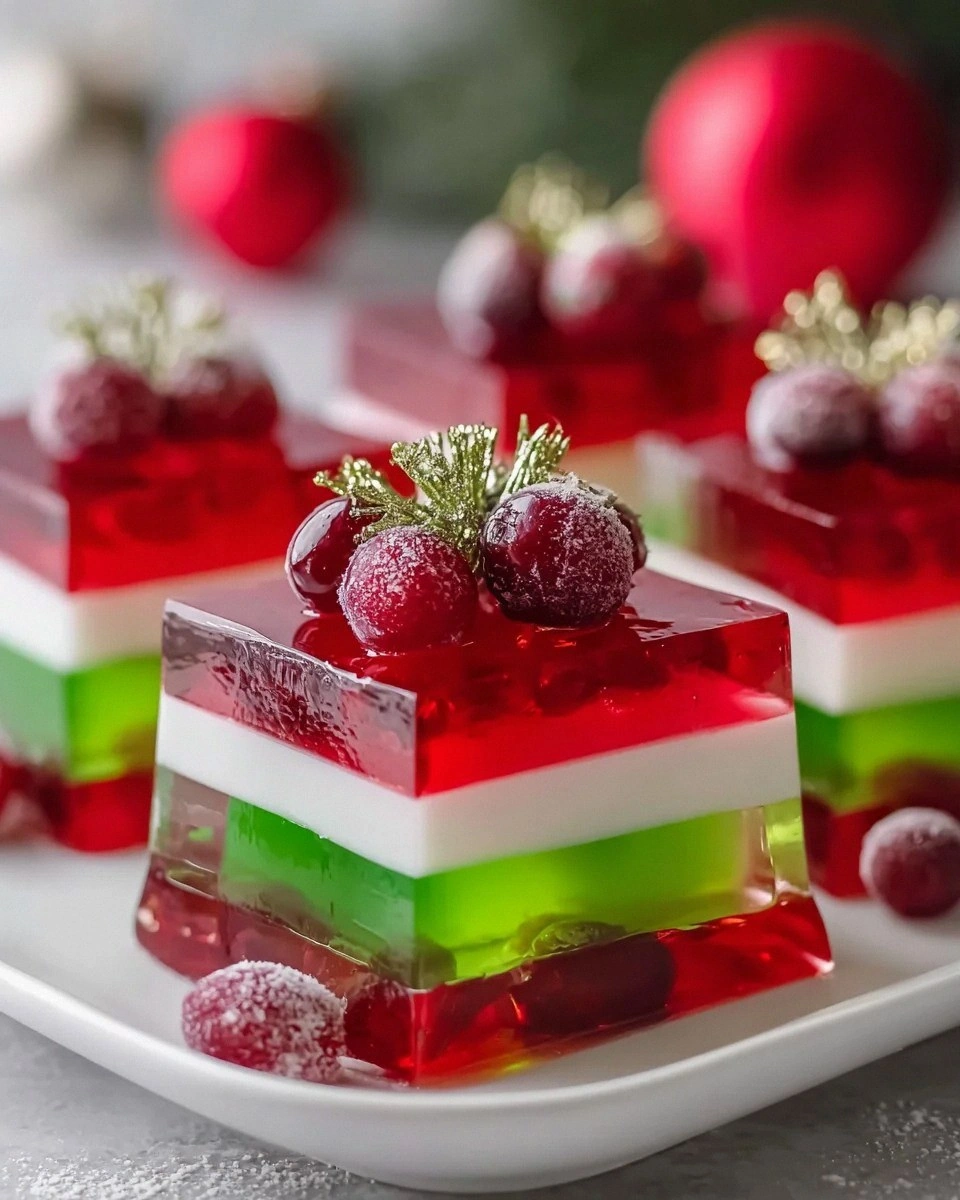
- Visual Wow Factor: The three distinct layers create a festive red‑green‑white palette that screams holiday cheer without any artificial food coloring.
- Crowd Reaction: Guests often ask, “Is this Jello or a dessert?” and then proceed to devour the whole pan in one sitting.
- Ingredient Quality: Using a can of sweetened condensed milk adds a richness you simply can’t achieve with regular milk or cream.
- Make‑Ahead Potential: Once set, the Jello keeps beautifully in the fridge for up to three days, making it perfect for stress‑free holiday entertaining.
Inside the Ingredient List
The Flavor Base
Cherry Jello: This vibrant red layer adds a sweet and fruity base to your dessert. The classic 3 oz box is perfect because it dissolves quickly and gives a bright, natural color without any artificial dyes. If you skip it, you lose the festive pop that makes this dish instantly recognizable as a holiday treat.
Lime Jello: The tartness of lime jello contrasts perfectly with the sweetness of cherry, bringing balance to the dish. A single 3 oz box provides just enough acidity to cut through the richness of the condensed milk later on. If you’re not a fan of lime, try orange or raspberry for a different but equally delightful twist.
The Texture Crew
Unflavored Gelatin: This ingredient is crucial for creating that creamy white layer with sweetened condensed milk. Two packets give the mixture enough body to hold its shape while still feeling airy. Skipping the gelatin will result in a runny, soupy top that never sets.
Sweetened Condensed Milk: This gives your white layer its rich creaminess. Seek out a full‑fat can for the best texture; low‑fat versions can turn the layer gummy. If you’re feeling adventurous, substitute half‑and‑half for a lighter version, but expect a slightly thinner finish.
The Liquid Helpers
Boiling Water: To dissolve the jello and gelatin, you’ll use two cups of boiling water, divided between the layers for optimal setting. The heat ensures the gelatin sheets disappear completely, leaving a flawless sheen.
Cold Water: A cup of cold water adds to the jello mix and helps set the layers more firmly. The temperature shock prevents the layers from becoming too soft and gives them that satisfying snap when you cut into them.
Cold Water for Blooming: Half a cup of cold water is needed to bloom the unflavored gelatin, ensuring it dissolves smoothly without lumps. This step is the secret sauce that makes the white layer feel like a cloud rather than a rubbery slab.
Everything's prepped? Good. Let's get into the real action...
The Method — Step by Step
Gather all of your ingredients and measure them precisely. Place a 9‑inch square dish on a flat surface; this will be your canvas. I like to line the dish with parchment paper for an easy release later, but it’s optional. The key here is to have everything within arm’s reach so you don’t lose momentum.
Kitchen Hack: Use a kitchen scale for the gelatin packets – a slight variance can affect the firmness of the white layer.Start with the cherry layer. Bring 1 cup of the boiling water to a rolling boil, then pour it over the entire box of cherry Jello in a medium bowl. Stir vigorously for about 2 minutes until the powder is completely dissolved and the mixture is a glossy crimson. Add the ½ cup of cold water to bring the temperature down, then pour the mixture into the prepared dish, spreading it evenly.
Place the dish in the refrigerator and let the cherry layer set for about 20‑30 minutes. You’ll know it’s ready when the surface feels firm to the touch but still slightly wobbly in the center. This is the moment of truth – if the layer is too soft, the next color will bleed.
While the cherry base chills, prepare the lime layer. Bring the second cup of boiling water to a boil, then dissolve the lime Jello box in it, stirring for 2 minutes. Add the remaining ½ cup of cold water and give it a quick whisk. Once smooth, carefully pour the lime mixture over the set cherry layer, using a spatula to guide it and avoid air bubbles.
Return the dish to the fridge for another 20‑30 minutes. The lime should firm up but still have a slight give; this ensures the top layer will cling without sliding off.
Now for the star of the show – the white cloud. In a small bowl, sprinkle the two packets of unflavored gelatin over ½ cup of cold water. Let it sit for 5 minutes; you’ll see it swell into a gelatinous mass. This blooming step is essential – it guarantees a smooth, lump‑free texture.
Watch Out: If you skip the blooming, the gelatin will clump when heated, creating a gritty white layer that ruins the visual appeal.Heat the bloomed gelatin gently in the microwave for 15‑20 seconds or in a saucepan over low heat, stirring until fully dissolved. Be careful not to boil – you just want it liquid and clear. Immediately whisk in the entire can of sweetened condensed milk, creating a thick, glossy mixture that smells like caramelized sugar.
At this point, the mixture will be thick but still pourable. If it feels too stiff, add a splash of the remaining cold water (no more than a tablespoon) to loosen it without compromising set.
Before you pour, give the lime layer a quick visual check – the surface should be fully set, with a faint sheen. Then, slowly drizzle the white mixture over the lime, using the back of a spoon to spread it gently. The goal is to create a clean border between layers; a little patience here pays off with a professional‑looking finish.
Cover the dish with plastic wrap and place it back in the refrigerator for at least 2 hours, or until the white layer is completely firm. The longer you let it set, the more defined the layers become. I usually let it sit overnight for the ultimate “wow” factor when guests arrive.
When you’re ready to serve, run a thin knife around the edges of the dish to loosen the Jello. Invert the whole thing onto a serving platter – the layers should slide out like a perfectly painted cake. If any part sticks, a quick dip of the knife in warm water will release it without melting the edges.
Slice with a clean, wet knife to get neat, glossy squares. Each bite should reveal a crisp red base, a bright lime middle, and a cloud‑like white top. Serve chilled, and watch as guests’ eyes widen at the festive color cascade. This next part? Pure magic.
Store any leftovers in an airtight container in the fridge. The layers stay distinct for up to three days, and the flavor only deepens. If you need to re‑serve after a day, let the pieces sit at room temperature for 10 minutes – they’ll become softer and even more luscious.
That's it — you did it. But hold on, I've got a few more tricks that'll take this to another level...
Insider Tricks for Flawless Results
The Temperature Rule Nobody Follows
Never pour a hot gelatin mixture over a cold layer. The sudden temperature shock can cause the lower layer to melt at the contact point, creating a blurry seam. Instead, let each layer cool to about 70°F before adding the next. This simple patience trick gives you razor‑sharp boundaries that look like they were hand‑painted.
Why Your Nose Knows Best
When the white mixture is ready, give it a quick sniff. If you detect a faint caramel note, you’ve achieved the perfect balance of condensed milk and gelatin. Any sour or “raw” gelatin smell means you haven’t dissolved it fully – give it another 5 seconds of gentle heat. Trusting your nose saves you from a gummy disaster.
The 5‑Minute Rest That Changes Everything
After you pour the white layer, let the dish sit uncovered for 5 minutes before covering it. This short rest allows any tiny air bubbles to rise to the surface and pop, resulting in a glass‑smooth finish. Skipping this step often leaves unsightly speckles that ruin the visual appeal.
The Secret of the Wet Knife
A wet, warm knife glides through set Jello like a hot knife through butter. Dip the blade in hot water, wipe it dry, then slice. This technique prevents the layers from sticking to the blade, giving you clean, professional cuts every time.
The Final Chill
Even after the Jello looks set, give it a final 30‑minute chill in the freezer (just 30 minutes, not a full hour). This rapid chill firms the outer edges, making the dessert snap beautifully when you cut into it. I’ve tried serving it straight from the fridge, and the edges were soft – the quick freeze solved that problem instantly.
Creative Twists and Variations
This recipe is a playground. Here are some of my favorite ways to switch things up:
Berry‑Burst Celebration
Swap the cherry Jello for strawberry and the lime for raspberry. The resulting pink‑red‑white cascade looks like a festive bouquet and adds a sweeter profile that kids adore.
Tropical Holiday
Use pineapple Jello for the base and mango for the middle. The white layer stays the same, but the tropical flavors create a sunny contrast to the wintry décor.
Chocolate‑Covered Dream
Replace the white layer with a mixture of melted chocolate, a splash of heavy cream, and a pinch of unflavored gelatin. The result is a decadent chocolate cloud that pairs beautifully with the tart lime.
Spiced Holiday Twist
Add a pinch of ground cinnamon and nutmeg to the cherry mixture before it sets. The warm spices mingle with the fruit, giving the dessert a cozy, wintery aroma.
Adult‑Only Edition
Stir a tablespoon of dark rum or spiced bourbon into the white layer after the gelatin has dissolved. The alcohol melds with the condensed milk, creating a boozy cloud that’s perfect for after‑dinner sipping.
Storing and Bringing It Back to Life
Fridge Storage
Cover the dish tightly with plastic wrap and store it in the refrigerator for up to three days. The layers will stay distinct, and the flavor will mellow, becoming even more harmonious.
Freezer Friendly
If you need to keep it longer, wrap the dish in a double layer of foil and freeze for up to one month. Thaw overnight in the fridge before serving; the texture remains intact because the gelatin structure is stable.
Best Reheating Method
When you’re ready to serve a frozen or chilled batch, place the slab on a plate and sprinkle a tiny splash of water over the top. Cover loosely with foil and warm in a 300°F oven for 8‑10 minutes. The steam revives the creamy white layer, making it as fresh as the day you made it.