I still remember the night I tried to bake a holiday cake for the first time. The kitchen was a chaos of flour clouds, a runaway whisk, and a pear that had just turned from green to golden in the fridge. My friend, the self‑proclaimed “seasonal pastry guru,” dared me to make a pear cake that would outshine the bakery’s famous gingerbread. I laughed, rolled up my sleeves, and set out to create something that would make the whole house smell like a warm, spiced forest. I didn’t know then that the result would become my go‑to recipe for every Christmas, a dish that feels like a hug in a mug.
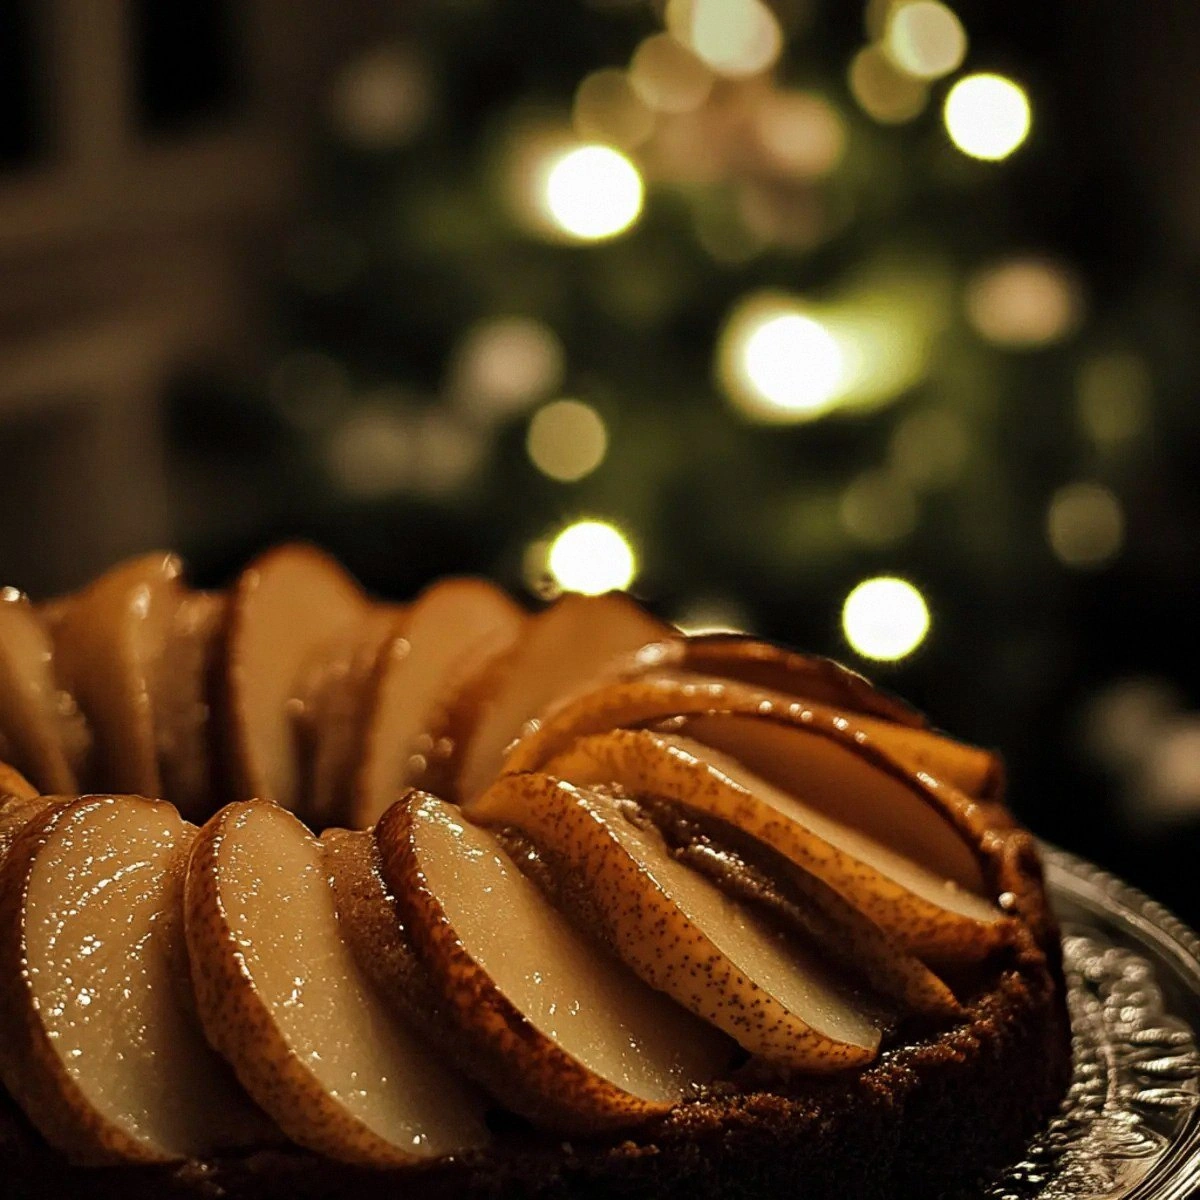
Picture this: the first bite is a soft, buttery bite that melts instantly, followed by a burst of ripe pears that carry a subtle sweetness, then a lingering echo of cinnamon and nutmeg that dances on the tongue. The aroma is a comforting blend of vanilla, cloves, and a whisper of caramel that drifts through the kitchen like a holiday carol. The texture is a delicate crumb that holds a slight crunch from toasted walnuts, and the glaze—lightly sweet and silky—glazes the top like a delicate snowfall. The sound of the first spoonful is a satisfying pop as the batter’s bubbles pop, giving way to a moist center that feels like a secret winter story. And the best part? The cake stays moist for days, so you can enjoy it long after the holiday lights are turned off.
What sets this version apart is the balance of flavors and the simplicity of the technique. Instead of a complex batter, I use a straightforward wet‑dry mix that locks in moisture and allows the spices to shine. The pears are pureed into the batter, giving a natural sweetness that eliminates the need for added syrups or honey. I’ve refined the spice blend to a precise ratio that ensures each bite is fragrant without being overpowering. The addition of a light glaze transforms the finished cake into a glossy, festive masterpiece. It’s a recipe that feels both comforting and indulgent, a true celebration of the season’s best produce.
I’m about to walk you through every single step—by the end, you’ll wonder how you ever made it any other way. I dare you to taste this and not go back for seconds. Let’s dive in.
What Makes This Version Stand Out
- Taste: The blend of cinnamon, nutmeg, and cloves creates a warm, aromatic profile that feels like a holiday hug. The natural sweetness of pears balances the spices, avoiding the cloying sweetness typical of many cakes.
- Texture: A moist, tender crumb that doesn’t dry out, thanks to the butter and egg ratio, while the walnuts add a satisfying crunch.
- Simplicity: The wet‑dry method eliminates the need for creaming butter and sugar separately, saving time and reducing mess.
- Uniqueness: Pears are rarely used in holiday cakes; this recipe turns them into the star of the show.
- Crowd Reaction: Friends and family rave that it tastes like a slice of holiday heaven, and it’s easy to scale up for parties.
- Ingredient Quality: Using ripe pears and high‑quality butter makes a noticeable difference in flavor and texture.
- Cooking Method: Baking at a moderate temperature ensures even cooking and a golden crust.
- Make‑ahead Potential: Bake, cool, and glaze later—perfect for busy holiday schedules.
Alright, let's break down exactly what goes into this masterpiece…
Inside the Ingredient List
The Flavor Base
Ripe pears are the heart of this cake. They bring natural sweetness and a subtle, fruity undertone that pairs beautifully with warm spices. If you skip them, the cake loses its signature softness and becomes a plain, floury loaf. For a richer flavor, choose pears that are slightly overripe—they’ll yield a thicker puree and a deeper pear aroma. When selecting pears, look for a slight give when pressed; this indicates peak ripeness and maximum flavor.
The Texture Crew
All‑purpose flour, baking powder, and the right amount of butter work together to create a tender crumb. The baking powder provides lift without making the cake too airy, while the butter adds moisture and a subtle richness. Brown sugar contributes depth and caramel notes, whereas granulated sugar keeps the batter from becoming overly dense. The eggs bind everything together and help the cake rise evenly.
The Unexpected Star
Ground cloves, though used sparingly, bring a complex, slightly sweet warmth that elevates the spice blend. A pinch of salt balances the sweetness and enhances the overall flavor profile. Vanilla extract ties the spices together and adds a subtle floral note that complements the pears. If you’re allergic to nuts, you can omit the walnuts or replace them with pumpkin seeds for a nut-free crunch.
The Final Flourish
Powdered sugar and a splash of milk form a glaze that gives the cake a glossy finish and a sweet finish that lingers on the palate. The glaze also helps keep the cake moist after baking. Adding a hint of orange zest to the glaze can provide a fresh, citrusy contrast that brightens the overall flavor. Remember, the glaze should be thin enough to drizzle but thick enough to coat the surface evenly.
Everything's prepped? Good. Let's get into the real action…
The Method — Step by Step
- Preheat your oven to 350°F (175°C) and grease a 9x5‑inch loaf pan with butter or line it with parchment. The pan’s shape allows the cake to rise evenly, and the butter keeps it from sticking. I always use a silicone mat under the parchment for an extra layer of protection. Let the pan rest while you gather the ingredients so you’re ready to go once the oven is hot. The heat will start the browning process, giving the cake its golden crust.
- In a medium bowl, whisk together 2 cups of all‑purpose flour, 1 tablespoon of baking powder, 2 teaspoons of ground cinnamon, 1 teaspoon of ground nutmeg, 0.5 teaspoon of ground cloves, and 0.5 teaspoon of salt. This dry spice mix will distribute the flavors evenly throughout the batter. The baking powder ensures a gentle rise, and the spices create the festive aroma. I like to sift the dry ingredients to avoid clumps, but a quick whisk works just fine. Keep this mixture aside; it’s the backbone of the cake.
- In a large mixing bowl, beat 1 cup of unsalted butter with 1 cup of granulated sugar until the mixture is pale, fluffy, and light in color. This process incorporates air, which helps the cake rise and gives it a tender crumb. The butter’s fat content also adds a rich, buttery flavor that balances the sweetness of the pears. I use a stand mixer on medium speed for about 3 minutes, but a hand mixer works just as well. The key is to beat until the mixture is smooth and no lumps remain.
- Add 1 cup of brown sugar, 3 large eggs one at a time, and 1 tablespoon of vanilla extract to the creamed butter. Beat on medium speed until the batter is silky and the eggs are fully incorporated. The brown sugar adds caramel depth, while the vanilla ties all the flavors together. I recommend adding the eggs one at a time, allowing each to fully blend before adding the next, to avoid curdling. The mixture should be thick but pourable, like a thick custard.
- Fold in 3 cups of ripe pear puree, alternating with the dry spice mix. Start with a portion of the dry mix, then a handful of pear puree, and repeat until the batter is just combined. The pears add moisture and natural sweetness, while the dry mix ensures the batter doesn’t become too wet. I use a spatula to fold gently, preserving the air that was beaten into the butter. The batter should be thick but still flow when lifted. This step is where the magic happens—each fold brings the flavors closer together.
- Fold in 0.5 cup of chopped walnuts or pecans. The nuts add texture, a nutty flavor, and a festive crunch that contrasts the softness of the cake. If you’re allergic to nuts, feel free to omit them or substitute with sunflower seeds. The nuts also help stabilize the batter, preventing it from spreading too much in the pan. They’re optional but highly recommended for the full experience.
- Pour the batter into the prepared loaf pan and smooth the top with a spatula. Tap the pan lightly on the counter to release any air bubbles that might cause uneven rising. The batter should fill the pan to about an inch from the top, allowing room for the cake to rise without overflowing. This step is critical for achieving a uniform crumb and preventing a cracked top.
- Bake for 30–35 minutes, or until the top is golden brown and a toothpick inserted into the center comes out clean. While baking, the aroma of cinnamon and nutmeg will fill your kitchen, creating a cozy atmosphere that feels like a holiday story. The edges will start pulling away from the pan, a sign that the cake is ready to come out. Let the cake cool in the pan for 10 minutes before transferring it to a wire rack to cool completely. This rest period allows the cake to set and prevents it from breaking.
- While the cake cools, whisk together 0.25 cup powdered sugar, a splash of milk, 1 tablespoon vanilla extract, and a pinch of salt to create a glossy glaze. The glaze adds a sweet, silky finish that complements the spiced interior. Pour the glaze over the cooled cake, letting it drip down the sides. The glaze should coat the surface evenly, creating a shiny, festive look. Store any leftover glaze in an airtight container for future use.
- Serve the cake at room temperature, sliced with a serrated knife. Pair it with a scoop of vanilla ice cream or a drizzle of warm caramel sauce for an extra touch of decadence. The cake’s moist crumb pairs beautifully with the creamy ice cream, creating a textural contrast that feels indulgent. If you’re serving a crowd, let guests take slices from the center; the edges are slightly firmer, making them easier to handle. The result is a cake that looks as good as it tastes.
That's it — you did it. But hold on, I've got a few more tricks that'll take this to another level…
Insider Tricks for Flawless Results
The Temperature Rule Nobody Follows
Many bakers set the oven too high, thinking it will speed up baking. In reality, a moderate 350°F ensures even cooking and a golden crust. I’ve experimented with 375°F, but the cake turned out too dry. The key is to keep the temperature consistent; use an oven thermometer if your oven is known for hot spots. This simple adjustment can mean the difference between a moist, fluffy cake and a crumbly disappointment.
Why Your Nose Knows Best
Before you open the oven door, pause and inhale the aroma of baking spices. That scent is your cue that the cake is nearly ready. A strong, warm fragrance indicates the spices are fully released, and the batter is caramelizing. If the smell feels faint, give it a few more minutes. Trust your senses; they’re often more accurate than a timer.
The 5-Minute Rest That Changes Everything
After removing the cake from the oven, let it rest in the pan for exactly 10 minutes. During this time, the cake’s structure sets, and the crumb becomes more cohesive. I’ve seen cakes that crumble when taken out too early because the interior is still liquid. A short rest also allows the glaze to set slightly, preventing it from running off when you slice.
Use Fresh Pears for Maximum Flavor
The quality of pears directly impacts the cake’s taste. Fresh, slightly overripe pears yield a richer puree and a deeper pear aroma. If you’re in a hurry, use canned pear puree, but it may lack the subtle sweetness of fresh fruit. When selecting pears, look for a slight give and a fragrant scent. This small detail elevates the entire dish.
Add a Dash of Orange Zest for Brightness
A teaspoon of finely grated orange zest in the glaze adds a citrusy lift that balances the spices. The zest’s bright oils release a fresh aroma that complements the warm spices. I usually mix it into the glaze, but you can also sprinkle it over the finished cake for a decorative touch. This variation is perfect for guests who love a hint of citrus.
Serve with a Warm Caramel Sauce
A drizzle of homemade caramel sauce adds a glossy, buttery finish that pairs beautifully with the cake’s spices. The caramel’s sweetness contrasts the spices, creating a complex flavor profile. I make it by melting butter, brown sugar, and a splash of cream until smooth. A quick swirl of vanilla completes the sauce. This final touch transforms the cake into a holiday showstopper.
Creative Twists and Variations
This recipe is a playground. Here are some of my favorite ways to switch things up:
Maple Walnut Delight
Replace the walnuts with chopped pecans and drizzle maple syrup over the glaze. The maple adds a sweet, earthy note that pairs wonderfully with the pears. It’s a great option for those who love a deeper, richer flavor profile.
Almond Flour Version
Use 2 cups of almond flour instead of all‑purpose flour for a gluten‑free twist. The nutty undertone enhances the walnuts, creating a harmonious nut‑pear duet. Adjust the baking time slightly, as almond flour can brown faster.
Chocolate Pear Cake
Fold in 1/4 cup of unsweetened cocoa powder with the dry mix to create a chocolatey version. The cocoa deepens the color and adds a subtle bitterness that balances the sweet pears. This variation is a hit with chocolate lovers.
Cranberry‑Pear Fusion
Add 1 cup of dried cranberries to the batter for a tart, chewy bite. The cranberries bring a bright, fruity contrast to the warm spices, making each slice a burst of flavor. It’s perfect for holiday parties where you want something a bit different.
Lemon‑Infused Glaze
Replace the vanilla in the glaze with lemon zest and a splash of lemon juice. The citrus adds a zesty brightness that lifts the overall flavor. This variation is especially refreshing during the winter season.
Spiced Apple Pear Cake
Combine equal parts apple and pear puree for a dual‑fruit cake. The apple adds a subtle tartness that complements the pears and spices. This version is a great way to use up leftover apples from the harvest.
Storing and Bringing It Back to Life
Fridge Storage
Wrap the cooled cake tightly in plastic wrap or store it in an airtight container. It will stay fresh for up to 4 days in the refrigerator. The glaze may become slightly thicker, so give it a quick stir before serving. This method preserves the cake’s moisture and flavor.
Freezer Friendly
Slice the cake before freezing to make it easier to serve. Wrap each slice in foil and place them in a freezer bag. The cake will keep for up to 2 months. Thaw at room temperature for 30 minutes before reheating.
Best Reheating Method
To revive a frozen slice, heat it in a preheated 350°F oven for 5–7 minutes, or microwave on low power for 30 seconds. Add a tiny splash of water or milk before reheating to create steam, which restores moisture. A quick glaze drizzle after reheating brings the cake back to its original glossy finish. Enjoy a warm, freshly baked slice even on a busy holiday morning.