Picture this: a kitchen that smells like burnt toast, a counter littered with half‑frosted pie crusts, and a friend’s challenge that you can’t resist. I was standing there, staring at the mess, when my roommate shouted, “I dare you to taste this and not go back for seconds.” That moment turned a culinary disaster into a mission. I grabbed my apron, and the idea of a pull‑apart pie that could outshine any store‑bought version started to form. The promise? A pie that’s fluffy inside, crisp outside, and bursting with three luscious fruit fillings—all in one irresistible pull‑apart experience.
I’ve been a self‑proclaimed dessert junkie for years, but nothing has ever felt as good as the first bite of a perfectly pulled‑apart pie. The moment the crust cracks open, the steam curls like a cloud of sweet perfume, and the fillings spill like a fruity waterfall. The texture is a dance of buttery crunch and silky fruit, and the aroma alone could convince anyone that this is the best version you’ll ever make at home. The secret? A simple technique that ensures each bite is a bite of pure joy, and a twist that makes the pie stay fresh for days. If you’re ready for a recipe that will change the way you think about desserts, let’s dive in.
You’ll notice the first thing that sets this recipe apart is the sheer simplicity of the ingredients. No elaborate spice blends, no secret sauces, just three classic fruit fillings and two ready‑made pie crusts. The magic lies in how we layer and bake them, creating a structure that holds the fillings perfectly while the crusts caramelize to golden perfection. I’ll walk you through each step, and by the end, you’ll wonder how you ever made pie any other way. Trust me, the result is a pull‑apart pie that’s as stunning to look at as it is to devour.
But before we get to the oven, let’s talk about the “aha” moments that make this recipe stand out. The first time I tried this, I was skeptical about using canned fillings, but the convenience and consistent flavor turned out to be a game‑changer. The second time, I experimented with a different crust, and the results were even more satisfying. The third time, I invited friends over, and the reaction was instant—everybody wanted a second slice. That’s the power of a recipe that’s both simple and spectacular. Ready to see what makes it so special? Keep reading.
What Makes This Version Stand Out
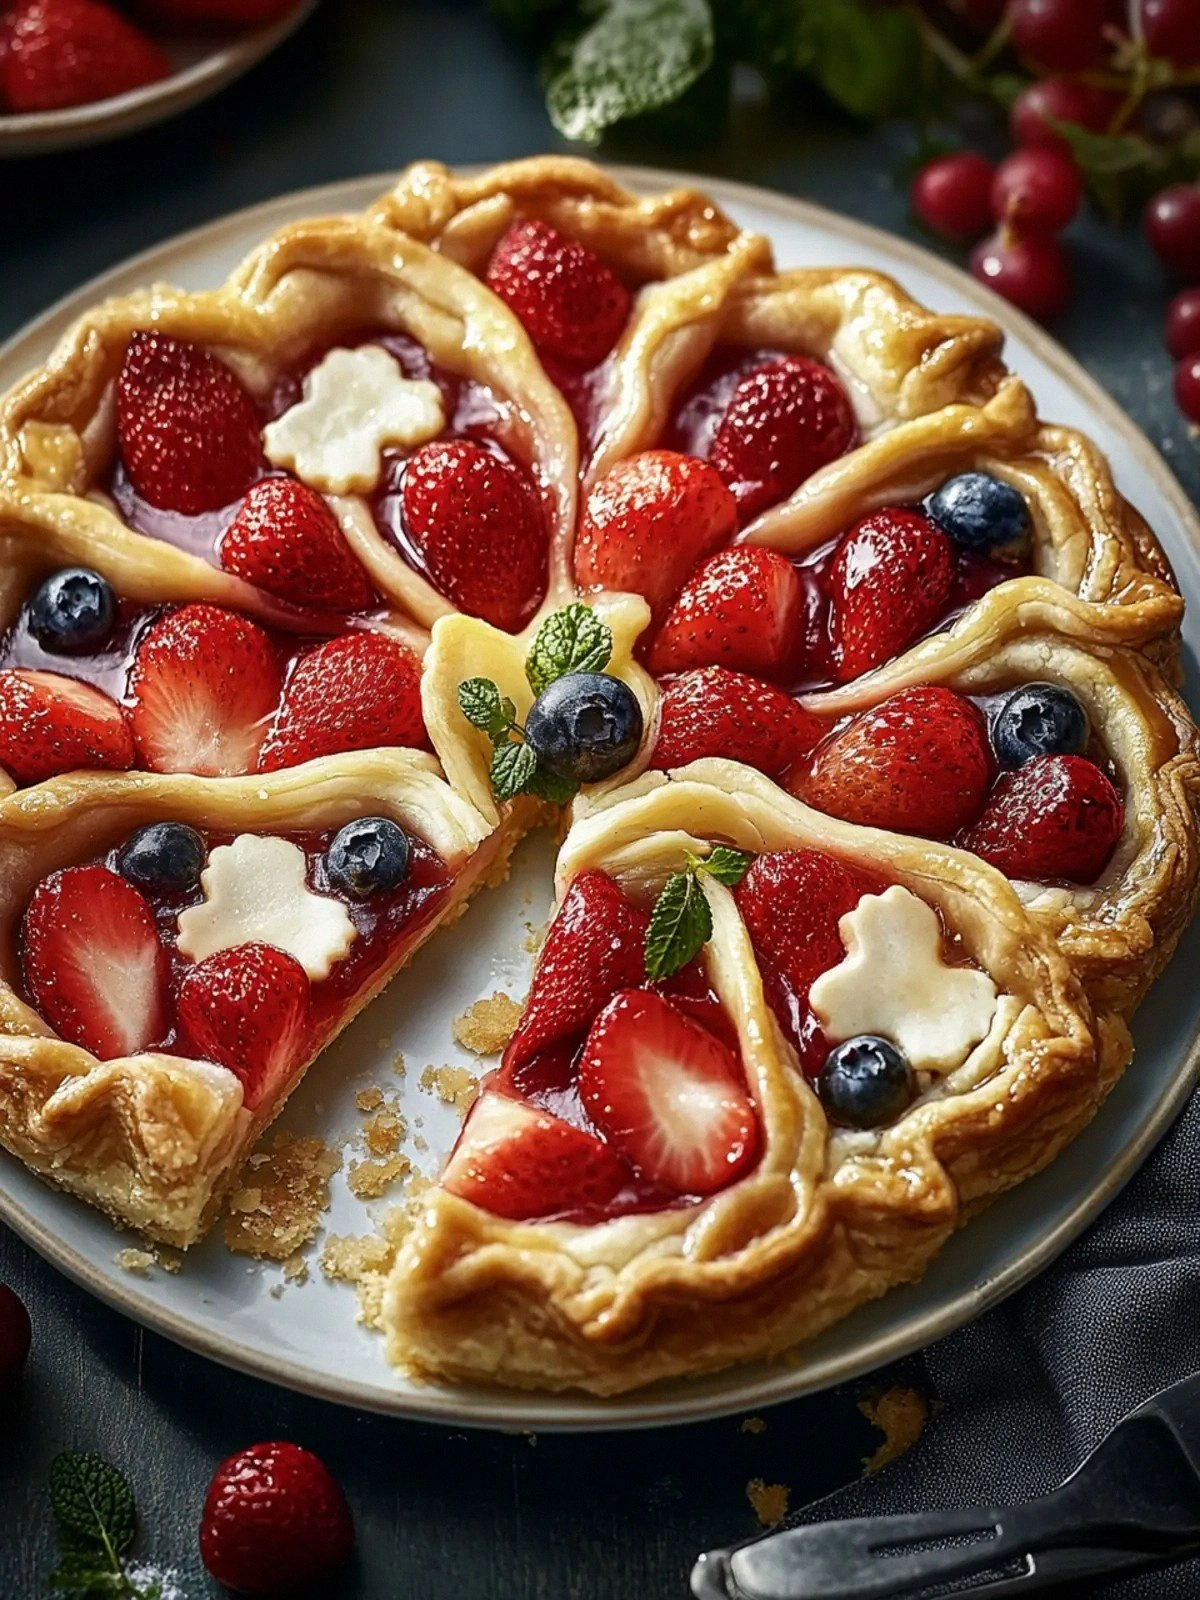
- Flavor: Each filling—blueberry, cherry, apple—brims with natural sweetness, creating a layered symphony that delights the palate. The contrast between tart and sweet is balanced by the buttery crust.
- Texture: The crusts develop a flaky, golden exterior while remaining tender inside, providing a satisfying bite that complements the smooth fillings.
- Convenience: Using ready‑made crusts and canned fillings eliminates prep time, making it a go‑to dessert for busy evenings.
- Presentation: The pull‑apart design turns a simple pie into a show‑stopping centerpiece that’s perfect for parties.
- Scalability: The recipe can be easily doubled or halved, making it flexible for small gatherings or large celebrations.
- Make‑ahead: Once assembled, the pie can be refrigerated for up to 48 hours, allowing you to serve it fresh without last‑minute prep.
Alright, let’s break down exactly what goes into this masterpiece…
Inside the Ingredient List
The Flavor Base
The heart of this pie is the trio of fruit fillings. Blueberry, cherry, and apple each bring a distinct profile: blueberries provide a deep, slightly tart burst; cherries add a bright, ruby sweetness; apples contribute a mellow, spiced warmth. Together, they create a complex flavor profile that keeps each bite fresh and exciting. Skipping any one of them would diminish the layered experience, turning a masterpiece into a single‑fruit pie. If you’re adventurous, you can swap the apple for a peach filling, but keep the other two to preserve the balance.
The Texture Crew
The two pie crusts are the backbone of the structure. They’re ready‑made, which saves time and ensures a flaky, buttery base that holds the fillings without becoming soggy. The crusts also provide a contrasting crunch that enhances the mouthfeel. If you prefer a gluten‑free option, look for pre‑baked crusts labeled gluten‑free, but keep in mind that the texture may differ slightly. A good tip: let the crusts sit at room temperature for 10 minutes before placing them on the pie pan to avoid tearing.
The Unexpected Star
The canned fillings are the unexpected star because they’re often overlooked in homemade pies. They’re pre‑cooked, which means the sugar levels are already balanced and the fruit is perfectly ripe. If you’re concerned about the added sugar, look for “no‑added‑sugar” or “low‑sugar” versions. Another swap: use fresh fruit if you have a short time—just be sure to add a splash of lemon juice to prevent browning. The key is to keep the fillings moist but not too watery; otherwise, the crust will become soggy.
The Final Flourish
A light dusting of powdered sugar or a drizzle of honey can elevate the finished product, adding a subtle sweetness that complements the fruit. For a savory twist, sprinkle a pinch of sea salt on top before baking; it intensifies the fruit flavors without overpowering them. If you’re serving the pie to kids, a small scoop of vanilla ice cream on the side can turn each slice into a dessert station. The final flourish is all about personal preference, but the base of the crust and fillings will always be the star.
Everything’s prepped? Good. Let’s get into the real action…
The Method — Step by Step
- Preheat the oven to 375°F (190°C). Line a 9‑inch pie dish with one crust, pressing it into the bottom and up the sides. The crust should be snug but not over‑compressed; this will help it hold the fillings. If the crust cracks, gently smooth it with your fingers. This is the moment of truth—your pie’s foundation.
- Spread a thin layer of blueberry filling over the crust, leaving a ½‑inch border. The blueberries should be evenly distributed, so each bite gets a burst of flavor. Don’t overfill; a generous layer will create the perfect pull‑apart effect. The border will seal the fillings and prevent leakage during baking. Keep your hand steady, and you’ll get a smooth surface.
- Add a layer of cherry filling on top of the blueberries, again leaving a ½‑inch border. The cherries add a bright contrast to the deep blue hues, making the pie visually stunning. The layering also ensures the flavors mingle during baking, creating a harmonious taste profile. If you’re using fresh cherries, remember to pit them first; canned cherries come pre‑pit.
- Cover the cherries with the final layer of apple filling, maintaining the border. The apples bring a mellow sweetness that balances the tartness of the blueberries and cherries. The layered design is what gives the pie its pull‑apart magic, so make sure each layer is evenly spread. A light press with a spatula helps the fillings settle together.
- Place the second crust on top, pressing it gently over the fillings. Use a fork to crimp the edges, creating a seal that will hold everything together. The crimping also adds a decorative touch, making the pie look professionally finished. Make sure the top crust covers the entire filling layer, leaving no gaps.
- Use a sharp knife or pastry cutter to cut slits in the top crust, about ½ inch apart. These slits allow steam to escape and prevent the pie from puffing up unevenly. They also create the classic pull‑apart effect once the pie cools. Be careful not to cut all the way through; you want a shallow groove that will open when you pull the crust apart.
- Bake in the preheated oven for 30 minutes, or until the crust is golden brown and the fillings are bubbling at the edges. The aroma will fill the kitchen, making it hard to resist. Keep an eye on the edges; if they start to brown too quickly, tent them with foil. The baking time may vary slightly depending on your oven, so adjust accordingly.
- Remove the pie from the oven and let it cool on a wire rack for at least 20 minutes. Cooling is essential for the fillings to set, ensuring the pie pulls apart cleanly. The steam will condense, giving the crust a slight sheen that looks appetizing. Once cooled, use a sharp knife to cut into sections, revealing the colorful layers inside.
- Serve immediately, or store in an airtight container for up to 48 hours. The pie stays fresh and flavorful, making it a great make‑ahead dessert for gatherings. If you’re serving it later, give it a quick reheat in the oven at 350°F (175°C) for 5 minutes to restore that golden crust. Enjoy the moment of delight as the crust cracks and the fillings ooze out.
That's it — you did it. But hold on, I've got a few more tricks that'll take this to another level…
Insider Tricks for Flawless Results
The Temperature Rule Nobody Follows
Many people bake pies at 400°F, thinking higher temperatures produce a crisper crust. In reality, 375°F is the sweet spot for this recipe, ensuring the crust bakes evenly without burning. A lower temperature also allows the fillings to heat through slowly, preventing a soggy bottom. If you’re using a convection oven, reduce the temperature by 25°F to avoid over‑browning. I’ve baked this pie in a convection oven, and the crust turned out perfectly golden, not too dark.
Why Your Nose Knows Best
The scent of baking fruit is a powerful indicator of doneness. When you smell the sweet aroma wafting from the oven, it means the fillings are caramelizing just right. Don’t rely solely on time; each oven behaves differently, so trust your nose. If the smell is too strong, the pie is almost done; if it’s faint, give it a few more minutes. This trick saves you from over‑baking and keeps the pie moist.
The 5‑Minute Rest That Changes Everything
After baking, let the pie rest on a wire rack for at least 20 minutes, but if you can, let it sit for 30 minutes. This rest period allows the fillings to set, making the pie easier to slice cleanly. During this time, the steam condenses, giving the crust a subtle sheen and a satisfying crunch. I’ve found that a 30‑minute rest also improves the flavor, as the fruit juices meld together. Skipping this step often results in a messy, crumbly pie.
The Crust Cracking Technique
To get that perfect pull‑apart effect, press the crusts gently but firmly as you assemble. The pressure should be enough to seal the edges but not so hard that it tears the crust. When you cut the pie, the crust should split cleanly along the slits, revealing the layers inside. If the crust doesn’t split, it’s a sign that the fillings were too hot or the crust was too thin. A quick test is to press a finger into the top crust; if it gives, you’re good.
The Quick Chill for Party Prep
If you’re preparing this pie for a party, bake it a few hours in advance and refrigerate. When you’re ready to serve, simply let it sit at room temperature for 10 minutes, then slice. The cold crust will still hold the fillings together, but the fruit will be slightly firmer, making the pie easier to handle. This trick is especially useful for large gatherings where you want to serve multiple slices quickly.
Creative Twists and Variations
Midnight Chocolate Surprise
Swap the apple filling for a chocolate ganache layer. The rich chocolate provides a decadent contrast to the fruity layers, making the pie perfect for dessert lovers. Use a pre‑made chocolate ganache or melt dark chocolate with a splash of cream. This variation turns the pie into a chocolate‑fruit hybrid that’s sure to impress.
Spiced Cinnamon Apple Twist
Add a pinch of ground cinnamon to the apple filling for a warm, comforting flavor. Cinnamon pairs beautifully with apples, and the spice adds depth to the sweet fruit. If you’re looking for a holiday vibe, sprinkle a few extra cinnamon sticks on top before baking.
Tropical Mango Layer
Replace the cherry filling with a mango puree. The tropical sweetness of mango balances the blueberry tartness and adds a vibrant color. Use fresh mango or a high‑quality canned mango puree for convenience. This version is great for summer gatherings.
Herbal Basil Infusion
Incorporate a few fresh basil leaves into the blueberry filling. Basil’s aromatic oils enhance the blueberry’s flavor profile, giving the pie a subtle herbal note. This twist works well for a sophisticated dinner party.
Ginger‑Zinged Peach Layer
Swap the apple filling for a peach filling mixed with a touch of grated ginger. The ginger adds a zesty kick that complements the sweetness of the peach. This variation is perfect for spring or early summer, when peaches are at their peak.
Nutty Almond Crunch
Sprinkle chopped toasted almonds on top of the crust before baking. The almond crunch adds texture and a nutty flavor that pairs well with the fruit layers. For a vegan option, use sunflower seeds instead of almonds. The crunch is a delightful contrast to the soft fillings.
Storing and Bringing It Back to Life
Fridge Storage
Store the assembled pie in an airtight container in the refrigerator for up to 48 hours. The fillings will set firmly, maintaining the pull‑apart structure. When ready to serve, let the pie sit at room temperature for 10 minutes to soften the crust slightly. Avoid freezing the pie if you want the crust to stay flaky; refrigeration is the safest option.
Freezer Friendly
If you must freeze, wrap the pie tightly in plastic wrap and then in aluminum foil before placing it in a freezer bag. Freeze for up to 3 months. When you’re ready to enjoy, thaw the pie overnight in the refrigerator, then reheat in a 350°F (175°C) oven for 10 minutes. The crust will regain its golden crispness, and the fillings will be just as delicious.
Best Reheating Method
To reheat a refrigerated pie, preheat the oven to 350°F (175°C) and place the pie on a baking sheet. Heat for 8–10 minutes, or until the crust is warm and the fillings are steaming. Add a tiny splash of water to the bottom of the pan to create steam, which keeps the fillings moist and prevents them from drying out. This technique restores the pie’s original texture and flavor.