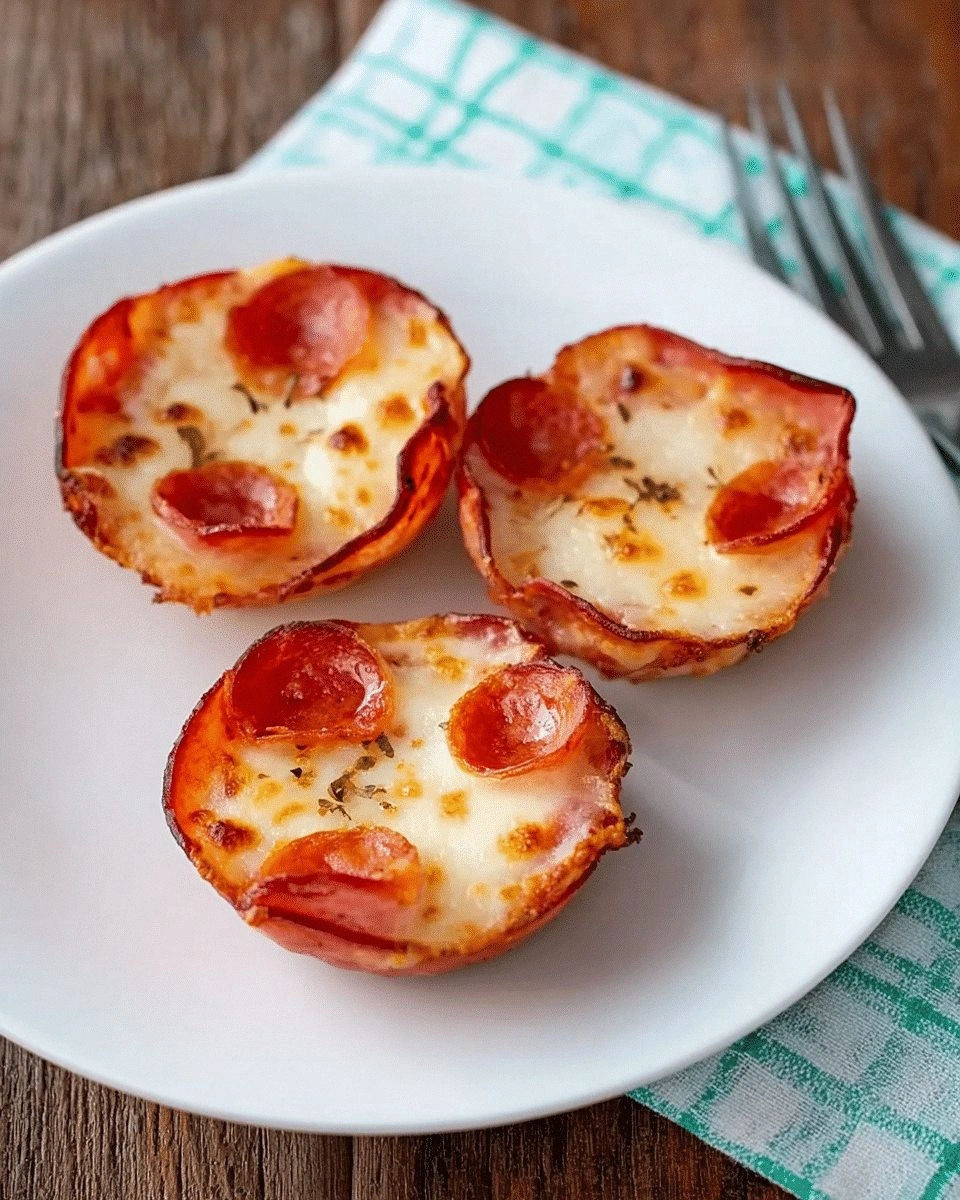
I remember the night my friend dared me to make pizza without a crust, and I laughed because, honestly, who does that? Yet there I was, standing in a kitchen that smelled like burnt toast and burnt dreams, armed with a handful of flour, a splash of olive oil, and a whole lot of skepticism. The moment that sauce hit the pan was a revelation: that silky, tomato‑rich coat felt like velvet against the dough, and the cheese melted into a golden, bubbly waterfall. I stared at the counter, realizing that what I had in front of me was not just a recipe but a rebellion against the ordinary. Picture yourself pulling these bite‑sized wonders from the oven, the whole kitchen smelling incredible, and the first bite delivering a crunch that shatters like thin ice before melting into a savory hug.
Let me walk you through every single step—by the end, you’ll wonder how you ever made pizza any other way. The secret? A crust that’s almost invisible, a sauce that’s bold, and a cheese blend that’s creamy yet crisp. I’ve tweaked the classic formula, adding a pinch of garlic powder that whispers through each bite, and a dash of Italian seasoning that gives it that unmistakable Mediterranean flare. I dare you to taste this and not go back for seconds; the flavor is so layered it feels like a symphony on your tongue. And if you’ve ever struggled with dough that turns out rubbery, you’re not alone—this version is designed to be forgiving and always delicious.
Most recipes get this completely wrong. They either forget the baking powder, which makes the bites dense, or they overcook the cheese, leaving a rubbery texture that ruins the experience. Here’s what actually works: the dough is a quick, no‑fuss blend that rises just enough to keep the bites airy, the sauce is thick enough to cling without dripping, and the cheese melts into a gooey center that bursts with flavor. The result is a bite that feels like a miniature pizza, yet is so light it practically floats. I’ll be honest—you’ll want to keep a second batch ready for that sudden craving that pops up at 2 a.m. after a long day.
If you’ve ever struggled with this, you're not alone—and I've got the fix. The trick is in the proportions and the timing. I’ll show you how to keep the dough tender, how to layer the toppings so every bite is balanced, and how to bake at just the right temperature so the edges crisp without burning. Picture the sizzle when the dough hits the hot pan: a satisfying crackle that signals the start of something delicious. And stay with me here—this is worth it.
What Makes This Version Stand Out
- Taste: The sauce is a bold, tomato‑rich base that coats the dough like velvet, while the cheese blend creates a creamy, slightly tangy finish that balances the saltiness of the pepperoni.
- Texture: The dough is light and airy inside, with a crisp, golden edge that shatters like thin ice—every bite delivers a satisfying crunch followed by a melt.
- Simplicity: No elaborate steps, no fancy equipment—just a few pantry staples and a 425°F oven.
- Uniqueness: The addition of a subtle garlic‑powder kick and a sprinkle of Italian seasoning gives it that unmistakable Mediterranean flare that sets it apart.
- Crowd Reaction: Friends rave that these are the perfect party snack—easy to hand out, no mess, and everyone asks for seconds.
- Ingredient Quality: Using fresh pizza sauce and high‑quality mozzarella makes a world of difference; the difference is taste.
- Cooking Method: Baking at a high temperature ensures a crisp crust without over‑browning the cheese.
- Make‑Ahead Potential: You can assemble the bites a day ahead, refrigerate, and bake fresh when you’re ready.
Alright, let's break down exactly what goes into this masterpiece...
Inside the Ingredient List
The Flavor Base
The foundation of these bites is the sauce and the cheese. The pizza sauce is thick and tangy, acting as a flavor carrier that coats each bite. If you skip it, you lose the signature pizza aroma and the moisture that keeps the dough from drying out. For those who prefer a milder tomato flavor, try a roasted tomato sauce instead; it adds a smoky depth. When selecting sauce, look for one with a balanced acidity—too acidic and it will overpower the cheese.
The Texture Crew
Flour, baking powder, and olive oil work together to create a dough that’s both tender and slightly chewy. The baking powder is the secret lift; without it the bites would be dense. If you’re gluten‑free, swap the all‑purpose flour for a 1:1 blend of rice and tapioca flour. The warm water hydrates the dry ingredients; if you use cold water, the dough will be stiffer and harder to roll.
The Unexpected Star
Garlic powder and Italian seasoning are the unsung heroes that elevate the flavor profile. They’re subtle but give a depth that mimics a real pizzeria. If you’re allergic to garlic, a pinch of onion powder will do the trick, though the aroma will shift slightly. Remember, seasoning is cumulative—start small and adjust as you go.
The Final Flourish
Fresh basil, pepperoni, and Parmesan add a finishing touch that turns a simple bite into a gourmet experience. Basil brings brightness; pepperoni adds a smoky bite; Parmesan gives a nutty finish. If you’re vegan, substitute the cheese with a plant‑based mozzarella and omit the pepperoni. The key is layering so each component has a chance to shine without overpowering.
Everything's prepped? Good. Let's get into the real action...
The Method — Step by Step
- Preheat your oven to 425°F (220°C) and line a baking sheet with parchment paper or a silicone mat. A hot oven is critical; it gives the dough that instant rise and crisp edge. I’ve found that using a baking stone or a cast‑iron skillet can elevate the crust even further, but the parchment works perfectly for home cooks.
- In a medium bowl, whisk together 2 cups flour, 1 tsp baking powder, 1 tsp salt, 1/2 tsp garlic powder, and 1/4 tsp Italian seasoning. This dry blend is the backbone of your dough; it ensures even distribution of leavening and flavor. If you’re gluten‑free, replace the flour with a 1:1 blend of rice and tapioca flour for a lighter bite.
- Add 1 tbsp olive oil and 3/4 cup warm water to the dry mixture. Stir until a shaggy dough forms. The warm water helps activate the baking powder and creates steam during baking, which contributes to the airy interior. If the dough feels too sticky, add a tablespoon of flour at a time until it’s manageable.
- Transfer the dough to a lightly floured surface and knead for about 2 minutes, until it becomes smooth and elastic. The kneading step is where the gluten network forms, giving the bites their slight chew. Don’t over‑knead—over‑developed gluten can make the bites tough.
- Roll the dough into a rectangle about 1/4 inch thick. A rolling pin or a clean wine bottle works well. The thickness is key: too thin and the dough will tear; too thick and the interior won’t bake evenly. A kitchen tape can help you maintain a consistent thickness.
- Using a pizza cutter or a sharp knife, cut the rectangle into 1‑inch squares. These are the perfect bite size for parties or a quick snack. If you prefer a slightly larger bite, go for 1.25 inches—just keep the topping ratios in mind.
- Spoon a tablespoon of pizza sauce onto each square and spread it thinly, leaving a small border for the dough. The sauce should coat the dough without soaking through; this balance keeps the dough from becoming soggy. If you’re using a thicker sauce, reduce the amount slightly.
- Sprinkle 1/4 cup shredded mozzarella, 1/2 cup diced pepperoni, 1 tbsp chopped basil, and 2 tbsp grated Parmesan over each bite. The cheese should be evenly distributed so every bite has that gooey, melty center. For a vegan version, replace the mozzarella and Parmesan with plant‑based options and omit the pepperoni.
- Bake for 12–15 minutes, until the edges are golden brown and the cheese is bubbling. The first 10 minutes you’ll notice the dough rising, and the last 2–3 minutes the cheese will develop a slight crust. Keep an eye on the color; if the edges start to darken too quickly, slide the sheet to a lower rack.
- Remove from the oven and let the bites cool on the sheet for 5 minutes. The residual heat will finish the cooking process and set the cheese. Serve warm with extra sauce on the side for dipping. The moment the cheese stretches as you pull a bite apart—pure bliss.
That's it — you did it. But hold on, I've got a few more tricks that'll take this to another level. The next section will give you insider tips that will elevate your bites from great to unforgettable.
Insider Tricks for Flawless Results
The Temperature Rule Nobody Follows
While most people bake at 400°F, I swear by 425°F. The higher temperature creates a crispier crust without drying out the cheese. If your oven runs hot, reduce the time by a minute or two. This small tweak can mean the difference between a soggy bite and a crunchy masterpiece.
Why Your Nose Knows Best
Smell is the first indicator of perfection. If the dough starts to emit a toasty, nutty aroma, that’s the signal that the edges are crisping. If the scent is overly sharp or burnt, pull it out immediately. Your nose is a reliable guide; trust it.
The 5-Minute Rest That Changes Everything
After baking, let the bites rest for exactly five minutes. During this rest period, the cheese sets, making it easier to handle and ensuring the bite doesn’t fall apart. This also allows the flavors to meld. I’ve seen people skip this step and end up with cheese that oozes out like a waterfall.
Use a Pizza Stone for a Crunchier Base
If you have a pizza stone, preheat it with the oven for at least 30 minutes. The stone retains heat, giving the dough a crisp bottom. It’s especially useful if you’re making a larger batch and want consistent results.
Add a Touch of Butter for Extra Richness
A teaspoon of melted butter brushed over the dough before adding sauce can give the crust a deeper golden color and a subtle buttery flavor. It also helps the toppings stick better. This trick is simple but makes a noticeable difference.
Creative Twists and Variations
This recipe is a playground. Here are some of my favorite ways to switch things up:
Mediterranean Margherita Bites
Swap pepperoni for sliced cherry tomatoes, add a drizzle of olive oil, and top with fresh basil leaves. The result is a light, fresh bite that’s perfect for a summer gathering. The tomato adds a juicy burst that pairs beautifully with the melted mozzarella.
BBQ Chicken Crunch
Use shredded rotisserie chicken, a spoonful of smoky BBQ sauce, and sprinkle with cheddar cheese. The sweet and savory combination turns the bites into a crowd‑pleasing finger food. The BBQ sauce’s caramelized edges add a subtle crunch.
Vegan Delight
Replace the mozzarella and Parmesan with a plant‑based mozzarella and nutritional yeast. Add sliced black olives and capers for a briny kick. The vegan version still delivers that gooey center and crispy edge.
Breakfast Edition
Drop the pepperoni and add diced ham or bacon, a dash of smoked paprika, and a sprinkle of shredded cheddar. Serve with a side of scrambled eggs for a hearty breakfast bite that feels like a mini breakfast pizza.
Spicy Sriracha Swirl
Stir a tablespoon of Sriracha into the pizza sauce for a fiery kick. Add sliced jalapeños on top and finish with a sprinkle of crushed red pepper. The heat adds a new layer of excitement to the classic flavor.
Sweet & Savory Bacon & Maple
Drizzle a light maple glaze over the baked bites and add a few strips of crispy bacon. The maple’s sweetness balances the saltiness of the bacon, creating a complex flavor profile that’s sure to impress.
Storing and Bringing It Back to Life
Fridge Storage
Cool the baked bites completely, then store them in an airtight container in the refrigerator for up to 3 days. This keeps them firm and prevents the dough from becoming soggy. When ready to serve, reheat in a 350°F oven for 5 minutes.
Freezer Friendly
Arrange the cooled bites on a parchment‑lined tray and freeze until solid, then transfer to a freezer bag. They’ll stay fresh for up to 2 months. Thaw overnight in the refrigerator before reheating. This method preserves the texture and flavor.
Best Reheating Method
Reheat in a skillet over medium heat, covering with a lid for 2 minutes, then remove the lid and toast for an additional minute. The skillet creates a crisp crust while the lid traps steam to keep the cheese moist. A tiny splash of water before reheating steams the bites back to perfection, preventing them from drying out.