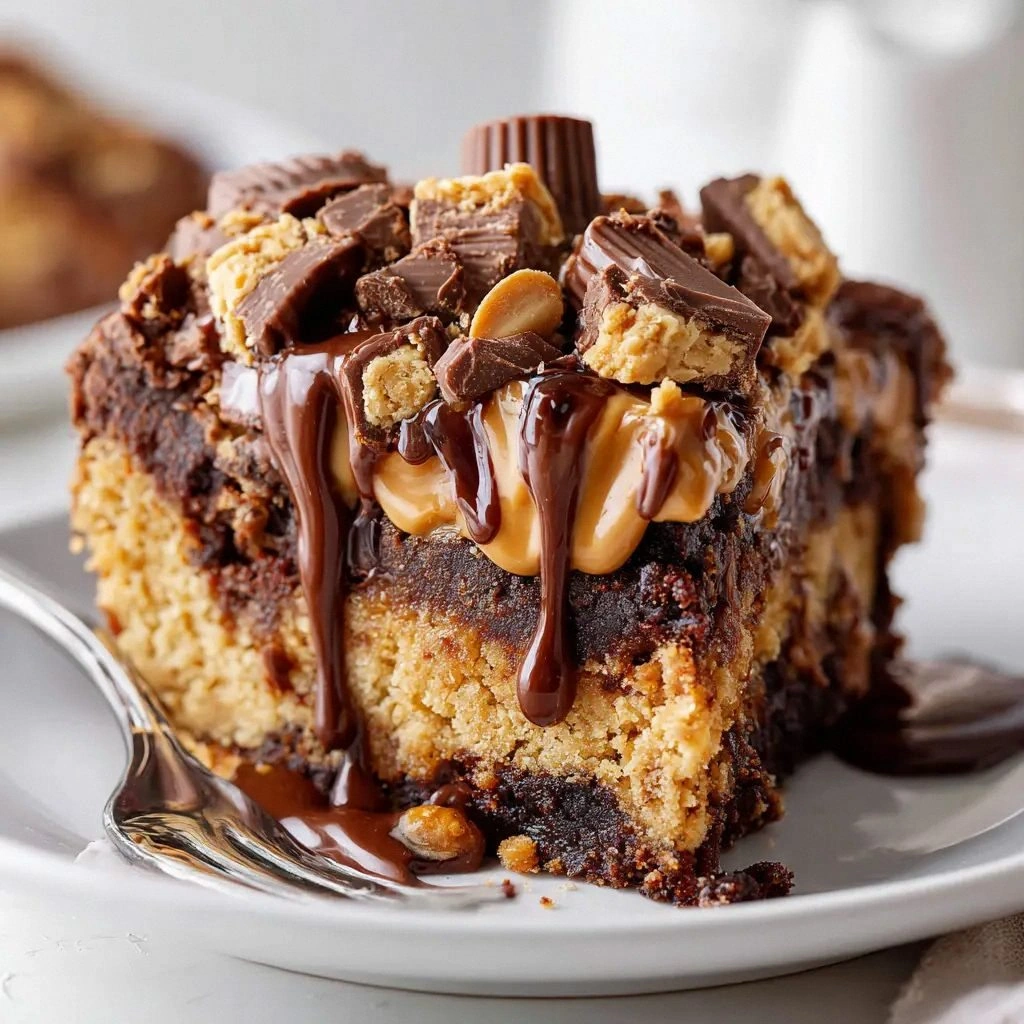
Picture this: I’m standing in a kitchen that smells like burnt sugar and nostalgia, trying to salvage a dessert that should have been a sweet triumph. The previous night, I attempted a classic peanut butter cup cake and ended up with a soggy, over‑cooked mess that left the table looking like a melted chocolate disaster. I stared at the cracked batter, felt the frustration, and thought, “There has to be a better way.” That moment sparked a daring experiment that turned a culinary flop into a flavor revelation.
I was craving the rich, creamy indulgence of peanut butter cups but wanted something that didn’t require a dozen steps or a fancy oven setup. The idea hit me: dump everything into a pan, let the ingredients mingle, and let gravity do the rest. The result? A dump cake that is both a crowd‑pleaser and a time‑saver. I’ll walk you through each detail, and by the end, you’ll wonder how you ever made peanut butter cups any other way.
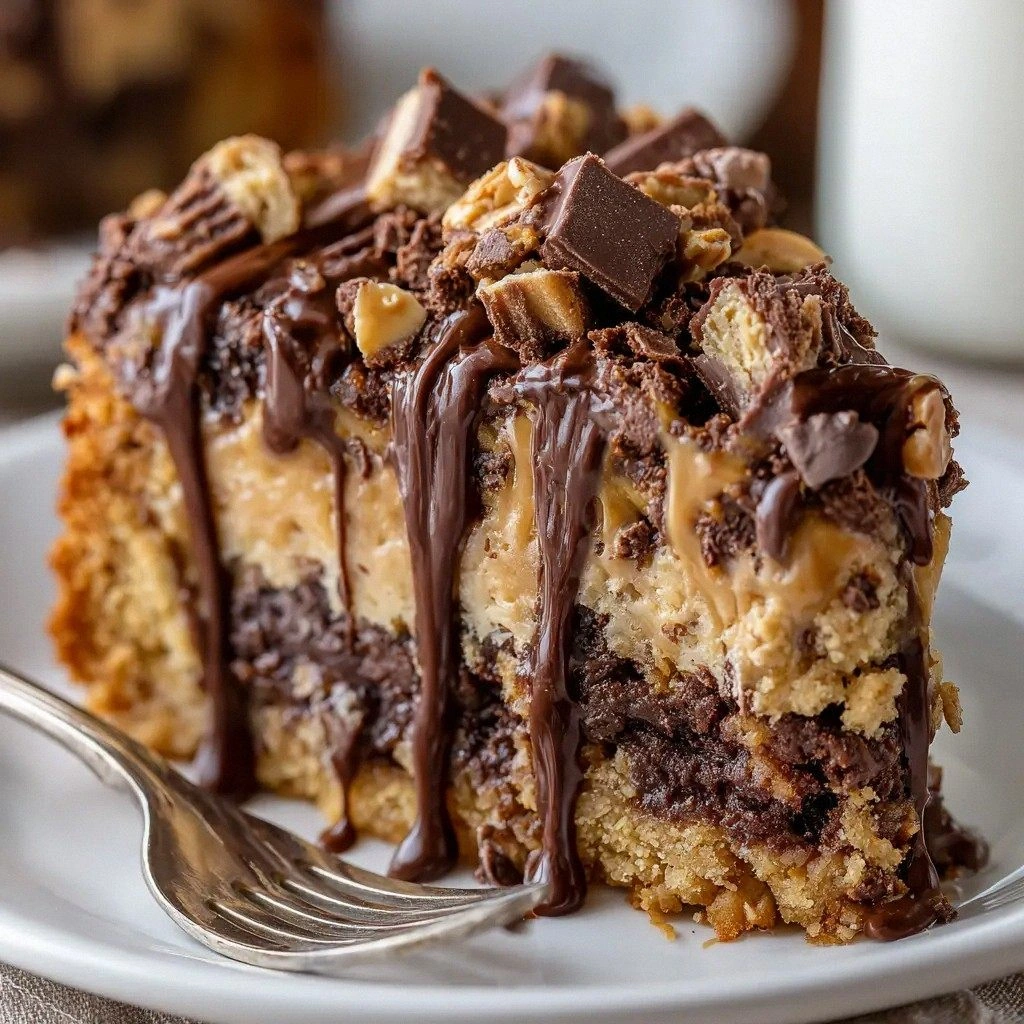
When you first open the box of chocolate fudge cake mix, the scent of vanilla and cocoa wafts through the air like a warm hug. The condensed milk’s sweet aroma mingles with the buttery undertone of the peanut butter cups, creating a head‑spinning perfume that signals decadence is on the way. The sound of the butter sizzling in the pan is the soundtrack to this dessert’s birth, a gentle hiss that promises a glossy finish. The texture starts as a thick, glossy pour, then settles into a fudgy, gooey core that clings to your spoon like a caramelized dream.
Most dump cake recipes rely on a single, generic mix that leaves you with a bland, over‑cooked result. What sets this version apart is the strategic layering of flavors and textures: the creamy condensed milk, the crunch of the peanut butter cups, and the buttery, cake‑like base that absorbs everything. I dare you to taste this and not go back for seconds—trust me, the first bite will have you reaching for more. And if you’re worried about the mess, stay with me here—this is worth it.
I’m not just talking about a dessert; I’m offering a culinary experience that feels like a warm blanket on a cold night, a sweet hug that you can taste and savor. The combination of chocolate, peanut butter, and a buttery cake base is a symphony of flavors that dance on your palate. The best part? The simplicity. No pre‑baking, no mixing bowls, just a single pan and a handful of ingredients. Let me walk you through every single step—by the end, you’ll wonder how you ever made it any other way.
What Makes This Version Stand Out
- Flavor: The creamy, sweetened condensed milk balances the rich chocolate and nutty peanut butter, creating a harmonious taste that lingers. The fudge cake mix adds a subtle vanilla undertone that rounds out the dessert.
- Texture: The melted peanut butter cups give a delightful crunch that contrasts the soft, custard‑like center. The buttery base absorbs the liquids, resulting in a moist, fudgy interior.
- Convenience: No pre‑mixing or baking required—just dump everything into a pan, let it cook, and serve. This is hands down the best version you'll ever make at home.
- Time: Prep takes 15 minutes; cook time is just 30 minutes, making it a perfect dessert for last‑minute gatherings.
- Visual Appeal: The golden edges, glossy surface, and chocolate chunks look as good as they taste. The dessert invites you to dig in with a smile.
- Versatility: You can swap in different chocolate or nut varieties, adjust sweetness, or add toppings like whipped cream or nuts.
Alright, let's break down exactly what goes into this masterpiece…
Inside the Ingredient List
The Flavor Base
The 1 can of sweetened condensed milk is the heart of this dessert, providing a silky sweetness that coats the palate. Its thick consistency allows it to meld with the melted butter and cake mix, creating a cohesive, glossy sauce. Skipping it would leave the cake dry and lack the signature caramelized finish. If you prefer a lighter version, you can replace half of the condensed milk with milk or a dairy alternative, but the richness will be noticeably reduced.
The Texture Crew
Half a cup of milk is added to loosen the batter, giving it a pourable but still thick consistency. This liquid balances the density of the cake mix and ensures the final product is not too heavy. If you find the mixture too runny, simply reduce the milk by a tablespoon; if it’s too thick, add a splash more. The 1/2 cup of salted butter melts into the base, adding a buttery depth that complements the chocolate and peanut butter flavors.
The Unexpected Star
Sixteen full‑size peanut butter cups are the secret weapon that elevates this dump cake from ordinary to extraordinary. Their creamy peanut butter centers break apart during cooking, releasing a nutty aroma and a delightful crunch. If you’re allergic or simply don’t have peanut butter cups on hand, you can substitute with chocolate chips or chopped nuts, but the classic experience will be lost. The key is to use full‑size cups; mini cups will melt too quickly and create a mess.
The Final Flourish
A box of chocolate fudge cake mix is the foundation that binds everything together. The mix’s cocoa and vanilla flavors provide a sweet, chocolatey base that absorbs the condensed milk, butter, and melted peanut butter. If you want a darker, richer cake, swap in a dark chocolate cake mix. The cake mix also contributes to the structure, preventing the dessert from turning into a soggy mess.
Everything's prepped? Good. Let's get into the real action…
The Method — Step by Step
- Preheat a 10‑inch non‑stick skillet over medium heat. The pan should be hot but not smoking, which ensures the butter melts evenly and the cake mix starts to set without sticking. If you’re using a cast‑iron skillet, a quick test is to sprinkle a drop of water; it should sizzle and evaporate almost instantly.
- Add the 1/2 cup of salted butter to the skillet. Let it melt fully, swirling the pan to coat the bottom. The butter’s aroma will mingle with the chocolate, signaling the dessert’s journey has begun.
- Pour the entire can of sweetened condensed milk into the skillet. Stir gently to combine with the melted butter, forming a thick, caramel‑like mixture. The mixture should be glossy and slightly thick; if it’s too thin, let it simmer for a minute to reduce.
- Add the chocolate fudge cake mix to the skillet. Stir vigorously until the mix is fully incorporated and the batter becomes smooth. The batter will thicken as the dry mix hydrates; keep stirring to prevent clumps.
- Pour in the 1/2 cup of milk, and stir until the batter is pourable but still thick enough to hold its shape. This step is crucial for achieving the right consistency; a runny batter will result in a watery dessert.
- Break the 16 peanut butter cups into quarters and scatter them evenly over the top of the batter. Don’t worry if they look like a mess—during cooking, they’ll melt, creating pockets of creamy peanut butter that will burst with flavor.
- Cover the skillet with a lid and reduce the heat to low. Let the cake bake for 25 minutes, checking every 5 minutes to ensure the edges are pulling away from the pan and the surface has a golden crust. The aroma will intensify, turning the kitchen into a chocolate haven.
- Remove the lid, give the cake a gentle stir to redistribute the melted peanut butter, then return the lid and continue baking for another 5 minutes. This final step ensures the peanut butter is fully incorporated and the cake is evenly cooked.
- Once the cake is done, remove it from the skillet and let it cool for 10 minutes. The cake will firm up, making it easier to slice and serve. If you’re serving immediately, cut it into squares and enjoy while it’s still warm.
- Serve with a scoop of vanilla ice cream or a dollop of whipped cream for an extra indulgent touch. The contrast between the warm, gooey cake and the cold, airy topping creates a sensory explosion.
That’s it— you did it. But hold on, I've got a few more tricks that'll take this to another level…
Insider Tricks for Flawless Results
The Temperature Rule Nobody Follows
Many people think that a high heat is the key to a great dump cake, but the truth is low, steady heat yields a more even bake. Keep the skillet on medium‑low to allow the batter to set without scorching the bottom. If you notice the edges browning too fast, slide the pan to a cooler spot or reduce the flame. This trick ensures a golden crust and a moist interior.
Why Your Nose Knows Best
The aroma of the baking cake is a reliable indicator of doneness. When the scent turns from sweet to a warm, buttery fragrance, the cake is close to finished. Trust your nose; if you’re unsure, give it an extra 5 minutes. The smell will guide you to the perfect balance of gooey and firm.
The 5‑Minute Rest That Changes Everything
After removing the cake from the skillet, let it rest for 5 minutes before cutting. This short rest allows the heat to distribute evenly, preventing the cake from collapsing or spilling over when sliced. It also gives the peanut butter to set slightly, so each bite has a consistent texture.
The Right Pan Makes All the Difference
A heavy‑bottomed skillet or cast iron works best because it distributes heat evenly and retains it, preventing hot spots. If you’re using a non‑stick pan, ensure it’s pre‑heated to avoid sticking. A well‑heated pan also helps develop that desirable crust on the edges.
The Secret to a Silky Finish
Stirring the batter only until the mix is fully incorporated, then letting it sit for a minute, allows the sugars to caramelize slightly. This step creates a silky glaze on the surface and enhances the overall flavor profile. If you skip it, the cake may taste more like a plain batter.
The Final Flourish
Just before serving, drizzle a small amount of chocolate ganache or caramel sauce over the top. The glossy finish adds a touch of elegance and a burst of flavor that elevates the dessert from good to unforgettable.
Creative Twists and Variations
This recipe is a playground. Here are some of my favorite ways to switch things up:
Nutty Crunch Variation
Add a handful of chopped pecans or walnuts to the batter before baking. The nuts provide a satisfying crunch that contrasts the gooey center, making each bite more dynamic. This variation is perfect for those who love a nutty texture.
Chocolate‑Only Delight
Replace the peanut butter cups with dark chocolate chunks and drizzle a touch of espresso powder into the batter. The espresso enhances the chocolate flavor, creating a sophisticated dessert that’s ideal for coffee lovers.
Spicy Kick Variation
Stir in a pinch of cayenne pepper or a splash of chili liqueur to give the cake a subtle heat. The spice pairs beautifully with the sweetness, creating a complex flavor profile that surprises the palate.
Caramel Swirl Variation
Fold a few tablespoons of caramel sauce into the batter before baking. The caramel adds a buttery sweetness that complements the chocolate and peanut butter, while also giving the cake a beautiful swirl pattern.
Vegan Version
Use a vegan chocolate fudge cake mix, replace the butter with coconut oil, and choose dairy‑free condensed milk. This version keeps the same indulgent flavor while making it suitable for plant‑based diets.
Mini Dessert Cups
Instead of a single skillet, bake the mixture in individual silicone muffin cups. This creates bite‑size desserts that are perfect for parties or for keeping portions under control.
Storing and Bringing It Back to Life
Fridge Storage
Store the leftover cake in an airtight container in the refrigerator for up to 3 days. The cake will firm up, making it easier to slice. Before serving, let it sit at room temperature for 10 minutes to soften slightly.
Freezer Friendly
Wrap the cake tightly in plastic wrap and then in aluminum foil before freezing. It can be stored for up to 2 weeks. When ready to eat, thaw overnight in the refrigerator and reheat in the oven at 350°F for 10 minutes.
Best Reheating Method
To bring back that fresh‑baked flavor, reheat the cake in a preheated oven at 350°F for 5–7 minutes. If you’re short on time, microwave on high for 30 seconds, then let it rest for a minute. Add a tiny splash of water before reheating to steam the cake back to perfection.