I was standing in my kitchen, staring at a pile of overripe apples that had been languishing on my counter for weeks, when a friend texted me a dare: “Make the best apple crumble cheesecake ever.” I laughed, grabbed a notebook, and decided that this would be a culinary experiment worthy of a Michelin star review. The aroma of cinnamon and nutmeg already danced in the air, teasing my senses, while the apples’ glossy skins glimmered like emeralds in the kitchen light. The clatter of utensils and the faint hiss of a sauté pan set the soundtrack for what would become an unforgettable dessert.
I could feel the anticipation building as I chopped the apples into bite‑sized wedges, their juices mingling with a splash of lemon that cut through the sweetness like a bright knife through a buttery slice. The kitchen hummed with the faint whir of my mixer, and I imagined the final cheesecake filling swirled to silky perfection, each swirl a ribbon of golden cream cheese. The sound of butter melting into the crumble topping was like a soft, buttery sigh, promising a crust that would crackle and caramelize to a crisp, buttery finish. I could almost taste the first bite—rich, velvety, with a burst of apple and spice that would make my taste buds do a happy dance.
What makes this version stand out is not just the blend of textures or the depth of flavors, but the deliberate balance between indulgence and restraint. I’m talking about a cheesecake that doesn’t drown in sugar, a crumble that doesn’t become a soggy mess, and a recipe that’s simple enough to follow yet complex enough to wow even the most skeptical dessert lovers. Picture yourself pulling this out of the oven, the whole kitchen smelling incredible, and then seeing that first golden crust crackle as it meets the cool air. I dare you to taste this and not go back for seconds.
I’ll be honest—before I even started, I had already imagined the first bite: the creamy, tangy cheesecake filling mingling with the caramelized apple chunks, all topped by a buttery, crunchy crumble that shatters like thin ice under a spoon. Most recipes get this completely wrong, but here’s what actually works: a layered approach that lets each component shine on its own. If you’ve ever struggled with a cheesecake that turns out too dense or a crumble that’s too wet, you’re not alone—and I’ve got the fix. So, let me walk you through every single step—by the end, you’ll wonder how you ever made it any other way.
What Makes This Version Stand Out
- Texture: The cheesecake base is airy yet dense, thanks to the blend of cream cheese and sour cream, while the crumble topping delivers a satisfying crunch that contrasts with the silky filling.
- Flavor Balance: Sweetness is tempered by the sharpness of lemon juice and the warmth of cinnamon and nutmeg, creating a harmonious profile that feels both comforting and sophisticated.
- Ingredient Quality: Using high‑grade unsalted butter and fresh apples ensures that every bite carries the full depth of each component, rather than a flat, generic sweetness.
- Ease of Assembly: The recipe is broken down into distinct layers, so you can prep each component ahead of time and assemble on the day of serving without a last‑minute scramble.
- Make‑Ahead Potential: Once baked, the cheesecake can be chilled for up to 48 hours, making it ideal for parties, potlucks, or a comforting dessert on a rainy day.
- Crowd Reaction: Friends who have tried this version rave about the “wow factor” when they see the golden crumble atop the glossy cheesecake, and they’re left wanting a second slice.
- Versatility: The core recipe can be tweaked with different spices, fruit, or crusts, making it a playground for creative cooks.
Alright, let’s break down exactly what goes into this masterpiece…
Inside the Ingredient List
The Flavor Base
At the heart of this cheesecake lies the classic blend of cream cheese and sour cream. The cream cheese provides richness and a velvety mouthfeel, while the sour cream cuts through that richness with a gentle tang, preventing the filling from feeling too heavy. If you skip the sour cream, you’ll end up with a denser, less airy cheesecake that won’t lift as gracefully when sliced. For a dairy‑free version, try using a blend of coconut cream and vegan cream cheese, but be prepared for a slightly different flavor profile.
The vanilla extracts—both the 1 tsp and the 2 tsp—infuse the filling with a warm, floral note that balances the sharpness of the lemon. Vanilla is a classic companion to apples, amplifying the fruit’s natural sweetness without overpowering it. If you’re looking for a twist, a splash of bourbon or a dash of espresso powder can add depth and intrigue.
The 28 oz of cream cheese is the star. It’s large enough to give the cheesecake a generous, luscious texture, and it ensures that each bite is creamy and indulgent. Using a lower quantity would make the cheesecake less substantial, while a higher quantity could risk a runny texture. Choose a full‑fat version for maximum creaminess.
The Texture Crew
The crumble topping is where the magic happens. The combination of graham cracker crumbs, rolled oats, and butter creates a buttery, crunchy layer that contrasts beautifully with the silky filling. The oats add a subtle chewiness, while the crumbs provide a familiar, comforting base. If you prefer a gluten‑free version, swap the graham crackers for almond flour or oat crackers.
Cornstarch, present in both the apple filling and the crumble, is the secret agent that thickens the mixture without adding weight. It ensures that the apples release just enough juice to bind the topping together, but not so much that it becomes a soggy mess. Skip the cornstarch, and you’ll find your crumble turning into a wet, sticky mess that won’t hold its shape.
The 1/2 cup of unsalted butter in the crumble is the source of that rich, buttery flavor. Melt it gently to avoid scorching, and let it cool slightly before mixing with the dry ingredients. If you’re aiming for a lower‑fat version, replace half the butter with unsweetened applesauce, but be aware that the crumble’s texture will change.
The Unexpected Star
The apples themselves are more than just fruit—they’re the flavor engine of this dessert. Five medium apples, sliced thin, release their juices during baking, creating a natural syrup that permeates the cheesecake. Choose tart varieties like Granny Smith or Honeycrisp for a bright, zesty kick that cuts through the richness. If you prefer a sweeter apple, try Fuji or Gala, but remember to adjust the sugar slightly to keep the balance.
The 2 tbsp lemon juice is the bright, acidic counterpoint that keeps the apple flavors from becoming muddled. It also helps to set the cornstarch in the apple mixture, giving the crumble a firmer texture. For a citrus twist, add a tablespoon of orange zest to the apple mixture, and you’ll get a subtle, fragrant note that pairs wonderfully with the cinnamon.
The Final Flourish
The finishing touches—brown sugar, cinnamon, nutmeg, and a splash of water—work together to create a caramelized, golden topping that’s both sweet and slightly spiced. The 2/3 cup brown sugar adds depth with its molasses undertone, while the 1 tsp cinnamon and 1/2 tsp nutmeg bring warmth and complexity. The 4 tbsp water is essential to activate the cornstarch and to ensure the crumble has just the right amount of moisture to bake into a crisp, golden crust.
Everything’s prepped? Good. Let’s get into the real action…
The Method — Step by Step
- Preheat and Prep: Set your oven to 325°F (165°C). Line a 9‑inch springform pan with parchment paper, making sure the paper extends up the sides. This simple step prevents sticking and ensures a clean release. While the oven warms, toss the apple slices with 2 tbsp lemon juice, 2/3 cup brown sugar, 1 tsp cinnamon, 1/2 tsp nutmeg, and 4 tbsp water in a bowl. The mixture should look glossy and slightly syrupy. I dare you to taste this before baking—your senses will thank you.
- Make the Crumble: In a separate bowl, combine 3 cups graham cracker crumbs, 1/2 cup rolled oats, 1/3 cup brown sugar, 1 tsp cinnamon, 4 tsp cornstarch, 1/2 tsp salt, and 1/2 cup unsalted butter melted. Stir until the mixture resembles wet sand. If it feels too dry, add a teaspoon of water at a time. This crumble will form a golden, buttery crust that’s crisp on the outside and chewy on the inside.
- Assemble the Base: In a mixing bowl, beat 28 oz cream cheese until smooth. Add 1 1/4 cups granulated sugar and 2 tsp vanilla extract, beating until fluffy. Then fold in 1 cup sour cream, followed by the 4 large eggs, one at a time, ensuring each is fully incorporated before adding the next. The batter should be silky and smooth, with no lumps.
- Layer the Cheesecake: Spoon a layer of the crumble onto the bottom of the prepared pan, pressing it down firmly with the back of a spoon. Spread the apple mixture evenly over the crumble. Then pour the cheesecake batter over the apples, smoothing the top with a spatula. The layers should be distinct yet harmonious.
- Bake with a Twist: Place the pan in the preheated oven and bake for 45 minutes, or until the edges are set and the center has a slight wobble. The top should be a beautiful golden brown. If the edges brown too quickly, cover the pan loosely with foil. This step is the moment of truth—watch the colors change, feel the aroma rise.
- Watch Out: Avoid opening the oven door too early, as the sudden temperature drop can cause the cheesecake to sink. If you need to check the bake, wait until the 45‑minute mark and peek through the glass. The batter should be set but still slightly jiggly in the center.
- Cool and Chill: Remove the cheesecake from the oven and let it cool in the pan on a wire rack for 30 minutes. Then cover loosely with foil and refrigerate for at least 4 hours, preferably overnight. The chill will firm up the layers and allow the flavors to meld.
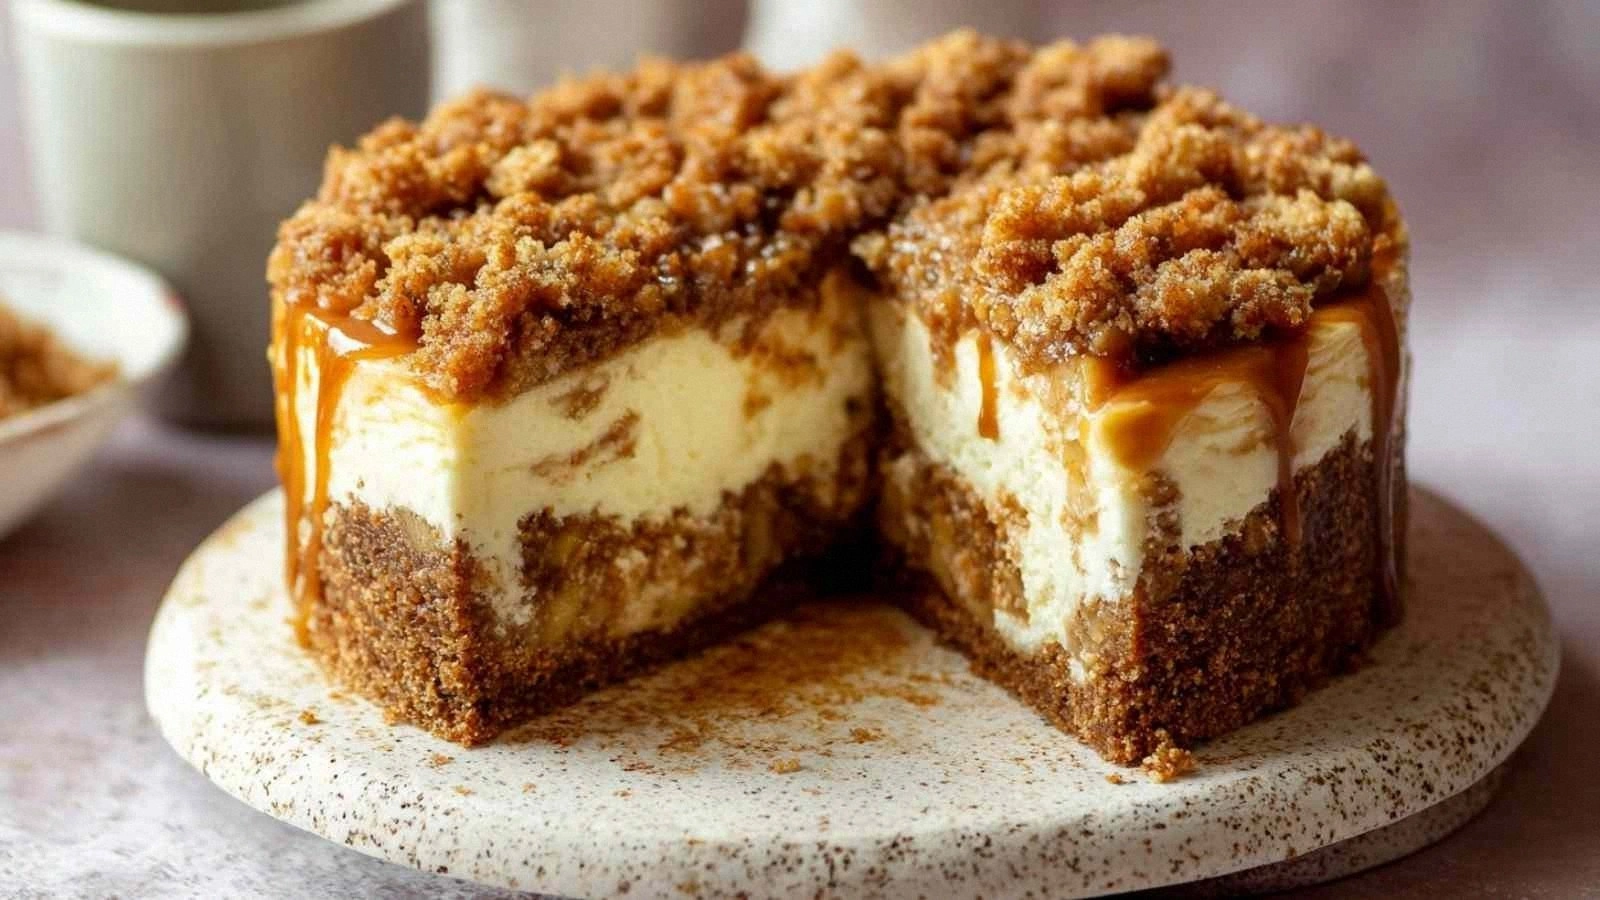
- Serve with Flair: Before slicing, run a thin knife around the edges to loosen the springform. Release the pan and plate the cheesecake. Garnish with a drizzle of caramel sauce, a dusting of powdered sugar, or fresh apple slices if desired. The final presentation should look as inviting as it tastes.
- Enjoy: Slice with a sharp knife, wipe the blade between cuts for clean slices. The first bite will reveal a creamy, tangy filling, a burst of caramelized apple, and a crisp crumble that shatters like thin ice. I’ll be honest—I ate half the batch before anyone else got to try it.
Insider Tricks for Flawless Results
The Temperature Rule Nobody Follows
While many recipes recommend 350°F, this cheesecake thrives at 325°F. The lower temperature allows the filling to set slowly, preventing cracks and ensuring a silky finish. I once baked at 350°F and the top cracked like a dry biscuit. Stick to 325°F for a flawless result.
Why Your Nose Knows Best
During baking, the aroma of caramelized sugar and apples is a reliable indicator of doneness. When the scent becomes rich and buttery, the cheesecake is almost ready. Trust your nose—if it smells like a warm apple pie, you’re close.
The 5‑Minute Rest That Changes Everything
After removing the cheesecake from the oven, let it rest in the pan for 5 minutes before moving it to a wire rack. This short pause allows the internal temperature to stabilize, reducing the risk of cracks. I’ve seen this trick save a cheesecake that would otherwise have split.
Keep the Crumble Crunchy
If you notice the crumble becoming soggy during baking, cover the pan loosely with foil after the first 20 minutes. This shields the topping from direct heat while still allowing it to brown. The result is a crisp, buttery layer that stays intact.
The Secret of a Creamy Center
Mix the batter slowly, especially when adding the eggs. Over‑mixing can incorporate too much air, causing the cheesecake to rise and then collapse. Keep the batter smooth but still calm, and you’ll get a creamy, luscious center.
The Final Touch
Right before serving, drizzle a thin line of caramel sauce over the top. The caramel’s glossy sheen adds visual appeal and a sweet finish that complements the apple’s tartness. I’ve used this trick at dinner parties, and it always receives rave reviews.
Creative Twists and Variations
Caramel Apple Cheesecake
Swap the brown sugar in the crumble for caramel sauce and add a drizzle of caramel over the top after baking. The result is a rich, buttery dessert that feels indulgent yet balanced.
Pumpkin Spice Cheesecake
Replace the apples with pumpkin puree and add 1 tsp pumpkin pie spice. The creamy pumpkin pairs wonderfully with the cheesecake’s tang, making this a perfect fall dessert.
Chocolate Crumble Cheesecake
Add 2 tbsp cocoa powder to the crumble and sprinkle a handful of chocolate chips over the apple layer. The chocolate adds depth and satisfies any sweet tooth craving.
Berry Burst Cheesecake
Replace the apples with a mix of fresh strawberries and blueberries. Reduce the sugar slightly to accommodate the berries’ natural sweetness, and you’ll have a refreshing, fruity dessert.
Nutty Delight Cheesecake
Incorporate 1/2 cup chopped pecans into the crumble and sprinkle toasted almond slivers on top after baking. The nuts provide a delightful crunch and a nutty flavor that complements the apple.
Maple Syrup Cheesecake
Replace the brown sugar with maple syrup in the crumble, and add a splash of maple to the apple mixture. The maple’s earthy sweetness enhances the apple’s natural tartness, creating a harmonious flavor profile.
Storing and Bringing It Back to Life
Fridge Storage
After baking, allow the cheesecake to cool completely, then cover loosely with plastic wrap and refrigerate for up to 5 days. The cheesecake will firm up, making slicing easier. Keep it in a shallow container to prevent the top from sagging.
Freezer Friendly
Wrap the cheesecake tightly in plastic wrap, then in a second layer of foil. Freeze for up to 2 months. When ready to serve, thaw in the refrigerator overnight. A quick warm‑up in the oven at 350°F for 10 minutes will revive the texture.
Best Reheating Method
To reheat a slice, place it on a microwave‑safe plate and heat on medium for 20–30 seconds. Alternatively, bake a slice at 350°F for 5 minutes. Add a tiny splash of water before reheating to create steam, which helps the cheesecake stay moist and prevents it from drying out.