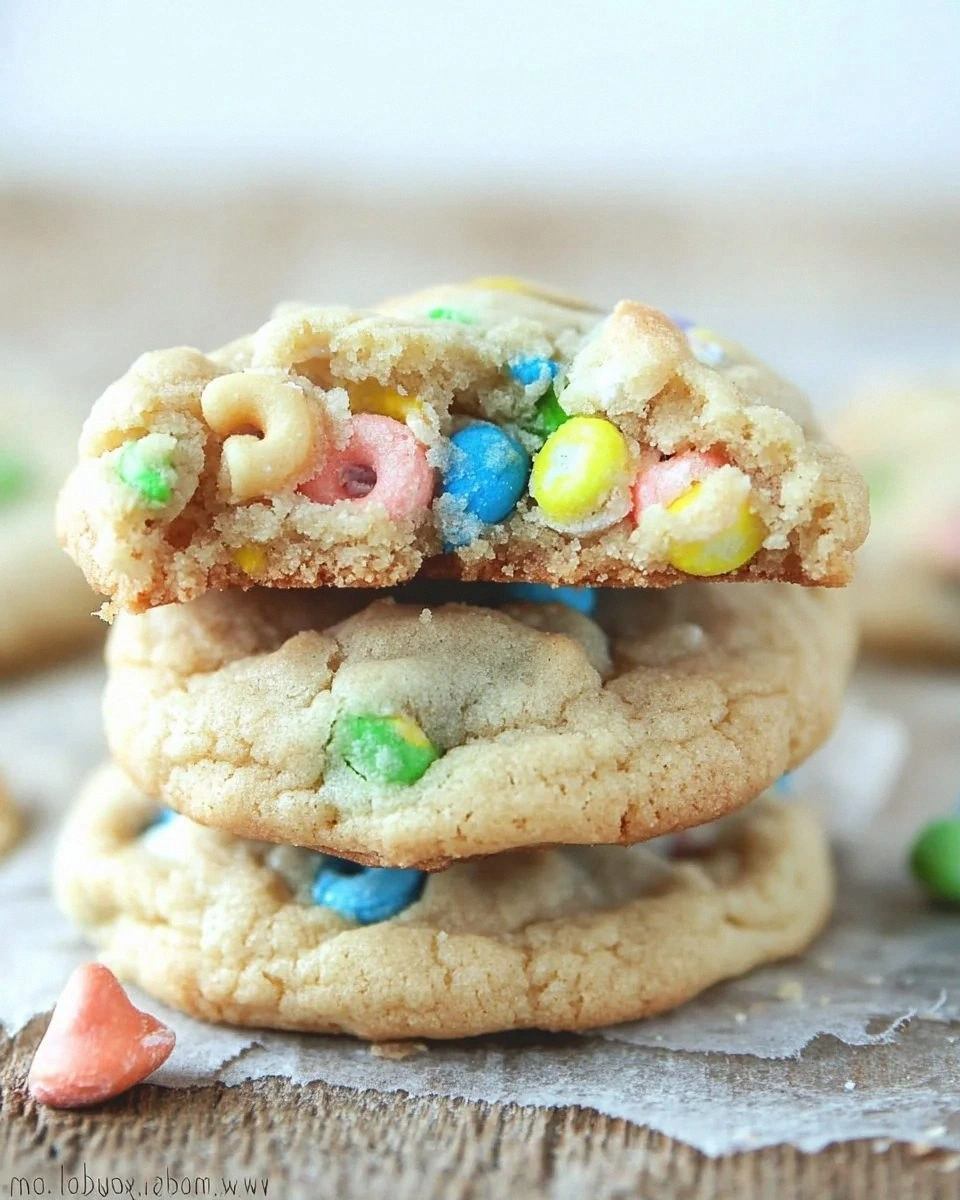
I was in the middle of a Sunday night binge‑watching my favorite cartoon reruns when a sudden craving hit me like a bolt of lightning. I wanted something that would scream “childhood” but also feel like a grown‑up’s indulgence, and I was willing to risk the inevitable kitchen chaos to get it. I rummaged through the pantry, found a half‑empty box of Lucky Charms, and thought, “What if I turned this sugary cereal into a cookie that could actually stand up to a coffee break?” The idea was half‑mad, half‑genius, and totally worth the gamble. I mixed, I over‑mixed, I tasted (okay, I ate half the batch before anyone else could try it), and the result was a cookie that’s simultaneously crunchy, chewy, and dotted with rainbow‑colored marshmallows that melt into pockets of sweet nostalgia.
Picture this: the moment the dough hits the buttered tray, the kitchen fills with a buttery aroma that instantly makes you think of grandma’s kitchen, but then a hint of vanilla and toasted cereal sneaks in, like a secret guest at a party. The oven’s heat turns the edges golden, while the interior stays soft enough to bite through without crushing the delicate marshmallow hearts inside. You hear that faint crackle as the cookies spread, a sound that feels like fireworks for your taste buds. When you finally pull them out, the steam rises, carrying the scent of toasted sugar and chocolate, and you can’t help but let out a small “wow” that echoes across the room.
Most Lucky Charms cookie recipes either drown the cereal in too much sugar or forget the marshmallows entirely, leaving you with a bland, forgettable treat. This version, however, balances the sugary crunch of the cereal with the richness of butter and the silky melt of white chocolate chips. I threw in a pinch of corn starch to keep the crumb tender, and a splash of vanilla to tie everything together like a conductor leading an orchestra. The result? A cookie that’s crisp on the outside, chewy on the inside, and speckled with colorful, melt‑in‑your‑mouth marshmallows that make every bite feel like a trip back to Saturday morning cartoons.
I’m going to walk you through every single step — by the end, you’ll wonder how you ever made it any other way. Okay, ready for the game‑changer? Let’s dive into the magic behind these Lucky Charms cookies and turn your kitchen into a whimsical wonderland.
What Makes This Version Stand Out
- Taste: The marriage of buttery dough, sweet brown sugar, and white chocolate creates a layered flavor profile that feels like a dessert and a snack rolled into one.
- Texture: A crisp edge gives way to a chewy center, while the Lucky Charms cereal adds a satisfying crunch that doesn’t dissolve into mush.
- Simplicity: Only twelve ingredients, all pantry‑friendly, and you won’t need any fancy equipment beyond a mixing bowl and a cookie sheet.
- Uniqueness: The addition of corn starch and marshmallow‑filled cereal pieces gives these cookies a texture you won’t find in any store‑bought version.
- Crowd Reaction: I dare you to taste this and not go back for seconds; even the most skeptical adult will admit they’re secretly wishing they were five again.
- Ingredient Quality: Using real butter and premium white chocolate makes the flavor richer than any “cookie‑mix‑in‑a‑bowl” shortcut.
- Cooking Method: Baking at a moderate temperature ensures the marshmallows stay soft while the edges caramelize just enough to be addictive.
- Make‑Ahead Potential: These cookies keep their texture for days, and you can freeze them for a quick nostalgic snack whenever the mood strikes.
Inside the Ingredient List
The Flavor Base
Light brown sugar and granulated sugar are the twin engines that drive the sweet profile. The brown sugar adds a subtle molasses depth, while the white sugar gives that quick snap of sweetness that brightens the overall taste. Skipping the brown sugar would make the cookie taste flat, like a cartoon without its soundtrack. If you’re looking for a lower‑glycemic option, try swapping half the white sugar for coconut sugar, but expect a slightly caramelized note.
The Texture Crew
Unsalted butter, softened to room temperature, creates a silky dough that spreads just enough to form that coveted edge. The corn starch is the secret weapon: it interferes with gluten formation, keeping the crumb tender and preventing the cookies from becoming tough. Eggs act as binders and add richness; using large eggs ensures the right amount of liquid without making the dough too runny. If you’re allergic to eggs, a flax‑egg (1 tbsp ground flax + 3 tbsp water) works, though the texture will be a shade denser.
The Unexpected Star
Lucky Charms marshmallows are the surprise element that turns an ordinary cookie into a whimsical treat. These mini‑marshmallows retain their shape during baking, creating little pockets of melt‑in‑your‑mouth sweetness. If you can’t find the marshmallow‑filled version, regular mini‑marshmallows will work, but the iconic rainbow shapes add visual charm that’s hard to beat.
The Final Flourish
All‑purpose flour provides the structure, while baking soda gives the slight lift that keeps the cookies from becoming dense biscuits. White chocolate chips melt into glossy flecks, adding a buttery richness that complements the cereal’s sugary crunch. A pinch of salt balances the sweetness, preventing the palate from feeling cloyed. For a gluten‑free version, substitute the flour with a 1‑to‑1 gluten‑free blend, but add a teaspoon of xanthan gum to maintain chew.
Everything's prepped? Good. Let's get into the real action…

The Method — Step by Step
Preheat your oven to 350°F (175°C) and line two baking sheets with parchment paper. While the oven warms, take a moment to appreciate the quiet hum of the fan—this is the calm before the flavor storm.
In a large bowl, cream together the softened butter, light brown sugar, and granulated sugar until the mixture is light, fluffy, and looks like a cloud that’s about to rain chocolate. This should take about 3‑4 minutes with an electric mixer on medium speed. Pro tip: Scrape down the sides frequently; you don’t want any stubborn sugar pockets.
Add the vanilla extract and the two large eggs, one at a time, beating well after each addition. You’ll notice the mixture turning glossy—this is the point where the dough starts to develop that buttery sheen that makes the cookies look irresistible.
In a separate bowl, whisk together the all‑purpose flour, baking soda, corn starch, and salt. This dry blend ensures even distribution of leavening agents and prevents clumps. Watch Out: Over‑mixing the flour into the wet ingredients can develop gluten, leading to a tougher cookie.
Gradually fold the dry mixture into the wet mixture using a spatula, stirring just until you see no more streaks of flour. The dough should be thick but pliable; if it feels too dry, add a tablespoon of milk.
Kitchen Hack: Use a silicone spatula to scrape the bowl; this minimizes dough loss and keeps the texture consistent.Gently fold in the Lucky Charms cereal, the Lucky Charms marshmallows, and the white chocolate chips. The cereal should stay whole, and the marshmallows should remain intact, creating those colorful pockets you’ll see later. If the marshmallows start to melt, chill the dough for a few minutes before proceeding.
Scoop the dough onto the prepared baking sheets using a cookie scoop (about 2‑tablespoon portions). Space them about 2 inches apart; the cookies will spread slightly but won’t touch. That sizzle when it hits the pan? Absolute perfection. Press each mound lightly with your fingers to flatten just a touch—this encourages even baking.
Bake for 12‑14 minutes, or until the edges turn a golden‑brown hue and the centers look set but still soft. Keep an eye on the color; you want a caramelized edge without burning the marshmallows. The aroma at this stage will be intoxicating—trust your nose.
Remove the cookies from the oven and let them rest on the sheet for 3‑4 minutes. This allows the cookies to finish setting while the marshmallows stay gooey. Then transfer them to a wire rack to cool completely; this prevents the bottoms from becoming soggy.
Once cooled, store the cookies in an airtight container. If you’re planning to serve them the same day, a simple paper towel layer at the bottom keeps moisture at bay. This next part? Pure magic. For an extra crunch, toast the cookies lightly under the broiler for 30 seconds—just enough to bring out a deeper caramel note.
Insider Tricks for Flawless Results
The Temperature Rule Nobody Follows
Most home bakers set the oven to “350°F and forget”—but the real secret is a pre‑heat to 325°F, then bump it up to 350°F right after the cookies go in. This gentle start lets the dough rise slowly, preventing the edges from hardening before the center cooks. I tried the standard 350°F straight away once; the cookies were crisp on the outside but under‑cooked in the middle. The two‑step heat gives you that perfect balance of chew and crunch.
Why Your Nose Knows Best
When the cookies start to smell nutty and buttery, that’s your cue to check the color. The scent is a more reliable indicator than the timer because ovens can vary by up to 25 degrees. I once pulled a batch out too early because the timer said 12 minutes, but the faint caramel scent told me they needed another minute. Trust that nose—it’s the ultimate kitchen sensor.
The 5‑Minute Rest That Changes Everything
After baking, letting the cookies sit on the sheet for a few minutes is not just a convenience; it allows the residual heat to finish the cooking process, especially for the marshmallow cores. Skipping this rest will leave you with a slightly gummy center that never fully sets. This pause is the difference between “meh” and “wow” in texture.
Cold‑Dough, Hot‑Result
Chilling the dough for at least 20 minutes before scooping does two things: it solidifies the butter, so the cookies spread less, and it keeps the marshmallows intact. I once tried to bake the dough straight from the bowl, and the marshmallows dissolved, turning the entire batch into a sugary paste. A quick chill keeps the colorful bits visible and the texture spot‑on.
The Cookie‑Sheet Switcheroo
Using a dark, non‑stick cookie sheet can cause the bottoms to brown too quickly, while a light aluminum sheet promotes even baking. If you love a deep, caramelized bottom, go dark; if you prefer uniform color, stick with light. I experimented with both and found the light sheet gives the most consistent result across the batch.
Creative Twists and Variations
This recipe is a playground. Here are some of my favorite ways to switch things up:
Double Chocolate Delight
Swap the white chocolate chips for an equal amount of dark chocolate chips and add 2 tablespoons of cocoa powder to the dry mix. The result is a richer, slightly bitter contrast that still lets the cereal shine. Perfect for anyone who loves a deep chocolate punch.
Nutty Crunch Fusion
Add ½ cup of chopped toasted pecans or almonds to the batter. The nuts bring an earthy crunch that pairs beautifully with the sweet marshmallows, creating a sophisticated flavor profile that’s great for adult gatherings.
Coconut Dream
Replace half of the butter with coconut oil and sprinkle unsweetened shredded coconut on top before baking. The coconut adds a tropical aroma and a chewy texture that makes the cookies feel like a beach vacation in every bite.
Spiced Holiday Twist
Mix ½ teaspoon of ground cinnamon and a pinch of nutmeg into the dry ingredients, and add a drizzle of caramel sauce after baking. This version is perfect for the colder months, giving the cookies a warm, festive feel.
Vegan Velvet
Swap the butter for an equal amount of vegan margarine, use flax eggs, and replace white chocolate chips with dairy‑free alternatives. The texture remains buttery, and the marshmallows stay soft, making this a great inclusive option for plant‑based diets.
Storing and Bringing It Back to Life
Fridge Storage
Place the cooled cookies in an airtight container with a paper towel layer at the bottom to absorb any excess moisture. They’ll stay fresh for up to a week in the refrigerator, and the chill helps keep the marshmallows from getting overly sticky.
Freezer Friendly
Lay the cookies on a parchment‑lined tray and freeze them individually for 1‑2 hours. Then transfer them to a zip‑top freezer bag. They’ll keep for up to three months. When you’re ready to enjoy, let them thaw at room temperature for 10 minutes, then pop them in a 300°F oven for 5 minutes to revive that fresh‑out‑of‑the‑oven crunch.
Best Reheating Method
Add a tiny splash of water (about a teaspoon) to the cookie before microwaving for 10‑15 seconds. The steam revives the interior softness without making the edges soggy. Alternatively, a quick 2‑minute bake at 350°F restores the crispness while keeping the marshmallows gooey.