I was standing in my kitchen, surrounded by the chaos of a cooking disaster that had become a running joke among my friends. I had tried to recreate the street‑style Egyptian street food that had hooked me on my last trip to Cairo, only to end up with a soggy, flavorless mess that made my neighbor’s dog stare at me with pity. The moment I tasted the final dish—crisp, buttery phyllo sheets layered over a spicy, aromatic meat filling that smelled like a sun‑kissed desert market—I knew I had stumbled upon something special. That single bite was a revelation, a reminder that the best recipes are born from a mix of trial, triumph, and a dash of daring.
Imagine stepping into a bustling Egyptian market: the air thick with the scent of cumin, the hiss of onions sautéing, and the bright green of fresh parsley that glistens like emeralds. The sound of a skillet sizzling, the feel of a wooden spoon against a pan, the sight of golden phyllo sheets trembling in the oven—every sense is pulled into a delicious vortex. I was not just cooking; I was telling a story, one that had to be shared because the flavor profile was so unmistakable, so bold, that it demanded a second plate. I dare you to taste this and not go back for seconds; that’s the promise of this recipe.
What sets this version apart is not just the ingredients but the meticulous layering of flavors and textures that transform a simple dish into a culinary masterpiece. I’ve distilled the essence of Egyptian goulash into a single, elegant recipe that feels both authentic and approachable. The secret? It’s all about the crispy phyllo, the robust spice blend, and the finishing touch of fresh herbs that lift the dish into the realm of the extraordinary. And trust me, after you try it, you’ll wonder how you ever cooked without this method.
Let me walk you through every single step—by the end, you’ll wonder how you ever made it any other way. From the first sizzle of onions to the final golden crust, this recipe is a step‑by‑step journey that guarantees a dish that’s as satisfying to make as it is to eat. Ready to dive in? Let’s get started.
What Makes This Version Stand Out
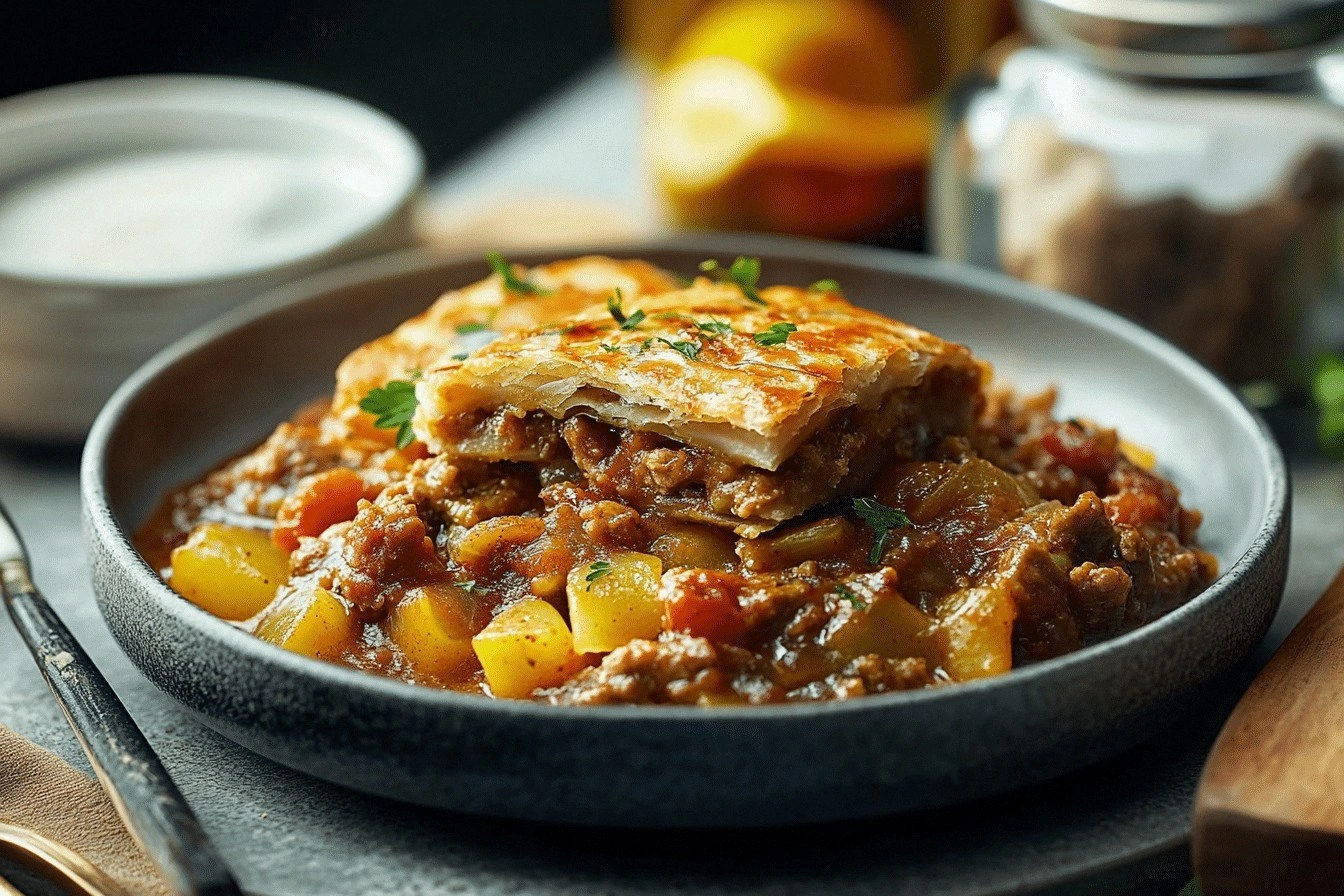
- Authentic Flavor: The blend of cumin, cinnamon, paprika, and black pepper captures the heart of Egyptian street food, delivering warmth and depth that dance on the palate.
- Crispy Texture: Thin, flaky phyllo sheets are brushed with butter or olive oil, creating a crunch that shatters like thin ice when you bite into it.
- Fresh Finish: A generous handful of parsley and cilantro adds a bright, herbaceous lift that cuts through the richness, offering a balanced finish.
- Time‑Efficient: While the dish feels indulgent, the prep and cook times are short—under an hour from start to finish.
- Versatility: The filling can be tweaked for beef, lamb, or chicken, making it adaptable to your pantry and taste preferences.
- Make‑Ahead Friendly: Assemble the dish the night before, refrigerate, and bake the next morning for a stress‑free breakfast or brunch.
- Scalable: The recipe scales beautifully, thanks to the serving adjuster in the recipe card, so you can feed a crowd or a couple with ease.
- Visual Appeal: The golden, flaky layers and the vibrant green herbs create a dish that looks as good as it tastes.
Alright, let's break down exactly what goes into this masterpiece...
Inside the Ingredient List
The Flavor Base
Onions and garlic form the aromatic backbone of the filling. Finely chopped onions release a sweet, caramelized note when sautéed, while garlic adds a pungent punch that lingers. Together, they create a savory foundation that invites the spices to weave their magic. If you skip this step, the dish loses its depth and becomes a flat, one‑dimensional experience.
Tip: Use a non‑stick skillet and medium heat to avoid burning the onions. A slight browning enhances the sweetness, but over‑sautéing turns them bitter.
The Texture Crew
Phyllo dough is the star of the show—thin, flaky sheets that create the signature crisp layers essential to Egyptian Goulash’s texture. Each sheet should be brushed lightly with melted butter or olive oil to achieve that coveted golden crust. If you’re short on time, pre‑baked phyllo sheets can be used, but fresh sheets give the best mouthfeel.
Choosing the right phyllo is key: look for sheets that are supple, not brittle. A fresh batch will hold together better when you roll it, preventing tears that can compromise the crispness.
The Unexpected Star
Tomato paste is often overlooked but is vital for adding richness, moisture, and a hint of tang to the meat mixture. Its thick, concentrated flavor balances the spices and grounds the filling, ensuring it doesn’t dry out during baking. Skipping it will leave the dish feeling thin and under‑seasoned.
If you’re vegan or have a gluten intolerance, you can substitute tomato paste with a small amount of tomato sauce and a dash of sugar to mimic the same depth.
The Final Flourish
Fresh parsley and cilantro are the finishing touches that elevate the dish from good to unforgettable. Their bright, herbal notes cut through the richness, adding a layer of freshness that lingers on the palate. A handful of each, chopped finely, should be sprinkled over the filling before the final bake.
If you’re allergic to cilantro, simply double the parsley or add a splash of lemon juice to maintain that bright lift.
Everything's prepped? Good. Let's get into the real action...
The Method — Step by Step
- Prep the Filling: Heat a large skillet over medium heat and add a tablespoon of olive oil. Once hot, add the finely chopped onions and sauté until translucent, about 3 minutes. Add the minced garlic and cook for an additional 30 seconds until fragrant. This is the moment your kitchen starts to smell like a bustling market street. Now, stir in the ground meat, breaking it apart with a wooden spoon. Cook until browned all over, about 5–7 minutes, ensuring the meat is fully cooked and any excess moisture has evaporated. Sprinkle in the cumin, cinnamon, paprika, and black pepper; stir to coat the meat evenly. Add the tomato paste, mixing until the meat is evenly coated and the paste is fully integrated. Simmer the mixture for 5 minutes, allowing the spices to meld. Finally, fold in the chopped parsley and cilantro, reserving a handful for garnish. Taste and adjust seasoning with salt, then set the filling aside. This step creates the rich, spicy foundation that will be encased in flaky phyllo.
- Prepare the Phyllo: Lay a sheet of phyllo on a clean, dry surface. Brush it lightly with melted butter or olive oil, covering the surface evenly. Place another sheet on top and repeat the brushing. Continue layering until you have about 12 sheets, ensuring each is well coated. The butter will give the sheets that golden, crisp finish. Let the stacked sheets rest for 5 minutes to allow the butter to seep in, preventing them from cracking during rolling.
- Assemble the Goulash: Spread a generous layer of the meat filling over the bottom of the phyllo stack, leaving a 1‑inch border around the edges to allow for sealing. Carefully roll the phyllo from one side to the other, creating a tight, cylindrical log. The key is to keep the roll snug but not so tight that the filling squeezes out. Once rolled, place the log seam‑side down in a lightly greased baking dish. Repeat with the remaining sheets and filling if you’re making a larger batch. The rolling process is where the dish’s structure is defined, so take your time and press firmly to seal the edges.
- Seal the Edges: Use a small amount of beaten egg or water to moisten the phyllo edges. Gently press them together to seal the roll, preventing the filling from spilling during baking. This step is crucial—if the seal is loose, the meat will leak out, ruining the presentation and texture. A tight seal ensures each bite is a perfect bite of flaky pastry and savory filling.
- Final Touches: Brush the top of each rolled log with a little more melted butter or olive oil, ensuring a glossy finish. Sprinkle the reserved parsley and cilantro over the top for a burst of color. The aroma of the herbs will mingle with the sizzling filling, creating a sensory symphony.
- Bake: Preheat your oven to 375°F (190°C). Place the baking dish in the oven and bake for 25–30 minutes, or until the phyllo turns a deep golden brown and the filling is bubbling. The internal temperature of the meat should reach at least 165°F (74°C). Keep an eye on the edges; if they start to brown too quickly, tent the dish with aluminum foil to prevent burning.
- Rest: Once baked, remove the dish from the oven and let it rest for 5 minutes. This allows the juices to redistribute, ensuring each bite is moist and flavorful. The rest period also lets the phyllo set, making slicing easier.
- Slicing & Serving: Using a sharp knife, slice the rolls into 1‑inch thick rounds. Arrange them on a platter, drizzle with a light drizzle of olive oil if desired, and serve hot. The contrast of the crisp phyllo against the tender, spiced filling is a treat for both the eyes and the palate.
That’s it — you did it. But hold on, I've got a few more tricks that'll take this to another level...
Insider Tricks for Flawless Results
The Temperature Rule Nobody Follows
Many cooks bake at 400°F, but this can scorch the phyllo before the filling cooks through. I’ve found that baking at 375°F gives a more even cook, allowing the phyllo to crisp without burning while the meat reaches the perfect internal temperature. Keep your oven rack in the center to ensure even heat distribution.
Why Your Nose Knows Best
Before you start the final bake, give the dish a quick sniff. If you detect a hint of burnt butter, the oven might be too hot. The scent of fresh herbs and spices should dominate. Trust your nose; it’s a reliable gauge for the dish’s readiness.
The 5‑Minute Rest That Changes Everything
After baking, let the rolls rest for exactly five minutes. This brief pause allows the juices to settle, preventing a watery bite and ensuring the phyllo remains crisp. Skipping this step often results in a soggy center.
Layering for Visual Appeal
When assembling, alternate the direction of each roll. For example, if you rolled the first one from left to right, roll the next from right to left. This creates a visually striking pattern when sliced, making the dish look as good as it tastes.
The Secret to Flaky Phyllo
If you’re using frozen phyllo, thaw it in a plastic bag at room temperature for 15 minutes. This prevents the sheets from tearing when you brush them. Also, keep a damp towel nearby; if the phyllo dries out, lightly mist it to keep it pliable.
Keep the Heat Even
Place a baking stone or a thick baking sheet in the oven while it preheats. This ensures a steady, even heat source, preventing hot spots that could cause uneven browning.
Creative Twists and Variations
This recipe is a playground. Here are some of my favorite ways to switch things up:
Lamb Goulash Twist
Swap the ground beef for ground lamb to introduce a richer, slightly gamey flavor. The lamb pairs beautifully with the cinnamon and paprika, creating a more robust taste profile. This version is perfect for a special dinner or when you’re craving a deeper, more earthy flavor.
Chicken & Sweet Potato Fusion
Use ground chicken and add diced sweet potatoes to the filling. The sweetness of the potatoes balances the spices, giving the dish a comforting, autumnal vibe. This variation works well for a lighter, yet still hearty, meal.
Vegetarian Phyllo Rolls
Replace the meat with a mixture of finely chopped mushrooms, lentils, and diced zucchini. The mushrooms provide umami, while the lentils add protein. This version is a satisfying plant‑based alternative that still delivers the iconic phyllo crunch.
Spicy Chili Kick
Add a handful of finely chopped fresh chilies or a teaspoon of chili flakes to the meat mixture. The heat will complement the cumin and paprika, giving the dish a fiery edge. Ideal for those who like their food with a punch.
Herb‑Infused Variations
Replace the parsley and cilantro with fresh dill or mint for a different herbal note. Each herb brings a unique brightness that can transform the flavor profile, making the dish feel new and exciting.
Citrus Zest Finish
Finish the rolls with a drizzle of fresh lemon or orange zest. The citrus adds a bright, refreshing contrast to the savory filling, making the dish feel lighter and more vibrant.
Storing and Bringing It Back to Life
Fridge Storage
Store the baked rolls in an airtight container in the refrigerator for up to 3 days. Before reheating, let them sit at room temperature for 15 minutes to reduce condensation. When you’re ready to serve, reheat in a 350°F (175°C) oven for 10 minutes or until warmed through. The phyllo will stay crisp, and the filling will be juicy.
Freezer Friendly
Wrap each roll tightly in parchment paper, then place in a freezer bag. They will keep for up to 3 months. To reheat, thaw overnight in the refrigerator, then bake at 350°F (175°C) for 15–20 minutes. The phyllo may soften slightly, but the filling remains flavorful.
Best Reheating Method
The key to a great reheated roll is to add a splash of water to the bottom of the baking dish before reheating. This creates steam, helping the phyllo stay moist and preventing it from drying out. Cover the dish with foil to trap the steam and keep the heat concentrated.