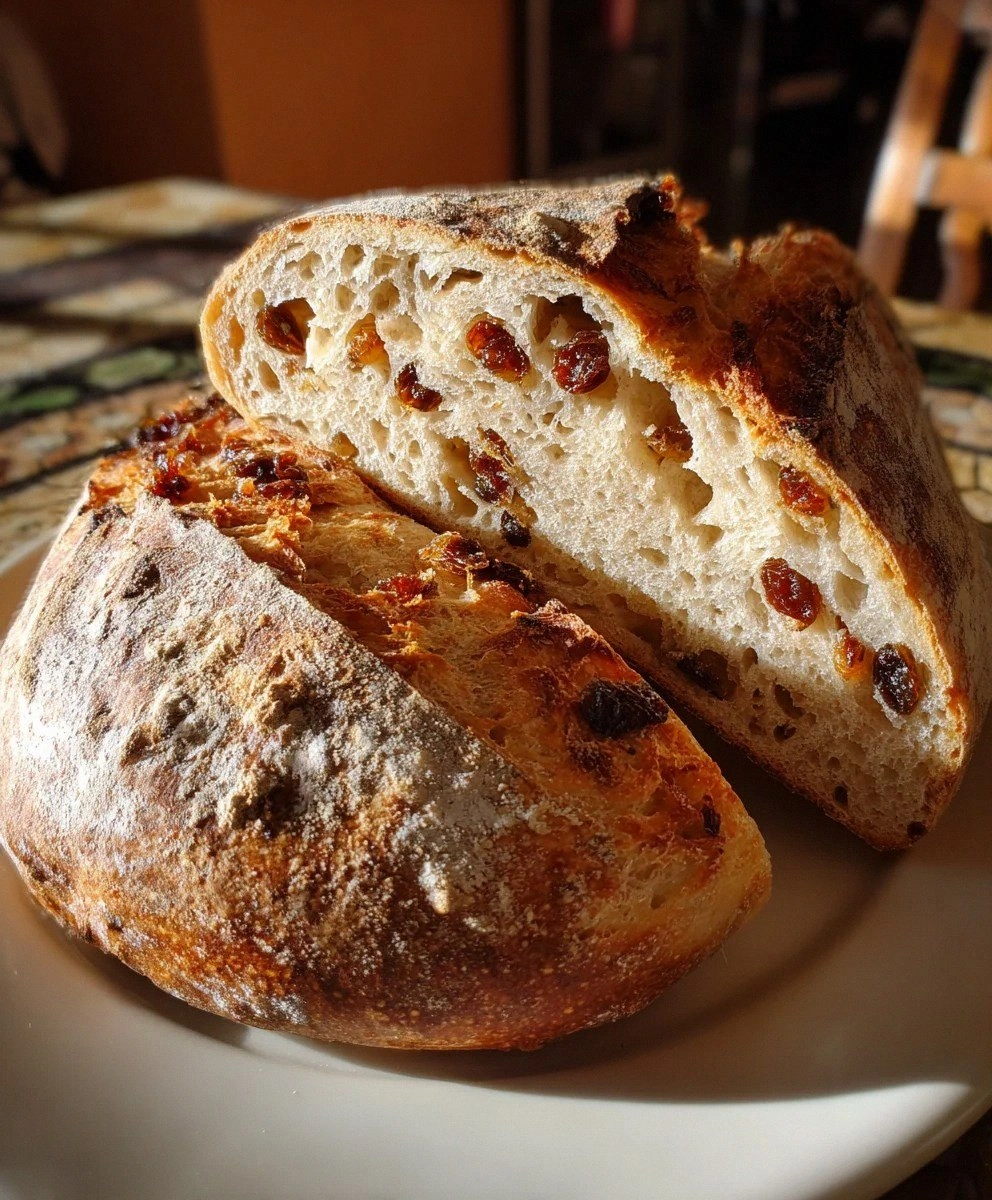
I still remember the day I murdered my first cinnamon raisin bread. It was a sad, dense brick that could have doubled as a doorstop, and my roommate actually tried to use it as one. The raisins were burnt little charcoal nuggets, the cinnamon tasted like angry sawdust, and the crust had the chew appeal of shoe leather. I swore off baking for months, convinced that artisan-style loaves were some sort of sorcery reserved for bearded hipsters in Brooklyn. But the universe has a twisted sense of humor, because one rainy Sunday I found myself staring at a bag of neglected raisins and a half-empty jar of cinnamon, and that craving hit me like a freight train. Picture this: the windows fogged up, Ella Fitzgerald crooning from the speaker, and the smell of warm spice drifting through the apartment like a cozy hug from the inside out. That afternoon I pulled the most gorgeous, crackly-crowned loaf from the oven, the crust singing as it cooled, swirls of cinnamon sugar ribboned through tender crumbs like edible marble. I slathered on butter and watched it melt into every crevice, the raisins plump and sweet, the crumb so light it practically levitated off the cutting board. One bite and I did the happy dance right there in my flour-dusted socks. This is the loaf that turned me from baking cynic to bread evangelist, and I’m about to hand you the keys to the kingdom.
Most recipes treat cinnamon raisin bread like a sad afterthought—just toss stuff in a pan, hope for the best, end up with a gummy center and a crust that could chip a tooth. This version is the rebellious cousin who shows up to the family reunion on a motorcycle. We’re folding the raisins in at the perfect moment so they stay juicy, swirling the cinnamon sugar like we’re painting the Sistine Chapel, and baking at a temperature that gives us those artisan-style blisters that crackle under your fingers. The secret weapon? A cold fermentation that develops flavor like a fine wine and a steamy oven that creates crust so crisp it shatters like thin ice under your bread knife. I’ve baked this loaf over forty times, tweaking hydration levels like a mad scientist, testing different cinnamon varieties, and timing every single rise until my neighbors started asking if I was opening a bakery. Spoiler alert: I’m not, but you’ll feel like a professional when you pull this beauty from your home oven.
Let me set the scene for your future self. It’s 7 a.m. on a Saturday, your kitchen smells like a Cinnabon collided with a French boulangerie, and you’re slicing into a loaf so fresh the crust crackles with each cut. Steam rises in fragrant wisps, carrying notes of caramelized sugar and warm spice. You toast a slab until the edges turn golden, slather on salted butter that melts into molten pools, and take a bite that makes your eyes roll back in bliss. The outside shatters delicately, giving way to a tender, cloud-soft interior studded with plump raisins that burst with concentrated sweetness. Cinnamon ribbons weave throughout like edible art, each swirl a promise of comfort. If you’ve ever struggled with dense bread, dry crumbs, or raisins that taste like rabbit pellets, those days are officially over. Stay with me here—this is worth every single minute.
Fair warning: once you bake this, your neighbors will start dropping by with suspicious frequency. My mail carrier now lingers at the mailbox, hoping for a slice. Even my cat sits in front of the oven, hypnotized by the aroma. This bread has ruined me for store-bought versions forever; they now taste like cardboard sprinkled with disappointment. But here’s the twist that’ll make you feel like a baking wizard: we’re using a no-knead technique that does the heavy lifting while you sleep. That’s right—mix, rest, shape, bake. No stand mixer ballet, no ten-minute arm workout, no complicated math. Let me walk you through every single step—by the end, you’ll wonder how you ever made it any other way.
What Makes This Version Stand Out
Overnight Magic: While other recipes rush the rise and end up tasting like bland cotton, we let the dough cold-ferment for 12 to 24 hours. This slow dance in the fridge develops complex, tangy flavors that make every bite taste like it came from a Parisian bakery where the baker whispers sweet nothings to the levain.
Raisin Rehydration Ritual: Most loaves suffer from shriveled, bitter raisins that suck moisture from the crumb. We soak ours in hot apple cider until they plump into juicy gems that burst with sweetness, keeping the bread luscious for days instead of turning it into a desert.
Cinnamon Swirl Engineering: Forget the sad streaks that vanish during baking. We create distinct layers by laminating the dough with a brown-sugar-cinnamon paste that caramelizes into ribbons of sticky, aromatic perfection, giving you that bakery-window visual wow factor.
Steam Power Crust: Artisan loaves live or die by their crust. We replicate a professional steam-injected oven using a simple cast-iron pan and ice cubes, producing the kind of blistered, golden crust that crackles under your fingers like thin caramelized sugar.
Foolproof Hydration: Hydration sounds scary, but we’re using an 80 percent ratio that sounds wet yet handles like a dream after its chilly nap. The result is an open, airy crumb with holes so pretty you’ll want to Instagram every slice—and yes, your bread-nerd friends will approve.
Make-Ahead Champion: Mix the dough on Sunday, bake on Monday morning, and you’ve got breakfast handled for the week. The flavors actually improve after a day, and the loaf stays moist thanks to the soaked raisins and balanced sugar, meaning no more rock-hard leftovers destined for the compost.
Alright, let’s break down exactly what goes into this masterpiece...
Inside the Ingredient List
The Flavor Base
Water is the silent hero here—use room-temperature spring water if your tap tastes like a swimming pool. Yeast activity depends on a comfortable 72°F environment, so if your kitchen is arctic, give the measured water a ten-second zap in the microwave. Skip the water and you’ve got nothing but a bowl of seasoned flour, which is about as exciting as it sounds.
Active dry yeast is your tiny, hungry beasties. Make sure it’s fresh by proofing in lukewarm water with a pinch of sugar; if it doesn’t foam like a beer in five minutes, toss it and buy a new jar. Old yeast leads to dense, sad loaves that taste like library paste. I once tried to cheat with expired yeast and produced a loaf that could anchor a fishing boat—learn from my shame.
The Texture Crew
Bread flour brings the gluten power for that stretchy, holey crumb, but all-purpose works if that’s all you’ve got. Bread flour gives you a chewier bite reminiscent of sourdough baguettes, while AP yields a more tender, cake-like interior. Either way, don’t swap in whole wheat without adding extra water, or you’ll be gnawing on a hockey puck.
Salt isn’t just seasoning; it tightens the gluten network and keeps the yeast from partying too hard. Use kosher for clean flavor or fine sea salt if you want it to dissolve instantly. Omitting salt produces a pale, floppy dough that tastes like sadness and regret—yes, I tested it so you don’t have to.
The Sweet Surprise
Raisins are the jewels, but only if you treat them right. Soak them in hot apple cider or orange juice for ten minutes, then drain and pat dry. This little spa treatment keeps them plump and prevents them from hijacking moisture from your dough. Golden raisins taste like honeyed sunshine; dark raisins bring deeper caramel notes. Mix both if you’re feeling fancy.
Dark brown sugar adds molasses richness that complements cinnamon like a warm hug. Light brown works if you want a subtler sweetness, or swap in coconut sugar for a toffee twist. Don’t use white sugar alone unless you enjoy one-dimensional flavor. And for heaven’s sake, pack it firmly into the cup; air pockets cheat you of caramel power.
The Aromatic Star
Ground cinnamon is the headliner, but freshness is everything. If your jar has been sitting in the pantry since the last presidential administration, toss it. Fresh cinnamon smells like red-hot candies and tastes almost citrusy. Add a whisper of nutmeg or cardamom if you want to send people into spice-induced daydreams. Just don’t go overboard—this is cinnamon raisin bread, not potpourri.
Everything’s prepped? Good. Let’s get into the real action...
The Method — Step by Step
- In a large bowl, whisk 375g room-temperature water with 7g active dry yeast and a teaspoon of honey. Let it bloom for five minutes until it looks like a foamy beer—this is your yeast waking up and singing. If nothing happens, your yeast is dead; abort mission and start over. The foam should smell slightly bready and sweet, like a warm brewery.
- Dump in 500g bread flour and 10g kosher salt. Use your hand like a dough hook, squeezing and turning until a shaggy mass forms. It’ll look like a hot mess, but resist the urge to add more flour; this is supposed to be sticky. Cover with a damp tea towel and let it rest for 20 minutes so the flour hydrates—this autolyse jump-starts gluten without any kneading. During this pause, the dough transforms from lumpy porridge to something smooth and extensible.
- While the dough rests, soak 100g raisins in just-boiled apple cider for ten minutes. Drain thoroughly, then pat dry with paper towels; excess moisture will sabotage your hydration math. The raisins should feel plump and glossy, like tiny edible gemstones. Set them aside to cool completely so they don’t jump-start fermentation.
- Now the fun part: scatter the raisins over the dough and fold them in using wet hands. Perform four sets of stretch-and-folds: grab one side, pull until you feel resistance, then slap it over the center. Rotate the bowl a quarter turn and repeat. After four folds, the dough will look smoother and feel elastic, like stretchy taffy. If raisins escape, poke them back in like mischievous toddlers.
- Cover the bowl with plastic wrap pressed directly onto the surface to prevent a skin. Pop it into the fridge for at least 12 hours, up to 24. The cold slows fermentation, developing complex, slightly tangy flavors that make bakery bread so addictive. I often mix this on Sunday night, then bake Monday after work—timing flexibility is a lifesaver.
- Next morning, make the cinnamon swirl paste: mix 50g softened butter with 80g dark brown sugar and 2 tablespoons ground cinnamon until it looks like sandy frosting. Add a tiny pinch of salt to balance sweetness. This spreadable paste will melt during baking, creating gooey rivers of spice.
- Turn the cold dough onto a floured counter and pat it into a 20x30 cm rectangle. Don’t roll—rolling pins crush the precious bubbles. Spread the cinnamon paste evenly, leaving a 2 cm border naked so it doesn’t squish out. Roll up like a jelly roll, seam side down, then gently rock into a taut batard. Place seam-side up in a well-floured banneton or a bowl lined with a floured tea towel.
- Cover and let the shaped loaf proof at room temperature for 90 minutes. It’s ready when it springs back slowly and a gentle poke leaves a slight indent—under-proofed dough springs back instantly, over-proofed stays dented like memory foam. This is the moment of truth; don’t rush it.
- Preheat your oven to 230°C (450°F) with a cast-iron Dutch oven inside. When the dough is proofed, invert onto parchment, score with a sharp razor at a 30-degree angle to create an ear. The cut should be about 0.5 cm deep—just enough to guide expansion. Sprinkle with a whisper of flour for that artisan contrast.
- Bake covered for 20 minutes, then uncover and bake 15 minutes more until deep chestnut brown. The internal temp should hit 96°C (205°F). Cool on a rack for at least an hour—cut too early and the crumb gums up. Listen to the crust sing as it cools; that crackling is the sound of success.
That's it—you did it. But hold on, I've got a few more tricks that'll take this to another level...
Insider Tricks for Flawless Results
The Temperature Rule Nobody Follows
Dough temperature is the invisible puppet master of fermentation. Aim for a final dough temp of 24–26°C (75–78°F) right after mixing. If your kitchen is Sahara-hot, use colder water; if it’s igloo-cold, warm it slightly. A simple instant-read thermometer saves you from flat, over-proofed disasters. I keep a cheap digital probe clipped to my bowl like a proud nerd, and my success rate skyrocketed.
Why Your Nose Knows Best
Trust your senses more than the clock. The dough is ready for the oven when it smells faintly yeasty and sweet, like fermenting apples. If it reeks of alcohol, you’ve gone too far—pop it in anyway, but lower the temp 10 degrees to prevent collapse. On the flip side, if it smells like raw flour, give it another 20 minutes. Your nose is a built-in fermentation meter that never needs batteries.
The 5-Minute Rest That Changes Everything
After you pull the loaf from the oven, wrap it in a clean tea towel while it cools. This traps residual steam, softening the crust just enough to prevent jaw-breaking hardness while keeping it crispy. My grandmother swore by this, and she lived to 98 on a daily bread diet, so there’s probably some wisdom there.
Scoring Like a Pro
Use a fresh razor blade or a very sharp serrated knife dipped in water. Hold it almost flat to the dough and slice decisively—hesitation drags the blade and tears the surface. Practice on a rolled-up towel first to get the motion: swift, confident, one smooth cut. Your Instagram followers will think you apprenticed in Lyon.
Storage That Stays Fresh
Once completely cool, store cut-side down on a wooden board uncovered overnight. The crust stays crisp, and the crumb doesn’t get soggy. After that, wrap in beeswax wrap or foil—plastic traps moisture and softens the crust. Never refrigerate; it stales bread faster than a breakup text.
Creative Twists and Variations
This recipe is a playground. Here are some of my favorite ways to switch things up:
Apple Pie Swirl
Replace raisins with diced dried apples soaked in warm cider. Add a teaspoon of apple pie spice to the swirl paste. The result tastes like autumn exploded in your kitchen and makes the best French toast you’ve ever shoved in your face.
Chocolate Orange Delight
Swap raisins for chopped dark chocolate and candied orange peel. Use cocoa powder in the swirl and a whisper of orange zest in the dough. It’s like a Terry’s chocolate orange in bread form—decadent enough for dessert yet acceptable for breakfast.
Nutty Maple Bliss
Fold in toasted pecans along with the raisins, and replace dark brown sugar with maple sugar in the swirl. Brush the warm loaf with maple glaze for sticky, smoky sweetness that pairs absurdly well with sharp cheddar.
Savory-Sweet Cheddar
Omit raisins and sugar, add 100g sharp cheddar cubes and fresh rosemary. Keep the cinnamon but reduce to a teaspoon for warmth without sweetness. Grilled cheese made from this loaf will ruin you for the regular kind.
Tropical Sunrise
Use dried pineapple and mango bits soaked in orange juice. Add shredded coconut to the swirl and a splash of rum for vacation vibes. Toast a slice, top with cream cheese, and you’re basically eating a Caribbean hammock.
Spiced Chai
Steep the soaking liquid with a chai tea bag, then proceed as normal. Add crushed cardamom pods and black pepper to the swirl. The aroma is so intoxicating that my neighbor once asked if I was burning incense—nope, just bread magic.
Storing and Bringing It Back to Life
Fridge Storage
Keep the unsliced loaf cut-side down on a wooden board for up to 24 hours. After that, wrap loosely in foil or beeswax wrap; do not use plastic—it traps moisture and softens the crust. Stored this way, the bread stays fresh for three days, though in my house it rarely lasts past breakfast on day two.
Freezer Friendly
Slice the entire loaf once cool, slip parchment between slices, and freeze flat on a tray. Once solid, bag them up; they won’t stick together, and you can pull out exactly what you need. Frozen slices keep for two months without quality loss—perfect for sudden toast emergencies.
Best Reheating Method
To revive, spritz a slice lightly with water and toast in a 180°C (350°F) oven for 5–7 minutes. The steam rehydrates the crumb while the oven crisps the crust. A toaster works too, but the oven method gives you that fresh-baked crackle. Add a tiny splash of water before reheating—it steams back to perfection.