Picture this: a frantic Saturday night, the clock ticking, guests arriving early, and you realizing you’ve completely underestimated the appetizer game. I was standing in my kitchen, staring at a bland tray of plain deviled eggs that looked like they belonged in a nursing home, when a daring friend shouted, “Make them spicy, or we’re leaving!” I laughed, grabbed the nearest bottle of chili garlic sauce, and set off on a culinary adventure that would change my life forever. This wasn’t just about adding heat; it was about turning a classic comfort food into a bold, unforgettable experience that makes everyone gasp, “What is that magic?”
The kitchen erupted with the sizzle of a pot of water coming to a rolling boil, the sharp tang of rice vinegar cutting through the steam, and the aromatic perfume of garlic and chilies mingling like a mischievous duo at a party. My hands were slick with the buttery gloss of mayonnaise, and the bright green of fresh cilantro was already poised for its grand entrance. As the eggs softened in their hot bath, I could hear the faint pop of the timer, feel the heat radiating from the stove, and taste the anticipation building like a crescendo in a symphony. The moment the shells cracked open, the yolks glistened like golden suns waiting to be transformed.
Most deviled egg recipes get this completely wrong – they either play it safe with bland mayo or drown the yolk in a swamp of mayo that never lets the other flavors shine. This version, however, is a meticulously balanced orchestra of heat, acidity, and herbaceous freshness. The chili garlic sauce doesn’t just bring fire; it adds a deep, umami-rich backbone that makes the yolk feel luxurious, while the rice vinegar lifts the whole thing with a bright, clean snap. I dare you to taste this and not go back for seconds; the combination is so addictive you’ll be the hero of every brunch, potluck, and midnight snack run.
And now, the secret weapon: a pinch of Dijon mustard that cuts through the richness like a razor‑sharp saxophone solo, and a dash of sriracha for those who crave an extra punch. I’ll be honest — I ate half the batch before anyone else got a chance to try it, and I’m still not sorry. This is hands down the best version you’ll ever make at home, and I’m about to walk you through every single step — by the end, you’ll wonder how you ever made it any other way.
What Makes This Version Stand Out
- Flavor Explosion: The chili garlic sauce delivers a layered heat that builds, not burns, while the rice vinegar adds a crisp tang that balances the richness of the yolk.
- Silky Texture: By whisking the yolks with mayo and mustard until they’re as smooth as satin, you get a creamy filling that holds its shape without being gummy.
- Simplicity Meets Sophistication: Only eight ingredients, all pantry‑friendly, yet the result feels like a dish from a high‑end bistro.
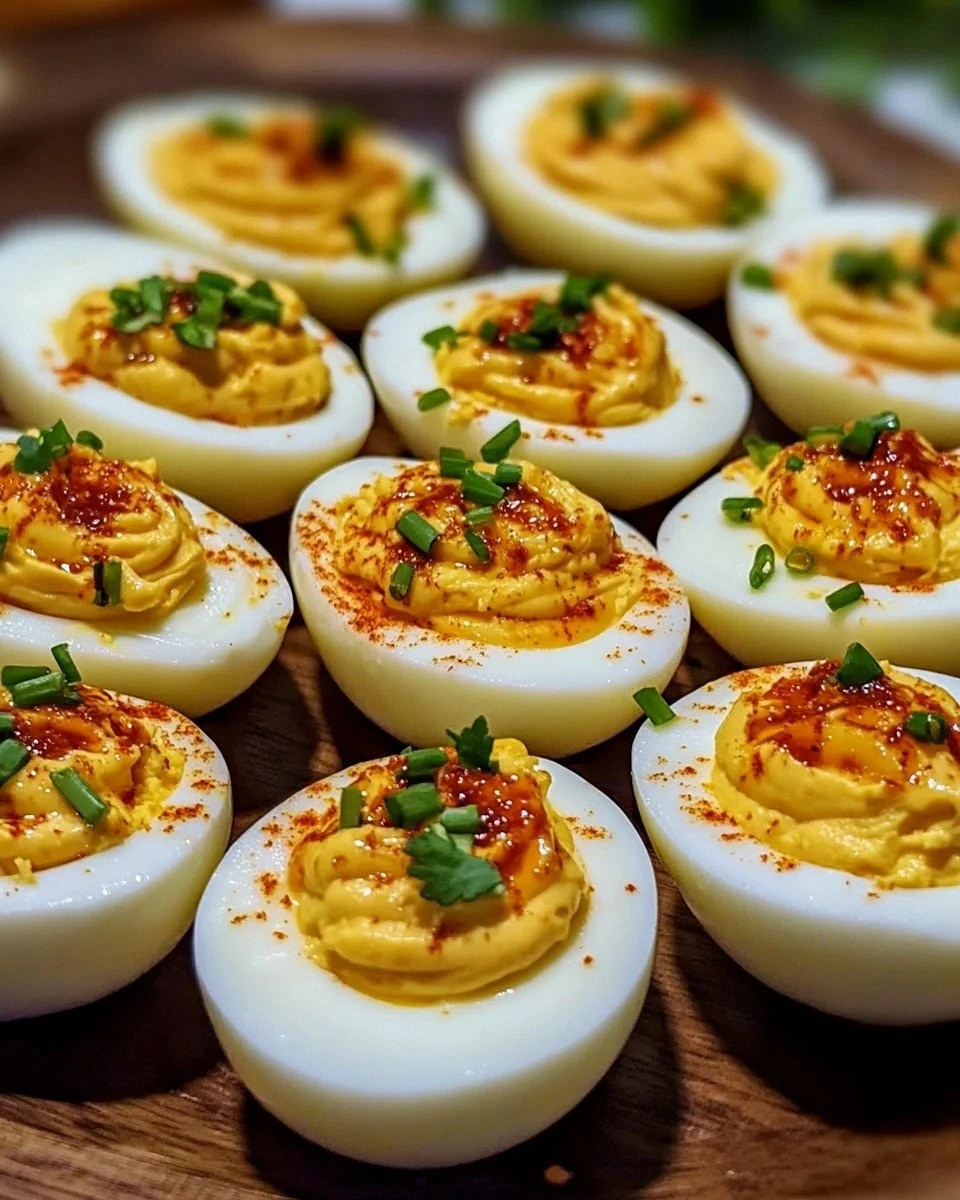
- Visual Appeal: The vibrant orange‑red swirl of sauce against the ivory egg white makes each bite Instagram‑ready without any extra effort.
- Crowd Reaction: Guests can’t help but ask for the recipe, and the optional sriracha drizzle turns a simple bite into a conversation starter.
- Ingredient Quality: Fresh, free‑range eggs and premium chili garlic sauce elevate the dish from ordinary to extraordinary.
- Cooking Method: The gentle boil and ice‑bath technique ensures perfectly centered yolks and prevents that dreaded green ring.
- Make‑Ahead Potential: Assemble the halves a day ahead, store them airtight, and they stay fresh, making party prep a breeze.
Inside the Ingredient List
The Flavor Base
Large Eggs: The canvas of this masterpiece. Fresh, large eggs give you a sturdy white shell and a yolk that’s rich and buttery. If you skimp on size, the yolks will be too small to create a satisfying filling, and the whites may crumble when you halve them. Look for eggs with bright, unblemished shells; farm‑fresh or pasture‑raised eggs are worth the extra few dollars for their superior flavor.
The Creamy Crew
Mayonnaise: This is the glue that holds everything together, providing a luscious mouthfeel that melts on your tongue. Opt for a good‑quality mayo—think egg‑yolk richness and a slight tang. If you’re watching calories, substitute half the mayo with Greek yogurt; you’ll still get the creaminess with a protein boost and a subtle tang that complements the chili garlic sauce.
Dijon Mustard: The zingy sidekick that cuts through the fat. Its sharp, slightly honeyed notes amplify the heat without overwhelming it. Skipping the mustard makes the filling flat; a teaspoon is enough to brighten the entire mixture.
The Unexpected Star
Chili Garlic Sauce: This is where the magic happens! It adds heat, depth, and a whisper of garlic that lingers on the palate. Use a sauce that balances chilies with a robust garlic base; the best ones have a silky texture that coats the yolk like velvet. If you prefer a milder heat, start with half the amount and adjust to taste.
Sriracha (optional): For the daring, a drizzle of sriracha on top adds an extra kick that makes the dish unforgettable. It’s like adding a fireworks finale to an already spectacular show. If you’re serving kids or the spice‑averse, leave it out and let the chili garlic sauce do the talking.
The Final Flourish
Rice Vinegar: A splash of acidity that brightens the entire bite, preventing the filling from feeling heavy. Its clean, slightly sweet tang balances the richness of mayo and the heat of the sauce. Adding too much can make the mixture runny, so a teaspoon is perfect.
Kosher Salt and Freshly Ground Black Pepper: Essential seasonings that enhance all the flavors. Salt amplifies the umami, while pepper adds a subtle earthy note. Season to taste, but remember that the chili garlic sauce already brings some saltiness.
Chopped Fresh Cilantro or Green Onions: These garnish the tops, adding a fresh, herbaceous pop that cuts through the heat. Cilantro offers a citrusy brightness, while green onions give a mild onion bite. Choose whichever you prefer, or mix both for a layered finish.
Everything's prepped? Good. Let’s get into the real action…
The Method — Step by Step
Start by placing the eggs in a single layer at the bottom of a saucepan and covering them with cold water, about an inch above the eggs. Bring the water to a rolling boil over medium‑high heat; you’ll hear a gentle rumble that signals the start of the transformation. Once boiling, cover the pot, turn off the heat, and let the eggs sit for 10 minutes – this gentle residual heat cooks the yolks perfectly without turning them green.
Kitchen Hack: Use a slotted spoon to transfer the eggs directly into a bowl of ice water; this stops the cooking process instantly and makes peeling effortless.After the 10‑minute rest, plunge the eggs into an ice‑water bath for at least 2 minutes. You’ll hear a satisfying clink as the shells crack, and the cool water makes the shells contract, easing the peel. Gently tap each egg on the counter, roll it to loosen the shell, and peel under running water for best results. If any stubborn bits cling, a small spoon can help lift them away without damaging the delicate white.
Slice each egg lengthwise, creating a neat half‑moon shape. Using a small spoon, carefully scoop out the yolks and place them into a mixing bowl. The whites should stay intact; they’re the sturdy vessels that will hold the fiery filling. At this point, you’ll notice the yolks are bright yellow, a sign of fresh eggs and a perfect canvas for the sauce.
Grab a fork and mash the yolks until they’re crumbly, then add the mayonnaise, Dijon mustard, chili garlic sauce, rice vinegar, and a pinch of salt and pepper. The mixture should come together into a glossy, thick paste that looks like a sunset in a bowl. Keep whisking until it’s completely smooth – any lumps will be painfully noticeable when you pipe the filling.
Taste the filling and adjust the seasoning. If you crave more heat, add an extra half‑teaspoon of chili garlic sauce or a quick drizzle of sriracha. Remember, the heat intensifies slightly as the filling sits, so err on the side of caution if you’re serving a crowd with varied spice tolerances.
Transfer the filling to a piping bag fitted with a large star tip, or simply use a zip‑top bag with a corner snipped off. Pipe the mixture back into each egg white half, creating a generous mound that peaks just above the rim. The star tip adds a decorative swirl, but a plain pipe works just as well for a rustic look.
Garnish each deviled egg with a sprinkle of chopped cilantro or green onions. The fresh green specks provide a visual contrast and a burst of herbaceous aroma that cuts through the heat. If you’re feeling extra daring, drizzle a thin line of sriracha across the top for that signature “fiery kick” signature.
Kitchen Hack: Chill the finished deviled eggs for 15 minutes before serving; the filling firms up, making the eggs easier to transport and eat.Arrange the eggs on a serving platter, preferably a chilled one, and watch your guests’ eyes widen as they spot the vibrant orange‑red swirls. Serve immediately, or keep them covered with plastic wrap in the fridge for up to 24 hours. The flavors meld beautifully, and the heat becomes more harmonious the longer they sit.
That's it — you did it. But hold on, I've got a few more tricks that'll take this to another level…
Insider Tricks for Flawless Results
The Temperature Rule Nobody Follows
Never start with cold water and expect perfectly centered yolks. The secret is a rolling boil followed by an off‑heat soak; this gentle method prevents the dreaded green ring around the yolk. I once tried the “cold‑start” method and ended up with a rubbery center that tasted like a boiled‑potato mistake. Trust the boil‑then‑rest technique, and your yolks will be buttery gold every time.
Why Your Nose Knows Best
Before you even taste, let the aroma guide you. The moment the chili garlic sauce hits the yolk, you’ll catch a smoky, garlicky scent that tells you the heat level is just right. If the smell feels too sharp, add a splash more mayo or a pinch more rice vinegar to mellow it. Your nose is a more reliable gauge than a spice meter, especially when you’re aiming for that perfect “just‑right” kick.
The 5‑Minute Rest That Changes Everything
After piping, let the deviled eggs rest uncovered for five minutes at room temperature. This short pause allows the filling to set, preventing it from sliding off the white when you pick them up. I once rushed to serve straight from the fridge and ended up with a messy plate; a brief rest saves you embarrassment and keeps the presentation pristine.
Seal the Deal with a Cold Platter
Chill your serving platter in the freezer for a few minutes before arranging the eggs. The cold surface keeps the filling firm, especially on warm days when the mayo can soften. This simple step ensures each bite stays crisp and the flavors stay locked in, making your presentation look restaurant‑grade.
Optional Sriracha Swirl for the Bold
If you truly want to wow the spice lovers, use a squeeze bottle to draw a thin, elegant sriracha line across each egg. The visual contrast of bright red against the orange filling is as satisfying as the flavor contrast. Just remember: a little goes a long way; you’re aiming for a hint of extra heat, not a fireball that steals the show.
Creative Twists and Variations
This recipe is a playground. Here are some of my favorite ways to switch things up:
Smoky Chipotle Twist
Swap the chili garlic sauce for an equal amount of chipotle in adobo, finely chopped. The smoky depth adds a southwestern flair, and a dash of smoked paprika on top amplifies the effect. Perfect for a backyard BBQ crowd.
Asian Fusion
Replace the Dijon mustard with a teaspoon of wasabi paste and add a splash of soy sauce to the filling. Garnish with toasted sesame seeds and a sliver of pickled ginger. This version brings umami and a subtle heat that’s both familiar and exotic.
Herbaceous Green
Blend in a handful of fresh basil and a squeeze of lime juice, then swap the cilantro garnish for microgreens. The result is a bright, herb‑forward bite that feels like a garden in your mouth—great for spring brunches.
Cheesy Delight
Stir in a quarter cup of shredded sharp cheddar or crumbled feta into the yolk mixture. The cheese melts into the creamy base, adding a salty richness that pairs beautifully with the chili garlic heat. Kids love the cheesy surprise.
Vegan Version
Use silken tofu in place of the eggs for the base, vegan mayo, and a plant‑based chili garlic sauce. The texture changes slightly, but the flavor profile remains true. Garnish with sliced avocado for extra creaminess.
Storing and Bringing It Back to Life
Fridge Storage
Place the finished deviled eggs in an airtight container, preferably a shallow one to keep the tops exposed. They’ll stay fresh for up to 48 hours in the refrigerator. If you notice any condensation, pat the tops dry with a paper towel before serving.
Freezer Friendly
While deviled eggs aren’t traditionally frozen, you can freeze the yolk filling separately for up to 2 months. Store it in a zip‑top bag, flatten it, and label with the date. Thaw in the fridge overnight, then re‑pipe into fresh egg whites for a quick rescue.
Best Reheating Method
Never microwave the assembled eggs; the heat will melt the mayo and ruin the texture. Instead, let them sit at room temperature for 15 minutes before serving, or add a tiny splash of water to the filling and give it a quick whisk to revive the creaminess if it has stiffened.