Picture this: I’m standing in my kitchen, the timer on the oven blinking red like a warning light, and a half‑eaten bag of vanilla wafers sprawled across the counter. I’d just attempted a “quick” apple dessert that ended up looking like a soggy mess of fruit and crumbs, and I swore off apple recipes for good. Then a friend dared me to turn that disaster into something that would make even the most skeptical sweet‑tooth swoon. I accepted the challenge, grabbed a fresh batch of crisp apples, and set out to create what I now know is the ultimate handheld caramel‑apple indulgence. This was no ordinary after‑dinner treat; it was a mission to combine the comforting warmth of cinnamon‑spiced apples with a luxuriously smooth caramel‑vanilla mousse, all tucked into a buttery wafer crust that crunches like a fresh‑baked cookie.
The moment the apples hit the pan, the kitchen filled with a perfume that could coax a smile from anyone within a ten‑foot radius. The scent of caramel bubbling, mingling with the earthy spice of cinnamon, was like a warm hug on a chilly autumn evening. I could hear the faint hiss as the sugar caramelized, a sound that promised sweet, golden goodness. My fingertips tingled as the butter melted into the vanilla wafer crumbs, creating a crust that felt like it was made of tiny, buttery clouds. When I finally lifted the first caramel‑apple cup out of the oven, the steam rose in a delicate veil, and the first bite was a revelation: a crisp crust giving way to molten caramel, tart apple, and a mousse that was as airy as a cloud yet rich enough to satisfy any dessert craving.
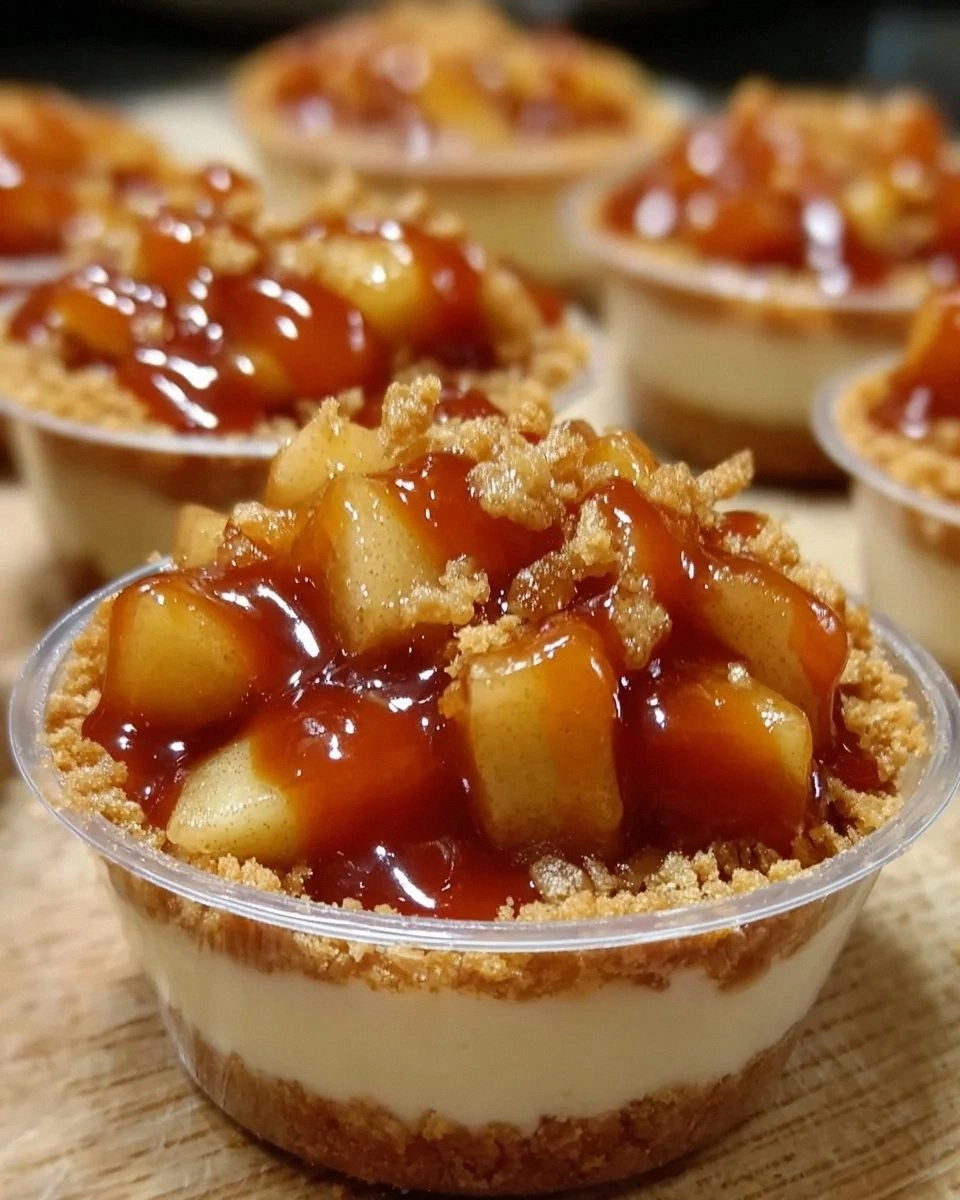
Most recipes out there either drown the apples in a syrupy swamp or skimp on the creamy topping, leaving you with a one‑note treat. This version flips the script by layering textures and flavors so deliberately that each mouthful feels like a mini celebration. The secret? A few unexpected moves: using instant vanilla pudding powder to create a mousse that sets perfectly without an ice bath, and a quick flash‑bake of the wafer crust that locks in a buttery crunch. I also swapped out ordinary brown sugar for light brown sugar, letting the caramel notes shine without becoming overly heavy. The result is a dessert that’s simultaneously crisp, creamy, and caramel‑kissed, a trifecta that most home cooks never achieve on the first try.
Let me walk you through every single step — by the end, you’ll wonder how you ever made caramel apples any other way. I dare you to taste this and not go back for seconds. Ready? Okay, ready for the game‑changer?
What Makes This Version Stand Out
- Flavor Fusion: The combination of tart apples, sweet caramel, and a vanilla‑infused mousse creates a balanced taste that dances on the palate without overwhelming any single note.
- Texture Symphony: You get a crunchy wafer crust, a soft apple compote, and a light mousse—all in one bite, delivering contrast that most desserts lack.
- Simplicity Meets Sophistication: Despite the gourmet feel, the recipe uses pantry staples and a few clever shortcuts that keep prep time under an hour.
- Ingredient Quality: Using fresh, firm apples and high‑quality salted caramel sauce makes the difference between “good” and “hands down the best version you’ll ever make at home.”
- Crowd‑Pleaser Factor: These cups look elegant enough for a dinner party but are easy enough for a weekday treat, earning applause from kids and adults alike.
- Make‑Ahead Magic: The mousse and crust can be prepared ahead of time, meaning you can assemble the cups just before serving for maximum freshness.
- Versatile Base: The vanilla wafer crust can be swapped for graham crackers or gluten‑free cookies, catering to dietary needs without sacrificing flavor.
- Visual Wow: The glossy caramel drizzle and the bright apple pieces make these cups look as good as they taste, perfect for Instagram bragging rights.
Inside the Ingredient List
The Flavor Base
Cinnamon Powder: This warm spice adds a cozy flavor to the apples, making them extra comforting. You can experiment with nutmeg for a twist, but cinnamon is the classic hero here. Skipping it would leave the apple filling flat and one‑dimensional.
Apples: Fresh, firm apples are essential. Granny Smith offers a nice tart zing, while Honeycrisp gives you that sweet, juicy vibe. If you pick a softer variety, the filling may become mushy and lose its shape.
Light Brown Sugar: This sweetener brings out the natural caramel notes of the apples, enhancing their sweetness. Brown sugar is key to that deep flavor. Using white sugar would make the sauce too sharp and lose the caramel depth.
The Texture Crew
Heavy Cream: We need chilled heavy cream to create that luxurious, velvety mousse. If you’re looking for a lighter option, consider using whipped topping, but the mousse won’t set as firmly.
Instant Vanilla Pudding Powder: This is the magic ingredient that gives our mousse its creamy texture and vanilla flavor. Be cautious with the flavors if you switch it up—non‑vanilla powders can clash with the caramel.
Vanilla Wafers: Crushed into crumbs, these provide a delightful crunch and buttery taste for the crust. Consider gluten‑free wafers if you’re catering to those with dietary restrictions. Skipping the wafers would mean losing the buttery foundation that holds the cup together.
The Unexpected Star
Cold Milk: Just regular milk will do here, but you can substitute with almond or oat milk for a dairy‑free version. The milk activates the pudding powder, so it can’t be omitted.
Salted Caramel Sauce: This adds a rich, sweet element. Store‑bought is super convenient, but DIY can elevate the flavors even further. Without it, the dessert would lack its signature caramel punch.
The Final Flourish
Butter: Melted butter binds the wafer crust nicely, delivering both flavor and texture. You can use either salted or unsalted butter here – it’s your call! Forgetting the butter will result in a crumbly, unstable crust.
Extra Caramel Sauce: Drizzling more caramel on top before serving adds an irresistible touch! Feel free to get creative with other toppings if caramel isn’t your favorite. Skipping the final drizzle means missing that glossy finish that makes the cups look restaurant‑ready.
Everything's prepped? Good. Let's get into the real action...
The Method — Step by Step
Preheat your oven to 350°F (175°C). While it heats, line a 12‑cup muffin tin with paper liners or lightly grease them. This step is crucial because a hot oven gives the wafer crust that instant snap‑crackle you crave. I always set a timer for the preheat; if you’re impatient, you’ll end up with uneven baking.
Crush the vanilla wafers into fine crumbs using a food processor or a sealed bag and a rolling pin. Add the melted butter and stir until the mixture resembles wet sand. Press about a tablespoon of this crumb mixture into the bottom and up the sides of each muffin cup, creating a sturdy shell. Power transition: This next part? Pure magic.
Kitchen Hack: Use the back of a spoon to smooth the crust evenly; it prevents gaps where the filling could leak.Bake the wafer crusts for 8‑10 minutes, or until they turn a light golden brown and feel firm to the touch. You’ll hear a faint crackle as the butter solidifies—listen for it; that’s your cue that the base is ready. Remove from the oven and let them cool completely before adding any wet ingredients; otherwise, the crust will become soggy.
While the crusts cool, dice the apples into bite‑size pieces. Toss them with cinnamon powder and light brown sugar in a skillet over medium heat. As the apples soften, the sugar will melt into a glossy caramel that coats each piece. That sizzle when it hits the pan? Absolute perfection. Cook for about 5‑7 minutes until the apples are tender but still hold their shape.
In a separate saucepan, gently warm the salted caramel sauce with a splash of heavy cream, stirring constantly. This creates a silky caramel‑cream mixture that will later be drizzled on top.
Watch Out: Do not let the caramel boil; it can scorch and turn bitter in seconds.Now for the mousse: In a mixing bowl, whisk together the instant vanilla pudding powder, cold milk, and a pinch of salt until smooth. Let it sit for 2 minutes to thicken, then fold in the chilled heavy cream until you achieve a fluffy, mousse‑like consistency. The mousse should hold soft peaks—if it’s too runny, add a splash more pudding powder.
To assemble, spoon a layer of the caramelized apple mixture into each cooled wafer cup, filling them about one‑third of the way. Next, pipe or spoon a generous dollop of vanilla mousse over the apples, smoothing the top with the back of a spoon. Finally, drizzle the warm caramel‑cream sauce over the mousse, letting it cascade down the sides for that glossy finish.
Refrigerate the assembled cups for at least 20 minutes to let the mousse set and the flavors meld. This chilling step is non‑negotiable; it gives the mousse its structure and lets the caramel thicken slightly. When you’re ready to serve, add a final drizzle of extra caramel sauce and, if you like, a pinch of sea salt for contrast.
That's it — you did it. But hold on, I've got a few more tricks that'll take this to another level...
Insider Tricks for Flawless Results
The Temperature Rule Nobody Follows
Always let the wafer crust cool completely before adding any wet ingredients. Even a few seconds of residual heat will melt the butter in the crust, turning it soggy. I once tried to speed things up by adding the apple filling while the crust was still warm; the result was a mushy bottom that ruined the whole cup. The rule of thumb: bake, cool, then fill.
Why Your Nose Knows Best
When the apples are caramelizing, trust your sense of smell more than the clock. The moment you detect a deep, buttery aroma with a hint of toasted sugar, you know the apples are perfectly caramelized. If you rely solely on time, you might overcook them, turning the fruit into a sticky paste.
The 5‑Minute Rest That Changes Everything
After whisking the pudding powder and milk, let the mixture sit for exactly five minutes before folding in the cream. This rest allows the starches to hydrate fully, creating a stable base that won’t weep later. Skipping this rest can lead to a watery mousse that collapses under the weight of the caramel.
Caramel Drizzle Temperature
Warm your caramel sauce just enough to be pourable, but not boiling. A temperature of about 120°F (49°C) is ideal; it stays fluid enough to drizzle but thickens quickly once it hits the chilled mousse. Overheated caramel will run off the cup and create a greasy mess.
Seal the Deal with a Pinch of Salt
Finish each cup with a light sprinkle of flaky sea salt. The salt amplifies the caramel’s sweetness and adds a subtle crunch that surprises the palate. I’ve seen people skip this final touch, and they miss out on that perfect sweet‑salty balance.
Creative Twists and Variations
This recipe is a playground. Here are some of my favorite ways to switch things up:
Maple‑Bacon Crunch
Swap half of the light brown sugar for pure maple syrup and crumble cooked bacon into the apple mixture. The smoky‑sweet combo adds a savory depth that’s perfect for a brunch twist.
Pumpkin Spice Delight
Replace the cinnamon with a pumpkin spice blend and add a tablespoon of pumpkin puree to the mousse. This version screams fall and pairs beautifully with a drizzle of spiced caramel.
Nutty Caramel Crunch
Stir chopped toasted pecans or walnuts into the caramel sauce before drizzling. The nuts introduce a buttery crunch that contrasts the smooth mousse.
Chocolate‑Covered Heaven
Dip the bottom of each wafer cup in melted dark chocolate before adding the crust. The chocolate adds richness and a slightly bitter edge that balances the sweetness.
Vegan Velvet
Use coconut cream in place of heavy cream and a plant‑based vanilla pudding mix. Swap butter for coconut oil and choose dairy‑free caramel. The result is a vegan‑friendly version that still feels indulgent.
Berry Burst
Fold a handful of fresh raspberries or blueberries into the apple compote for a burst of tartness that cuts through the caramel.
Storing and Bringing It Back to Life
Fridge Storage
Place the assembled cups in an airtight container and refrigerate for up to three days. The mousse stays firm, and the caramel may thicken—just give each cup a gentle stir before serving.
Freezer Friendly
Freeze the crusts and the apple filling separately on a parchment sheet, then transfer to freezer bags. The mousse can also be frozen in a sealed container. When you’re ready, thaw the crusts and filling in the fridge overnight, then re‑whip the mousse briefly to restore its airy texture.
Best Reheating Method
To revive a chilled cup, place it on a microwave‑safe plate, add a tiny splash of milk (about a teaspoon), and heat for 15‑20 seconds. The added moisture steams the mousse back to perfection without making it rubbery.