I still remember the first time I brought this caramelized onion dip to a party. My friend Sarah took one bite, grabbed the entire bowl, and literally walked away from the group like a raccoon with stolen treasure. I had to chase her down with backup chips. That moment sealed the deal — this isn't just another dip recipe floating around the internet. This is the dip that makes grown adults lose their manners and fight over the last scoop.
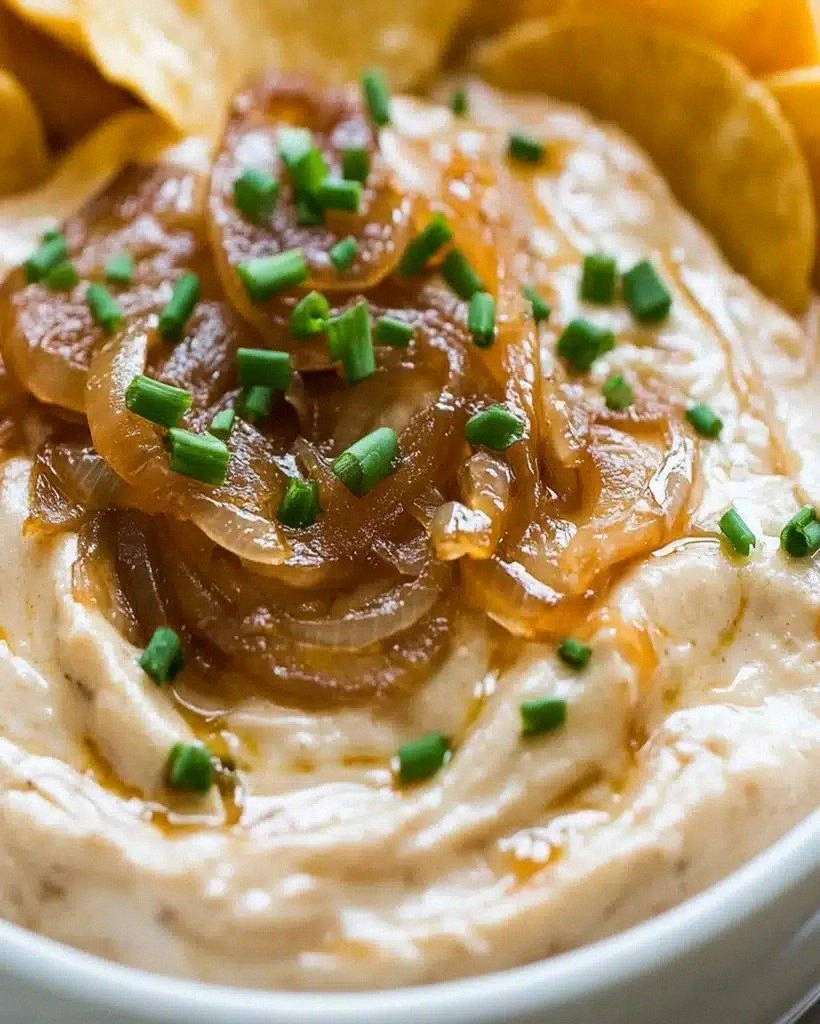
Let me paint you a picture of what happens when you make this golden beauty. The onions start their slow dance in the pan, releasing their natural sugars until they transform from sharp white crescents into silky, mahogany ribbons that smell like the world's most expensive perfume. Your kitchen fills with this intoxicating aroma that has neighbors knocking on your door with suspicious timing. The cream cheese and sour cream meld together into this luxurious base that coats your chips like velvet, while the caramelized onions bring this deep, complex sweetness that makes people close their eyes when they taste it.
After three years of tweaking, testing, and watching people's reactions (I've become a bit of a dip scientist), I've cracked the code on what makes this version absolutely irresistible. Most recipes rush the onions or use too much mayo, creating this one-note dip that tastes like something you'd find next to the grocery store vegetable tray. This version? It's got layers upon layers of flavor, the perfect balance of sweet and savory, and a texture so creamy you'll want to face-plant directly into the bowl.
The secret weapon is patience — letting those onions take their sweet time transforming into jammy perfection, then folding them into a base that's been carefully balanced with just the right touch of acidity and seasoning. Let me walk you through every single step — by the end, you'll wonder how you ever made it any other way.
What Makes This Version Stand Out
Depth Overload: We're talking about onions that have been coaxed into releasing every last bit of their natural sweetness, creating a complexity that store-bought versions can't touch. The slow caramelization process develops those deep, rich flavors that make people ask "what's in this?" after their first bite. Texture Heaven: Unlike those grainy, separated dips you've probably suffered through, this one stays luxuriously smooth and creamy for days. The combination of cream cheese and sour cream creates this perfect consistency that clings to chips without being too thick or too runny. Make-Ahead Magic: This dip actually gets BETTER after sitting overnight. The flavors meld and intensify, making it the perfect party prep recipe. You can make it up to three days ahead, which means less stress when you're hosting. Ingredient Integrity: No weird packet mixes or mystery seasonings here. Every ingredient serves a purpose and contributes to the final flavor symphony. You can pronounce everything on the list, and your taste buds will thank you for it. Universal Crowd-Pleaser: I've watched self-proclaimed onion haters demolish this dip. I've seen vegetarians and carnivores unite over the bowl. It's that rare recipe that somehow appeals to everyone, regardless of their usual food preferences. Fail-Proof Technique: While other recipes leave you guessing about doneness or timing, this method gives you clear visual and aromatic cues. Even if you've never caramelized onions before, you'll nail it with these instructions. Leftover Legend: If you somehow have leftovers (a big if), this dip transforms into an incredible sandwich spread, baked potato topping, or pasta sauce base. It's like getting multiple recipes in one.Inside the Ingredient List
The Flavor Foundation
Let's start with the star of the show: those beautiful yellow onions. You might be tempted to grab sweet onions, but trust me on this one. Yellow onions have the perfect balance of natural sugars and that sharp edge that transforms into something magical during caramelization. As they slowly cook down, they release their moisture and concentrate their flavors, turning into this jammy, mahogany-colored treasure that tastes like onion candy. Four large onions might seem excessive, but they reduce dramatically — we're talking about ending up with roughly two cups of caramelized gold.
Butter is our next essential player, and please, I'm begging you, don't substitute margarine here. Real butter brings this rich, nutty flavor that complements the onions perfectly. As the butter melts and mingles with the onion juices, it creates this beautiful fond on the bottom of the pan that we'll deglaze later for extra flavor layers. The butter also helps the onions cook evenly without burning, giving you that gorgeous golden color we're after.
The Creamy Dream Team
Now for the base that makes this dip absolutely irresistible. Full-fat cream cheese is non-negotiable here — it's what gives our dip that thick, luxurious texture that clings to chips like a dream. Let it come to room temperature before mixing, or you'll end up with little white lumps that refuse to incorporate smoothly. The cream cheese provides structure and richness that prevents the dip from becoming watery, even after sitting in the fridge overnight.
Sour cream brings the tang that balances out the sweetness of the caramelized onions. Go for the full-fat version here too — this isn't the place for diet substitutions. The fat content helps carry all those beautiful onion flavors and creates a mouthfeel that makes people close their eyes when they taste it. Greek yogurt can work in a pinch, but it will give you a slightly tangier, less creamy result.
The Umami Amplifiers
Worcestershire sauce might seem like an odd addition, but it's our secret weapon for adding depth and complexity. Just a teaspoon brings this incredible umami punch that makes people wonder what makes the dip so addictive. It's like the bass line in a song — you might not specifically notice it, but you'd definitely miss it if it wasn't there. The anchovy-based sauce melts into the background and amplifies all the other flavors.
Garlic powder gives us that subtle savory note without the harshness of fresh garlic. We're looking for background flavor here, not a garlic bomb that overpowers the delicate onion sweetness. Just half a teaspoon distributed throughout the entire dip provides that whisper of garlicky warmth that makes everything taste more interesting.
The Final Flourish
Fresh thyme brings an herby note that cuts through the richness and adds another layer of complexity. The woody, slightly lemony flavor pairs beautifully with caramelized onions — it's like they were made for each other. If you can't find fresh thyme, dried works too, but use half the amount since dried herbs are more concentrated.
White pepper provides gentle heat without the visual speckles of black pepper. It's more subtle and sophisticated, adding warmth that blooms across your palate rather than hitting you upfront with spice. If you only have black pepper, that's fine — just use a light hand so it doesn't overpower the delicate balance we've created.
The Method — Step by Step
- Start by slicing your onions into thin half-moons, about 1/8-inch thick. Here's the key — you want them evenly sliced so they cook at the same rate. If you have a mandoline slicer, this is its time to shine, but a sharp knife works perfectly. Don't worry about them looking like too much — remember, they'll reduce to about a quarter of their original volume. As you slice, separate the layers so they can all get equal access to the heat. That sizzle when they first hit the buttered pan? Absolute perfection.
- Melt your butter over medium heat in your widest, heaviest pan. You want it foaming but not browned — we're building flavors here, not burning them. Add all the onions at once (yes, all of them — don't crowd the pan is a myth when it comes to onions). Toss them around to coat every piece with butter, then spread them out in an even layer. They should sizzle gently, not furiously. If they're browning within the first five minutes, your heat is too high. This is a slow dance, not a sprint.
- Here's where patience becomes your superpower. Stir the onions every 5-7 minutes, scraping up any browned bits from the bottom. At first, they'll release a ton of moisture and look like they're swimming in onion juice. This is normal and good — we need to cook off that liquid before caramelization can happen. Around the 20-minute mark, they'll start to turn translucent and golden. Your kitchen will smell like you've stepped into a French bistro. Resist the urge to crank up the heat — low and slow is what transforms them from sharp and raw to sweet and complex.
- After about 35-40 minutes, magic starts happening. The onions will turn a deep golden color and start to stick to the pan. This is when you need to pay attention — stir more frequently now, every 2-3 minutes. They'll start to smell incredible, like the world's most expensive caramel. When you can scrape the bottom and see a brown film forming, it's time to add a splash of water. This deglazes the pan and incorporates all those flavorful browned bits back into the onions. It's like turning the flavor dial up to eleven.
- Keep cooking and stirring for another 15-20 minutes until the onions are a deep mahogany color and have reduced to about two cups. They should be jammy and sweet, with no sharp onion bite left. Taste one — it should melt on your tongue and taste like onion candy. If they're still slightly sharp, keep going. This is the foundation of your dip, and rushing it is the fastest way to end up with mediocre results. Trust the process, even if it feels like it's taking forever.
- While your onions are working their magic, let your cream cheese come to room temperature. This is crucial for a smooth, lump-free dip. If you're impatient (I see you), you can microwave it in 10-second bursts, but don't let it melt — just soften. Add the sour cream, Worcestershire sauce, garlic powder, thyme, salt, and white pepper to a large bowl. Whisk everything together until it's completely smooth and homogeneous. This base should taste slightly over-seasoned — remember, we're about to fold in a lot of sweet onions that will mellow everything out.
- Once your onions are perfectly caramelized, let them cool for about 10 minutes. Hot onions will melt your cream cheese base and create a weird, separated mess. You want them warm but not hot. Add them to your cream cheese mixture and fold gently with a spatula. Don't overmix — you want to see beautiful ribbons of mahogany running through the pale base. It should look like edible art, with swirls of sweet onion throughout the creamy base. Taste and adjust seasoning if needed, but resist the urge to add more salt right away — the flavors will continue to develop as it chills.
- Cover the bowl with plastic wrap, pressing it directly onto the surface to prevent a skin from forming. Refrigerate for at least 2 hours, but overnight is even better. This chilling time is when the magic happens — the flavors meld and intensify, creating the most incredible depth. When you're ready to serve, let it sit at room temperature for 15-20 minutes to take the chill off. Garnish with a sprinkle of fresh thyme or some reserved caramelized onions on top. Grab your favorite chips, crackers, or vegetables, and prepare to become the most popular person at the party.
Insider Tricks for Flawless Results
The Temperature Rule Nobody Follows
Here's the thing that separates good caramelized onion dip from life-changing caramelized onion dip: temperature control. Your onions need to cook at a temperature that's hot enough to encourage browning but cool enough to prevent burning. Think of it like finding the sweet spot on your car's cruise control — too fast and you'll get a ticket (burnt onions), too slow and you'll never get there (pale, limp onions). The perfect zone is when your onions are gently sizzling but not spitting or browning too quickly. If you can hold your hand about six inches above the pan for 5-7 seconds, you're in the right neighborhood. This patience pays off in flavor dividends you can't fake with shortcuts.
Why Your Nose Knows Best
Your sense of smell is actually your most reliable tool for judging doneness in this recipe. When the onions first hit the pan, they'll smell sharp and oniony — that's raw allium announcing its presence. As they cook, the aroma transforms through several stages: first slightly sweet, then deeply savory, and finally this incredible caramel richness that makes you involuntarily salivate. When your kitchen smells like the world's most expensive French onion soup, you're getting close. The final stage is this complex, almost wine-like aroma that signals the onions have reached their peak. Trust your nose — it's been refined over millions of years to detect exactly these kinds of delicious transformations.
The 5-Minute Rest That Changes Everything
After you've mixed everything together, walk away for five minutes before tasting and adjusting seasoning. This brief pause allows the salt to dissolve completely and the flavors to start melding. It's like letting a fine wine breathe — suddenly flavors that seemed separate and disjointed become harmonious and balanced. I learned this trick from a chef friend who swore by it for every recipe, and he was absolutely right. Those five minutes of patience prevent you from over-seasoning in the heat of the moment, only to end up with an over-salted dip that nobody wants to eat.
The Texture Secret from Restaurant Kitchens
Want to know why restaurant dips always seem smoother and more luxurious than homemade versions? It's all about temperature control and technique. Instead of dumping cold cream cheese into your mixing bowl, let it warm up until it's pliable but not melted. Then, use a whisk rather than a spoon for mixing — it incorporates air and creates a lighter, silkier texture. Finally, don't overmix once you add the onions. Those beautiful ribbons of caramelized goodness should stay distinct and visible, creating pockets of intense flavor throughout the creamy base. It's like edible marbling that ensures every bite has the perfect ratio of sweet onion to creamy base.
Creative Twists and Variations
This recipe is a playground. Here are some of my favorite ways to switch things up:
Smoky Bacon Caramelized Onion Dip
Add four strips of crispy bacon, crumbled into small pieces, to the finished dip. The smoky, salty bacon creates an incredible contrast with the sweet onions. Reserve a tablespoon of the bacon fat and use it instead of butter for caramelizing half the onions. This adds another layer of smoky complexity that makes people wonder what your secret ingredient is. Garnish with extra bacon crumbles and a drizzle of the rendered fat on top. It's completely over the top and absolutely irresistible.
French Onion Soup Dip
Replace the Worcestershire sauce with an equal amount of dry sherry, and add a cup of shredded Gruyère cheese to the base. The sherry brings this sophisticated, wine-like note that elevates the whole dip, while the Gruyère melts slightly into the base and creates these incredible cheesy pockets. Top the finished dip with more Gruyère and broil for 2-3 minutes until bubbly and golden. It's like your favorite soup transformed into the world's most addictive dip.
Spicy Caramelized Onion Dip
Add a minced jalapeño to the onions during the last 10 minutes of caramelization. The gentle heat infuses into the onions without overwhelming their sweetness. Stir in a teaspoon of your favorite hot sauce to the cream cheese base, and finish with a sprinkle of smoked paprika on top. The result is this perfect balance of sweet, savory, and spicy that keeps people coming back for "just one more bite" until the bowl is clean.
Mushroom and Onion Dip
Add a pound of finely chopped cremini mushrooms to the pan after the onions have been cooking for 20 minutes. The mushrooms release their moisture and then caramelize alongside the onions, creating this incredible umami bomb. Their earthy flavor complements the sweet onions perfectly, and the combination creates a dip that tastes like it came from a fancy restaurant. This version is particularly good with crusty bread or as a topping for grilled steak.
Everything Bagel Caramelized Onion Dip
Replace the thyme with a tablespoon of everything bagel seasoning, and add two tablespoons of cream cheese to make up for the extra dry ingredients. The sesame seeds, poppy seeds, and garlic flakes in the seasoning create these little flavor bombs throughout the dip. Serve with everything bagel chips for maximum everything bagel experience. It's like your favorite breakfast transformed into party food.
Roasted Garlic Caramelized Onion Dip
Roast a whole head of garlic by cutting off the top, drizzling with olive oil, wrapping in foil, and baking at 400°F for 40 minutes. Squeeze out the cloves and mash them into a paste, then fold into your cream cheese base along with the onions. The roasted garlic brings this incredible sweetness and depth that complements the caramelized onions perfectly. This version is so aromatic and flavorful that even garlic lovers will be impressed.
Storing and Bringing It Back to Life
Fridge Storage
This dip keeps beautifully in the refrigerator for up to five days, making it perfect for meal prep or party planning. Store it in an airtight container with plastic wrap pressed directly onto the surface to prevent oxidation and flavor absorption from other foods. The flavors actually continue to develop and meld during storage, so day-two dip often tastes even better than fresh. If you notice any separation, just give it a gentle stir before serving. Always let it sit at room temperature for 15-20 minutes before serving — cold temperature dulls the flavors and makes the texture too firm.
Freezer Friendly
While dairy-based dips can be tricky to freeze, this one actually holds up reasonably well thanks to the cream cheese base. Freeze in portion-sized containers for up to two months. Thaw overnight in the refrigerator, then let it come to room temperature before serving. The texture might be slightly less creamy than fresh, but the flavor remains incredible. Give it a vigorous stir once thawed, and if it seems too thick, thin it out with a tablespoon of milk or sour cream. Don't refreeze once thawed — the texture breaks down too much with repeated freezing and thawing.
Best Reheating Method
Technically, this is a cold dip, but sometimes you want to serve it slightly warm or need to take the chill off. The key is gentle, even warming. Place the desired amount in a microwave-safe bowl and heat on 50% power in 15-second bursts, stirring between each burst. You're looking for just slightly warmer than room temperature, not hot. Alternatively, place the container in a bowl of warm (not hot) water for 10-15 minutes, stirring occasionally. Never heat it directly on the stove or at full power — you'll end up with separated, greasy dip that's irreversibly ruined.