Picture this: I was standing in my kitchen, eyes wide, watching a batch of cinnamon rolls that had turned into a greasy, doughy disaster. The smell of burnt sugar hit me like a slap, and my friends were already laughing, begging for a taste of the “sugar‑cloud” that was about to form. That night, I swore I’d find a way to turn that chaos into a masterpiece that would make even the most skeptical taste buds swoon. And that’s when the idea of a Cinnamon Roll Apple Bake was born.
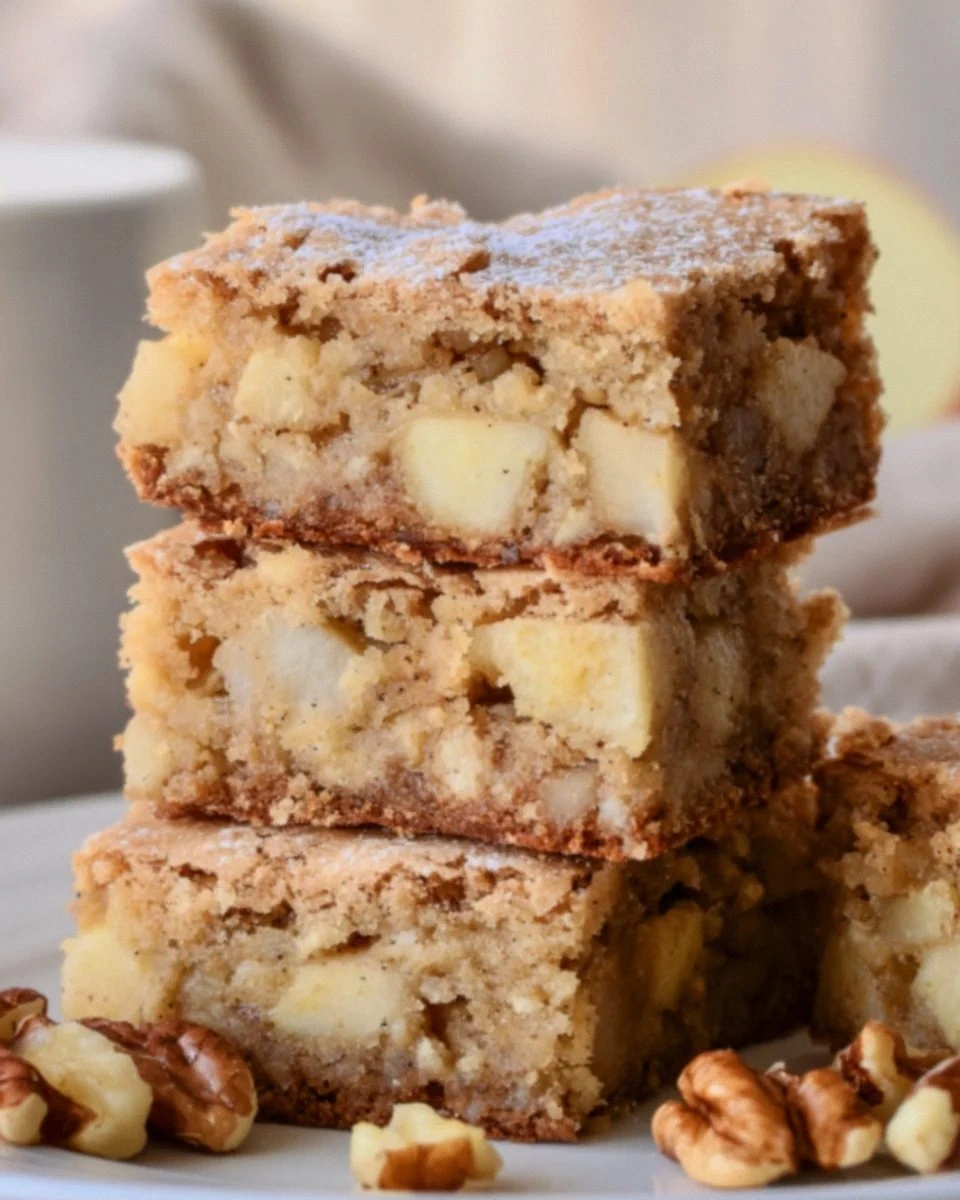
I was craving that familiar, warm hug of cinnamon, but I wanted something that could be sliced, served, and shared like a loaf of bread. The aroma of apples simmering with butter and sugar is enough to make any kitchen feel like a cozy cabin. I imagined the texture—soft, slightly crisp on the edges, with a glaze that glistens like honey on a morning sun. The flavor profile should be a perfect blend of sweet, spicy, and buttery, with each bite delivering a burst of caramelized apple.
What sets this version apart is the way it marries the comforting familiarity of a cinnamon roll with the rustic charm of an apple bake. It’s not just a dessert; it’s a conversation starter, a crowd‑pleaser that works for brunch, dessert, or a late‑night craving. The recipe’s simplicity means you can whip it up in under an hour, yet the final result is a showstopper that will have your guests begging for seconds. I dare you to taste this and not go back for a second helping.
The secret? A touch of brown sugar in the filling, a splash of vanilla, and a careful balance of wet and dry ingredients that keep the loaf moist without turning it into a cake. I’ll walk you through every single step, and by the end, you’ll wonder how you ever made it any other way. Let’s dive in.
What Makes This Version Stand Out
- Flavor: The combination of cinnamon, brown sugar, and apples creates a depth that feels like a warm hug wrapped in spice.
- Texture: The dough stays tender inside while the edges develop a golden, slightly crisp crust that shatters like thin ice.
- Simplicity: All you need is a standard baking pan and a few pantry staples; no fancy equipment required.
- Uniqueness: The glaze is a quick butter‑sugar drizzle that gives the loaf a glossy finish without being overly sweet.
- Crowd Reaction: Friends who’ve tried it say it tastes better than any store‑bought cinnamon roll and is easier to share.
- Ingredient Quality: Using fresh apples and real butter elevates the flavor profile beyond the usual processed ingredients.
- Cooking Method: Baking in a single pan simplifies cleanup and ensures even cooking.
- Make‑ahead Potential: The batter can be prepared the night before and baked in the morning, saving time on busy days.
Alright, let's break down exactly what goes into this masterpiece…
Inside the Ingredient List
The Flavor Base
All-purpose flour is the backbone of the dough, providing structure without overpowering the delicate apple flavor. If you’re avoiding gluten, a 1:1 blend of rice flour and cornstarch will work, though the texture will be slightly denser. Skipping the flour means you lose the essential lift; the loaf will collapse into a sticky mess.
The Sweetness Crew
Granulated sugar balances the tartness of the apples, while brown sugar adds depth and a caramel undertone to the glaze. If you prefer a lower sugar version, replace half the granulated sugar with coconut sugar for a subtle molasses note. The key is to keep the ratio at 1:1 to maintain the right moisture level.
The Spicy Star
Ground cinnamon is the star that ties everything together. A pinch of nutmeg or allspice can add a warm, aromatic complexity, but cinnamon remains the core flavor. If you’re sensitive to cinnamon, a light dusting of ground ginger can provide a similar warmth without the heat.
The Texture Enhancers
Unsalted butter, softened, contributes richness and helps the dough rise evenly. Whole milk adds moisture and a subtle tang, while eggs bind the batter and give it a tender crumb. If you’re vegan, coconut oil and a flaxseed “egg” replace the butter and eggs without sacrificing texture.
Everything's prepped? Good. Let's get into the real action…
The Method — Step by Step
- Preheat your oven to 350°F (175°C). In a large bowl, whisk together 2 cups flour, 1 cup granulated sugar, 1 tsp baking powder, ½ tsp salt, and 1 tsp ground cinnamon. The dry mixture should look like fine sand; this helps avoid clumps in the batter.
- In a separate bowl, beat 2 large eggs with ½ cup whole milk and 1 tsp vanilla extract until frothy. This wet mix will carry the flavors and keep the loaf moist.
- Pour the wet ingredients into the dry and stir just until combined. Be careful not to overmix; a few lumps are fine and will result in a lighter crumb.
- Fold in 2 diced apples, ¼ cup brown sugar, ½ cup softened butter (cut into small pieces), and ¼ cup chopped walnuts if desired. The butter should be fully incorporated, creating a silky texture that melts in your mouth.
- Grease a 9×5 inch loaf pan or line it with parchment. Pour the batter into the pan, smoothing the top with a spatula. The batter should settle evenly, forming a uniform surface.
- Bake for 30–35 minutes, or until the top turns golden brown and a toothpick inserted into the center comes out clean. The aroma should be a warm, buttery scent with a hint of cinnamon.
- While the loaf is cooling, whisk together ¼ cup melted butter, ¼ cup granulated sugar, and 1 tsp cinnamon. Drizzle this glaze over the warm loaf, letting it soak into the cracks for a glossy finish.
- Let the loaf cool in the pan for 10 minutes, then transfer to a wire rack to cool completely. Slice and serve warm or at room temperature.
That's it — you did it. But hold on, I've got a few more tricks that'll take this to another level…
Insider Tricks for Flawless Results
The Temperature Rule Nobody Follows
Many bakers bake at 375°F, but that temperature can cause the top to brown too quickly while the center stays undercooked. Stick to 350°F to ensure even baking and a tender crumb. I once baked at a higher temp and ended up with a dry, cracked loaf.
Why Your Nose Knows Best
Trust the scent: when the loaf starts emitting a caramelized, buttery aroma, it’s almost ready. If it still smells like raw flour, give it a few more minutes. A good rule of thumb is to check at 25 minutes and then every 5 minutes thereafter.
The 5-Minute Rest That Changes Everything
Letting the loaf rest in the pan for 10 minutes before transferring to a rack allows the steam to finish the cooking process. This small pause prevents the bottom from becoming soggy and keeps the top crisp. I always set a timer for this step.
Avoiding a Dry Top
If the top starts to look too brown before the center is done, tent the loaf with aluminum foil. This shields it from direct heat and lets the interior finish baking. The foil also gives a nice sheen when removed.
Balancing Sweetness
The glaze can be adjusted to taste. For a sweeter version, double the granulated sugar; for a lighter touch, reduce it by half. Remember that the apples contribute natural sweetness, so you don’t need to overdo the glaze.
Creative Twists and Variations
Maple Glaze Twist
Replace the butter‑sugar glaze with a mixture of maple syrup and butter for a deeper, caramel flavor. The maple’s natural sweetness pairs beautifully with the apples and cinnamon, creating a holiday‑ready loaf.
Coconut Cream Variation
Swap out whole milk for coconut milk and drizzle a coconut cream glaze on top. The tropical note adds an unexpected but delightful twist that feels like a vacation in every bite.
Nut-Free Option
Omit the walnuts and add a handful of dried cranberries for a tart contrast. This variation keeps the loaf light and is perfect for those with nut allergies.
Spiced Pear Variation
Use diced pears instead of apples and add a pinch of cardamom. The subtle floral aroma of cardamom enhances the pears, creating a sophisticated flavor profile.
Chocolate Swirl Add
Fold in a few tablespoons of melted dark chocolate into the batter before baking. The chocolate creates a swirl pattern and a rich, indulgent bite that will satisfy any sweet tooth.
Storing and Bringing It Back to Life
Fridge Storage
Cool the loaf completely before wrapping it tightly in plastic wrap. Store in the refrigerator for up to 4 days. The bread will stay moist and flavorful when reheated.
Freezer Friendly
Slice the loaf before freezing to make portioned servings. Wrap each slice in foil and place in a freezer bag; it will keep for up to 3 months. Thaw at room temperature before reheating.
Best Reheating Method
Reheat slices in a toaster oven at 350°F for 5–7 minutes, or microwave on low power for 20 seconds. Add a tiny splash of water before reheating to steam the bread back to perfection, restoring its softness.