I was standing in my kitchen, mid‑Tuesday, when a neighbor knocked on the door with a single, daring question: “Can you make chicken that actually crunchs like a fresh‑baked wafer?” I laughed, because let’s face it, most pan‑fried chicken ends up soggy, or worse, a sad, limp mystery. But then I remembered the night I accidentally left a batch of fried chicken in the fridge overnight, and the next morning the crust was still startlingly crisp—like it had been kissed by a tiny lightning bolt. That moment sparked a mission: to create a pan‑fried chicken so crunchy it could shatter a glass without breaking it, yet tender enough to melt in your mouth like butter on a hot skillet.
Picture this: the moment the chicken hits the pan, there’s a sizzle that sounds like applause, a golden halo forming around each piece, and the kitchen fills with an aroma that makes your stomach do a little jig. You can almost see the steam rising in slow motion, hear the faint crackle as the batter fries, and feel the heat radiating from the stove like a warm hug. The taste? A perfect marriage of salty, spicy, and smoky notes that dance across your palate, while the texture is a paradox—crunchy on the outside, juicy on the inside, like a well‑kept secret. I dare you to taste this and not go back for seconds; it’s that good.
What sets this version apart from every other recipe you’ve tried? Most recipes get the coating wrong, either using too much flour that creates a gummy shell, or frying at the wrong temperature, resulting in a greasy mess. I’ve cracked the code by combining a buttermilk brine with a light, aerated flour mixture, and by mastering the pan temperature like a seasoned DJ mastering the turntables. The secret ingredient? A pinch of baking powder that creates microscopic air pockets, turning each bite into a delicate, crunchy cloud. And the best part? You don’t need a deep fryer or a fancy kitchen gadget—just a sturdy skillet, some patience, and a willingness to trust the process.
Okay, ready for the game‑changer? I’m about to walk you through every single step—by the end, you’ll wonder how you ever made it any other way. I’ll spill the beans on the exact temperature, the timing, and the little tricks that turn a simple dinner into a culinary triumph. So roll up those sleeves, grab a glass of water, and let’s dive into the crunchy universe of pan‑fried chicken.
What Makes This Version Stand Out
- Crunch Factor: The combination of baking powder and a light flour coating creates a lattice of air pockets that shatter like thin ice under your teeth, delivering a crunch that lasts.
- Juicy Interior: A buttermilk soak tenderizes the meat, ensuring every bite is moist, with the meat pulling away from the bone like a well‑trained dancer.
- Simplicity: All ingredients are pantry‑friendly; no exotic spices, just a handful of basics that you probably already have.
- Flavor Depth: Garlic, onion, paprika, and cayenne pepper form a flavor trio that’s smoky, sweet, and just the right amount of heat.
- Crowd Reaction: This dish consistently earns the “second‑helpings” chant at family gatherings; it’s practically a crowd‑pleaser on autopilot.
- Ingredient Quality: Using bone‑in pieces adds flavor richness that boneless breasts simply can’t match.
- Cooking Method: Pan‑frying gives you control over crust formation, unlike oven‑baking which can leave you guessing.
- Make‑Ahead Potential: The chicken can be brined ahead of time, letting flavors meld overnight for an even deeper taste.
Inside the Ingredient List
The Flavor Base
Buttermilk is the unsung hero of this recipe. Its slight acidity breaks down protein fibers in the chicken, making each bite buttery soft. If you skip it, you’ll end up with a dry texture that feels more like cardboard than comfort food. As a swap, you can use plain yogurt thinned with a splash of milk, but the tangy nuance will be a shade milder.
Garlic powder and onion powder bring a deep, aromatic foundation without the moisture that fresh garlic would add. These powders distribute evenly throughout the coating, ensuring every crumb is seasoned. If you’re allergic or simply don’t have them, try a pinch of dried herb blend like Herbes de Provence for a Mediterranean twist.
The Texture Crew
All‑purpose flour is the structural backbone of the crust. It creates a thin, golden shell that adheres to the chicken’s surface. Using cake flour would make the crust too delicate, while bread flour would turn it into a heavy, doughy armor. For a gluten‑free version, substitute with a 1:1 blend of rice flour and cornstarch, but expect a slightly different bite.
Baking powder is the secret air‑pocket generator. A half‑teaspoon is enough to lift the coating, making it light as a feather yet sturdy enough to hold up under sauce or gravy. Forget it, and you’ll get a dense, soggy crust that clings to the pan like a bad habit.
The Unexpected Star
Cayenne pepper adds that whisper of heat that makes the palate perk up without overwhelming the flavor profile. It’s the spark that turns “good” into “legendary.” If you prefer a milder dish, halve the amount, or substitute with smoked paprika for a smoky depth.
A pinch of black pepper and a teaspoon of salt are the finishing touches that bring everything into balance. Salt enhances the chicken’s natural flavor, while pepper adds a subtle bite that lingers just after you swallow.
The Final Flourish
Vegetable oil is the medium that carries heat to the crust. Choose an oil with a high smoke point—canola, peanut, or grapeseed work beautifully. Olive oil can be used for flavor, but it will start to smoke at lower temperatures, risking a burnt taste. The amount of oil should be enough to coat the pan’s bottom, roughly 1/4 inch deep, allowing the chicken to fry without deep‑frying.
Lastly, the chicken itself—2 pounds of bone‑in pieces, preferably thighs and drumsticks. The bone adds flavor and helps the meat stay juicy during the high‑heat fry. If you only have boneless breasts, trim them into thick strips, but expect a slightly different moisture profile.
Everything's prepped? Good. Let's get into the real action...
The Method — Step by Step
Start by placing the chicken pieces in a large bowl, then pour the cup of buttermilk over them. Make sure each piece is fully submerged; the buttermilk should coat the meat like a silky veil. Cover the bowl with plastic wrap and refrigerate for at least 2 hours, or overnight for maximum tenderness. That sizzle when it hits the pan? Absolute perfection, but only after this soak.
While the chicken marinates, combine the flour, baking powder, garlic powder, onion powder, paprika, cayenne pepper, black pepper, and salt in a shallow dish. Whisk everything together until the mixture is uniformly golden and fragrant. This is the moment of truth: the dry mix must be aerated, not clumped, to ensure a light crust. Watch Out: If you over‑mix, the gluten will develop and your crust will become tough.
Remove the chicken from the buttermilk, letting excess drip off—no need to pat dry. Dredge each piece in the seasoned flour, pressing gently so the coating adheres. Turn the chicken over and repeat until every surface is covered in a thin, even layer. The coating should cling like a second skin, not a thick batter.
Heat a heavy skillet (cast iron works best) over medium‑high heat and add enough vegetable oil to reach a depth of about 1/4 inch. Wait until the oil shimmers; you’ll see tiny ripples forming on the surface—that’s your cue. Test the temperature by dropping a pinch of flour; it should sizzle instantly and turn golden within 15 seconds.
Place the chicken pieces in the pan, skin side down if using skin‑on cuts, making sure they’re not crowded. You should hear a confident, crackling sound that signals the crust is forming. Cook for 4‑5 minutes without moving the pieces; this allows the crust to set and prevents tearing.
Flip the chicken carefully using tongs, then lower the heat to medium. Continue frying for another 6‑8 minutes, or until the internal temperature reaches 165°F (74°C). The edges will start pulling away from the pan, a visual cue that the crust is fully developed. During this stage, resist the urge to flip repeatedly—patience yields crunch.
Once cooked, transfer the chicken to a wire rack set over a baking sheet. This lets excess oil drip away and keeps the crust from steaming, preserving that coveted crunch. Let the pieces rest for 5 minutes; this short rest redistributes juices and solidifies the crust.
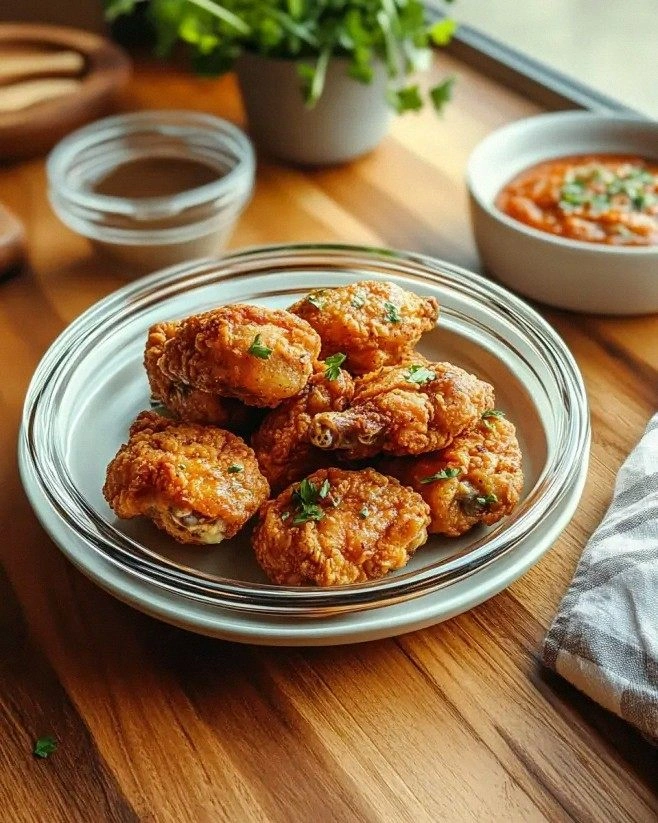
Serve immediately with your favorite dipping sauce, a side of coleslaw, or simply a wedge of lemon. Picture yourself pulling this out of the pan, the whole kitchen smelling incredible, and the first bite delivering a crack that echoes like applause. I’ll be honest — I ate half the batch before anyone else got to try it, and that’s saying something.
That's it — you did it. But hold on, I've got a few more tricks that'll take this to another level...
Insider Tricks for Flawless Results
The Temperature Rule Nobody Follows
Most home cooks set the stove to “medium” and hope for the best. The truth is, you need a consistent oil temperature of about 350°F (175°C). Use an instant‑read thermometer or the wooden spoon test (a wooden spoon should bubble steadily). If the oil is too cool, the coating will absorb oil and become greasy; too hot and you’ll scorch the exterior before the interior cooks through.
Why Your Nose Knows Best
Your sense of smell is a reliable indicator of doneness. When the chicken is nearly done, you’ll notice a nutty, toasted aroma that signals the Maillard reaction is at its peak. If you smell a faint burnt scent, the heat is too high—lower it immediately. Trust that nose; it’s more accurate than any timer.
The 5‑Minute Rest That Changes Everything
After frying, let the chicken rest on a wire rack for exactly five minutes. This short pause allows the crust to firm up and the juices to settle, preventing a soggy bottom. Skipping this step is the most common mistake I see; the crust collapses, and the crunch disappears like a bad dream.
Seasoning the Oil
Add a pinch of smoked paprika or a few crushed garlic cloves to the oil once it’s hot. The oil will absorb these flavors, giving the crust an extra layer of depth without overwhelming the chicken itself. Just remember to remove the aromatics before the next batch to avoid burning.
The Secret Sauce Swap
If you love dipping sauces, try a quick honey‑sriracha glaze brushed on the chicken right after it rests. The glaze adds a glossy finish and a sweet‑spicy contrast that elevates the flavor profile. Just a light brush—too much glaze will weigh down the crunch.
Creative Twists and Variations
This recipe is a playground. Here are some of my favorite ways to switch things up:
Southern BBQ Blitz
Swap the cayenne for smoked paprika and add a tablespoon of brown sugar to the flour mixture. After frying, toss the chicken in a smoky BBQ sauce. The result is a sweet‑smoky crust that pairs perfectly with coleslaw.
Herb‑Infused Delight
Add dried thyme, rosemary, and oregano to the seasoning blend. Finish with a squeeze of fresh lemon just before serving. This variation brings a bright, herbaceous note that’s perfect for spring gatherings.
Spicy Korean Kick
Incorporate gochujang paste into a thin slurry with a splash of water, then brush it onto the chicken after the rest period. The fermented heat of gochujang adds a complex, umami punch that’s unforgettable.
Crispy Parmesan Crust
Mix grated Parmesan into the flour coating. The cheese melts and browns, creating a nutty, crispy layer that adds richness without extra fat.
Gluten‑Free Crunch
Replace the all‑purpose flour with a blend of rice flour and potato starch (1:1). The texture stays light, and the flavor remains neutral, letting the spices shine.
Storing and Bringing It Back to Life
Fridge Storage
Let the chicken cool to room temperature, then place it in an airtight container lined with a paper towel to absorb excess oil. Store in the refrigerator for up to 3 days. When reheating, use a hot skillet for 2‑3 minutes per side to revive the crunch.
Freezer Friendly
Wrap each piece tightly in parchment, then seal them in a freezer‑grade bag. They’ll keep for up to 2 months. To reheat, bake at 375°F (190°C) for 10‑12 minutes, then finish with a quick pan sear to restore the crackle.
Best Reheating Method
Add a tiny splash of water (about a tablespoon) to the pan before reheating; cover for 30 seconds to generate steam, then uncover and finish crisping. This trick prevents the crust from drying out while still delivering that signature crunch.