Picture this: a snow‑drifted kitchen, the air thick with the scent of vanilla and chocolate, and the sound of a stubborn oven timer that refuses to quit. I was halfway through a holiday feast, juggling plates, when the timer dinged and I realized the oven was still on. I had a handful of white chocolate bars and a box of candy canes, and I thought, “Why not turn this kitchen mishap into a sweet triumph?” The result? A peppermint bark that not only saved the night but became the star of the table.
I remember the first bite: the white chocolate melted like velvet against the crisp, peppery crunch of crushed candy canes, while a subtle hint of peppermint laced the sweetness. The texture was a perfect marriage of brittle and melt‑away, a contrast that made my taste buds dance. The aroma was intoxicating—warm chocolate with a sharp, minty finish that made every breath feel like a holiday invitation. The sound of the first snap was satisfying, a crisp crack that echoed the silence of a quiet winter evening.
What makes this version stand out is not just the ingredients; it’s the method, the attention to detail, and the daring twist of crushed candy cane crunch that gives it an unmistakable personality. It’s a recipe that feels like a secret, a family heirloom that you’ve just discovered, and it’s the kind of treat that will have your guests begging for a second piece. I dare you to taste this and not go back for seconds—trust me, you’ll want to.
I’ve spent years experimenting with chocolate, and this is hands down the best version you’ll ever make at home. It’s not just about the peppermint; it’s about how every component sings together. The dark chocolate adds depth, the white chocolate brings silky sweetness, and the crushed candy canes add that satisfying crunch. The technique of layering and cooling at precise intervals turns a simple confection into a showstopper. Let me walk you through every single step—by the end, you’ll wonder how you ever made it any other way.
What Makes This Version Stand Out
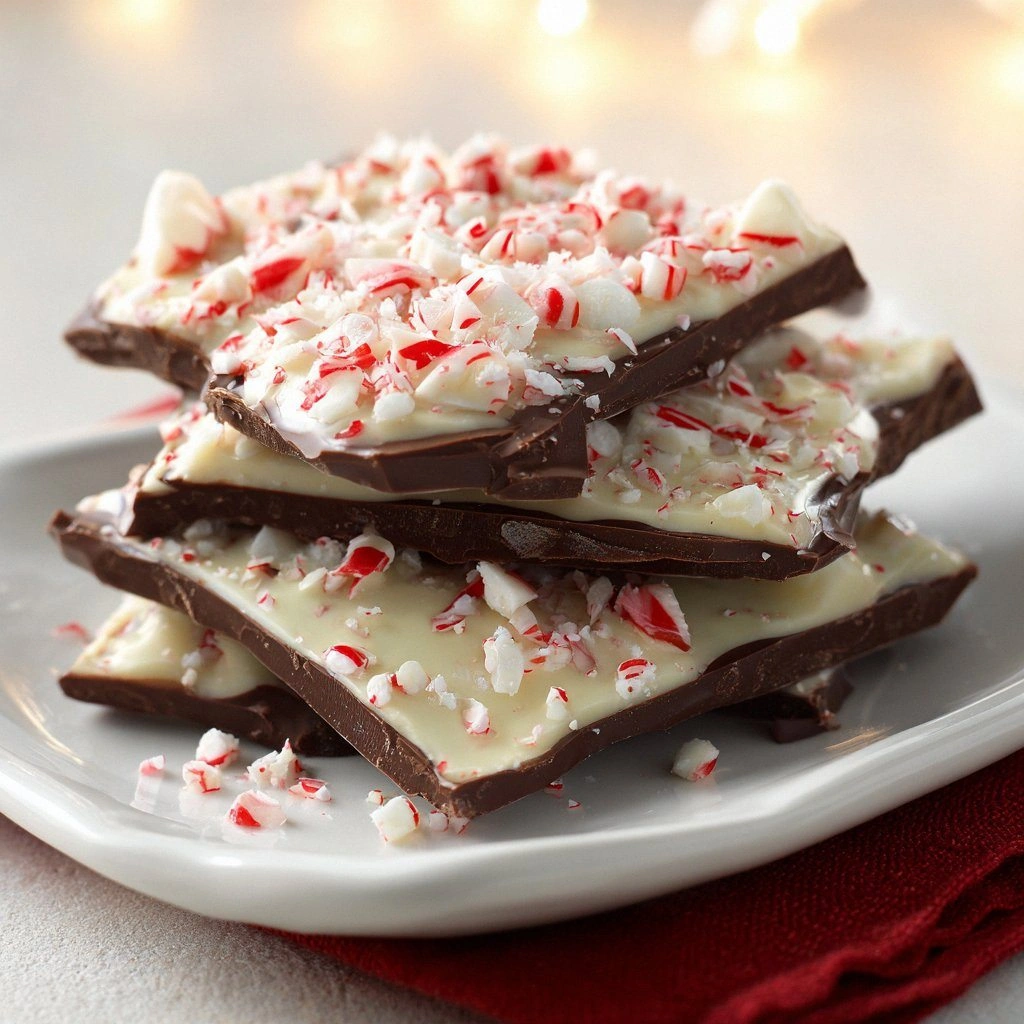
Flavor: The dual layers of white and dark chocolate create a rich, balanced profile that never feels heavy. The peppermint is bright but not overpowering, thanks to a measured amount of peppermint extract.
Texture: The crushed candy cane crunch offers a satisfying snap that contrasts with the silky melt of chocolate. Each bite delivers a playful, multi‑sensory experience.
Visual Appeal: The white chocolate layer glistens like fresh snow, while the dark chocolate stripe adds a dramatic contrast. When you break it, the colors explode, making it a feast for the eyes as well as the palate.
Ease of Preparation: Even if you’re not a seasoned chocolatier, the method is straightforward. No special molds or tempering equipment required—just a few simple steps and a watchful eye.
Make‑Ahead Potential: This bark can be made weeks ahead. It keeps its crispness in the fridge or freezer, making it a convenient holiday gift or a last‑minute dessert.
Crowd Reaction: Friends and family swear by the first bite. The combination of familiar flavors and an unexpected crunch creates a wow factor that keeps them coming back.
Ingredient Quality: Using high‑grade chocolate and real candy canes elevates the entire experience. The difference is palpable, and it justifies the extra effort.
Versatility: You can tweak the ratio of white to dark chocolate or the amount of crushed candy cane to suit your taste, making it a flexible recipe for any palate.
Alright, let’s break down exactly what goes into this masterpiece…
Inside the Ingredient List
The Flavor Base
White chocolate is the foundation—its creamy, buttery profile sets the stage for the peppermint. A 12‑oz bar of good quality white chocolate melts smoothly, delivering a silky texture that coats the palate. If you skip it, the bark will feel thin and lack the luxurious mouthfeel that makes it so indulgent. For a richer taste, you can choose a chocolate with a higher cocoa butter content, which will give the bark a silkier finish.
The Dark Chocolate Layer
Dark chocolate brings depth and a slight bitterness that balances the sweetness of the white chocolate. An 8‑oz bar of 70% cacao is ideal; it’s robust enough to hold its shape but not so bitter that it overwhelms the mint. If you prefer a smoother profile, opt for 60% cacao, but remember that the lower the cacao, the sweeter the chocolate will taste. Skipping this layer will leave the bark feeling one‑dimensional.
The Crushed Candy Cane Crunch
Crushed candy canes are the star of the show. They add a peppery, minty crunch that breaks the monotony of pure chocolate. Use 1 cup of crushed candy canes, ensuring they’re finely broken so they distribute evenly. If you use whole or large pieces, the bark will be uneven and the texture will be unpredictable. You can also experiment with different colors—red and white for classic, or green for a fresh twist.
The Final Flourish
Peppermint extract is the subtle but crucial finishing touch. A single teaspoon of high‑quality peppermint extract amplifies the mint flavor without making it taste like artificial toothpaste. A pinch of sea salt brightens the chocolate’s sweetness, while a tablespoon of butter adds a glossy sheen. Finally, a couple of tablespoons of powdered sugar can be dusted lightly for a sweet finish, but it’s optional if you prefer a cleaner taste.
Everything's prepped? Good. Let's get into the real action…
The Method — Step by Step
- Step 1: Preheat your oven to 350°F (175°C). Line a 9×13 inch baking sheet with parchment paper. This ensures the bark doesn’t stick and allows for easy removal. The parchment also adds a slight crispness to the edges when you break it.
- Step 2: Melt the white chocolate in a heat‑proof bowl over a pot of simmering water (double boiler method). Stir constantly until completely smooth. The goal is a glossy, silky texture—no lumps. Keep the temperature below 120°F (49°C) to avoid seizing.
- Step 3: Pour the melted white chocolate onto the prepared baking sheet, spreading it evenly with a spatula. Use a ruler to ensure a ½ inch thickness. Let it sit for 5 minutes; it will begin to set slightly, making it easier to handle.
- Step 4: Sprinkle the crushed candy cane evenly over the white chocolate layer. Press gently to ensure the pieces adhere. The candy will melt slightly, creating a sweet, peppery crust. This is where the crunch comes in—watch it as it starts to soften.
- Step 5: Melt the dark chocolate in the same double boiler, stirring until smooth. Once ready, pour it over the candy cane layer, creating a distinct stripe. Use a toothpick to swirl the dark chocolate through the white for a marbled effect, but keep it mostly separate for a clean look.
- Step 6: Add the peppermint extract and sea salt to the dark chocolate mixture. Stir until fully incorporated. The salt will cut through the sweetness, and the extract will give a lingering minty aftertaste. This step is the moment of truth; the aroma should be unmistakably festive.
- Step 7: Drizzle the melted butter over the top, then sprinkle the powdered sugar lightly if using. This final touch gives the bark a glossy sheen and a subtle sweet dusting. Let it sit at room temperature for 10 minutes to set the layers firmly.
- Step 8: Once set, cut the bark into bite‑size squares or strips. The edges should snap crisply, revealing the layered colors inside. Serve immediately or store as described below. Enjoy the moment of that perfect crackle with each bite.
That's it— you did it. But hold on, I've got a few more tricks that'll take this to another level…
Insider Tricks for Flawless Results
The Temperature Rule Nobody Follows
Chocolate is temperamental. The trick is to keep it below 120°F for white and 140°F for dark. Use a digital thermometer for precision. Even a 5°F difference can cause the bark to be grainy or sticky. I once made a batch that looked fine but tasted like melted butter—thanks to a slightly overheated chocolate.
Why Your Nose Knows Best
Before you set the bark, inhale the aroma of the melted chocolate. It should smell like fresh cocoa, not burnt. This simple sniff test ensures the chocolate is at the right temperature. If it smells off, give it a quick stir and let it cool a bit.
The 5‑Minute Rest That Changes Everything
After pouring the white chocolate, let it rest for exactly five minutes. This pause allows the chocolate to firm up enough to hold the candy cane layer without sticking. Skipping this step can result in a mushy bark that’s hard to cut cleanly.
The Secret of Even Layering
Use a ruler to measure the thickness of each chocolate layer. Consistency ensures that each bite has the same ratio of white to dark chocolate. A thicker white layer makes the bark sweeter, while a thicker dark layer adds depth. Experiment to find your preferred balance.
The Power of a Clean Surface
Always use parchment paper; it prevents sticking and makes cleanup a breeze. If you use foil, the bark may stick and crumble. For a glossy finish, lightly spray the parchment with cooking spray before pouring the chocolate.
The Final Touch: A Dusting of Powdered Sugar
A light dusting of powdered sugar gives a sweet finish and a slightly glossy look. It also helps the bark hold together. If you’re watching calories, you can skip this step; the bark will still be delicious.
Creative Twists and Variations
This recipe is a playground. Here are some of my favorite ways to switch things up:
Chocolate‑Only Delight
Replace the white chocolate with a second dark chocolate variety, like a 85% cacao bar. The result is a richer, less sweet bark that still carries the peppermint kick. Ideal for chocolate lovers who prefer a deeper flavor.
Coconut Cream Twist
Swirl in a thin layer of coconut cream between the chocolate layers. The coconut adds a tropical note that contrasts beautifully with the mint. It also gives the bark a silky mouthfeel.
Nutty Crunch
Add a handful of chopped almonds or hazelnuts to the crushed candy cane layer. The nuts bring a crunchy texture and nutty flavor that complements the chocolate. A perfect addition for those who love a bit of crunch.
Spiced Peppermint
Introduce a pinch of cinnamon or nutmeg to the peppermint extract. The warm spices add depth and make the bark feel like a holiday holiday treat. It’s a subtle shift that transforms the flavor profile.
Chocolate Chip Surprise
Drop in a few chocolate chips into the dark chocolate layer before pouring. The chips melt and create pockets of molten chocolate when you bite. This adds an unexpected gooeyness.
Minty Green Tea Layer
Replace the dark chocolate with matcha‑infused chocolate. The green tea’s earthy notes pair surprisingly well with peppermint, creating a sophisticated flavor. It’s a great choice for a more refined dessert.
Storing and Bringing It Back to Life
Fridge Storage
Wrap the bark tightly in parchment or foil and store in an airtight container at room temperature. It stays crisp for up to 2 weeks. The key is to keep it away from moisture, which can cause the chocolate to bloom.
Freezer Friendly
For longer storage, place the bark in a freezer‑safe bag. It can last up to 3 months. When ready to serve, let it thaw at room temperature for 30 minutes; it will regain its crispness.
Best Reheating Method
To revive a slightly stale bark, heat it gently in a 200°F (93°C) oven for 5 minutes. Alternatively, place a small piece in a microwave for 10 seconds, then let it sit for 30 seconds. A splash of water before reheating can help steam it back to perfection.