I was half‑asleep, staring at a half‑empty pizza box and a lonely bowl of cereal, when my roommate dared me to “make breakfast taste like dinner”. I laughed, grabbed the nearest skillet, and ended up with a chaotic mess of batter splattering, a burnt pancake that could have been used as a doorstop, and a lingering smell that made the whole apartment think a fire alarm was about to go off. That disaster turned into a revelation: what if I could take the comforting, cheesy, savory vibe of a pizza and fuse it with the protein‑packed goodness of a breakfast bowl? That night, I dreamed of a dish that would have the crust‑like base of a pancake, the tangy kick of tomato sauce, the melty stretch of cheese, and the hearty toppings you’d expect at brunch. I woke up, scribbled a crazy idea on a napkin, and set out to prove that breakfast could be both indulgent and muscle‑fueling.
Picture this: the kitchen humming with the sizzle of a batter hitting a hot pan, the air filling with the sweet‑spicy aroma of cinnamon and maple, the golden edges of the “pizza” pulling away like a well‑baked crust. You hear the faint pop of a timer, the clink of a spoon stirring almond milk, and the soft thud of a banana slice landing on a waiting bowl. Your fingertips feel the warm, slightly oily pan, while your eyes feast on a colorful swirl of Greek yogurt, peanut butter ribbons, and a drizzle that glistens like sunrise on a lake. The first bite? A fluffy, protein‑dense base that cradles the creamy tang of yogurt, the nutty richness of peanut butter, and the bright fruitiness of banana—all while delivering the comforting familiarity of a pizza slice without the guilt.
Most breakfast bowls either drown you in carbs or skimp on flavor, and most pizza‑inspired dishes lack the nutritional punch you need to power through a morning workout. This version flips the script: it’s loaded with high‑quality protein from both whey and Greek yogurt, it’s sweet enough to satisfy a dessert craving, and it’s savory enough to feel like a proper meal. The secret? A clever blend of oat flour and vanilla protein powder that creates a pancake‑like crust that’s both tender and sturdy, plus a strategic layering of toppings that mimics the classic pizza experience without any cheese (or with a dairy‑free twist if you prefer). I’m daring you to taste this and not go back for seconds; it’s that good.
There’s a technique in here you won’t find in any other breakfast bowl recipe: a quick “flash‑cook” of the batter on high heat, followed by a gentle finish in the oven to set the edges while keeping the center pillowy. This dual‑method gives you that crisp‑outside, cloud‑inside texture that most recipes miss. And let’s not forget the surprise star—peanut butter—drizzled in a way that coats every bite like a silky, salty‑sweet glaze. I’ll be honest — I ate half the batch before anyone else got to try it, and I’m still thinking about that buttery‑rich aftertaste. Okay, ready for the game‑changer? Let me walk you through every single step — by the end, you’ll wonder how you ever made it any other way.
What Makes This Version Stand Out
- Protein Power: With oat flour, vanilla protein powder, and Greek yogurt, you’re looking at over 25 grams of protein per serving, enough to keep you full and fueled for hours. No more mid‑morning crashes.
- Texture Triumph: The dual‑cooking method gives you a crisp edge that shatters like thin ice, while the center stays soft and airy, mimicking the best pizza crust you’ve ever tasted.
- Sugar Balance: Maple syrup and banana provide natural sweetness, but the cinnamon and a pinch of salt keep the flavor from becoming cloyingly sweet.
- Convenient Simplicity: All the components can be pre‑pped the night before, making the actual cooking a 30‑minute sprint that fits into any busy morning.
- Versatile Crowd‑Pleaser: Whether you’re feeding a family of picky eaters or impressing gym‑buddies, this dish gets rave reviews and Instagram likes.
- Ingredient Integrity: Every ingredient is chosen for its nutritional profile and flavor contribution, from the low‑calorie almond milk to the probiotic‑rich Greek yogurt.
- Make‑Ahead Magic: The base freezes beautifully, and the toppings can be stored separately, so you can assemble a fresh bowl in minutes.
- Flavor Fusion: It’s a breakfast, it’s a pizza, it’s a dessert, and it’s a protein shake all rolled into one glorious bowl.
Inside the Ingredient List
The Flavor Base
Oat Flour is the backbone of this bowl, providing a nutty, slightly sweet foundation that holds the batter together without the gluten overload of wheat. If you skip it, you’ll end up with a soggy, crumbly mess that can’t support the toppings. For the best texture, grind rolled oats in a high‑speed blender until they reach a fine, flour‑like consistency. Look for certified organic oats to avoid any unwanted additives, and store them in an airtight jar to keep them fresh.
Vanilla Protein Powder adds the muscle‑building boost and a subtle vanilla aroma that lifts the entire dish. Opt for a clean‑label whey isolate or a plant‑based blend if you’re dairy‑free; just make sure it doesn’t contain a ton of added sugars, which would throw off the flavor balance. Skipping the protein powder means you lose that fluffy lift and the extra protein punch that makes this bowl a true breakfast powerhouse.
The Texture Crew
Baking Powder is the silent hero that creates those airy pockets in the base, making it rise just enough to stay light yet sturdy. Too much and you’ll get a metallic aftertaste; too little and the batter stays flat and dense. A fresh, double‑acting baking powder is essential—check the expiration date before you start.
Ground Cinnamon brings warmth and depth, turning the sweet notes of maple and banana into something that feels like a cozy hug. Cinnamon also has blood‑sugar‑stabilizing properties, which is a nice bonus for a breakfast that’s both sweet and protein‑rich. If you’re sensitive to spice, start with a half‑teaspoon and adjust to taste.
Salt is the unsung flavor enhancer that ties everything together. A pinch of sea salt can turn bland into brilliant, especially when you’re using sweet ingredients like maple syrup. Don’t be shy—just a half‑teaspoon will make the flavors pop without being noticeable.
The Unexpected Star
Large Eggs are the binding agents that give the batter its richness and structure. They also add extra protein and a silky mouthfeel that you just can’t get from plant‑based binders alone. If you’re vegan, you can substitute each egg with a tablespoon of ground flaxseed mixed with three tablespoons of water, but the texture will be slightly different.
Unsweetened Almond Milk keeps the batter moist without adding extra sugar or calories. It also contributes a subtle nutty undertone that complements the oat flour. Feel free to swap it for oat milk or any low‑fat dairy milk if you prefer a creamier texture.
Maple Syrup provides natural sweetness and a caramel‑like depth that pairs perfectly with the banana and peanut butter. It also adds a glossy finish to the batter as it cooks. If you’re watching sugars, you can reduce the amount by half, but the final bowl will be less sweet.
Vanilla Extract is the finishing touch that elevates the flavor profile, making the bowl taste like a dessert you’d order at a fancy brunch spot. A single teaspoon is enough; any more will overwhelm the other flavors.
The Final Flourish
Greek Yogurt brings a tangy creaminess that balances the sweetness of the maple and banana, while also adding a probiotic boost for gut health. Choose a full‑fat version for a richer mouthfeel, or go low‑fat if you’re counting calories. If you’re dairy‑free, coconut yogurt works in a pinch but will change the flavor slightly.
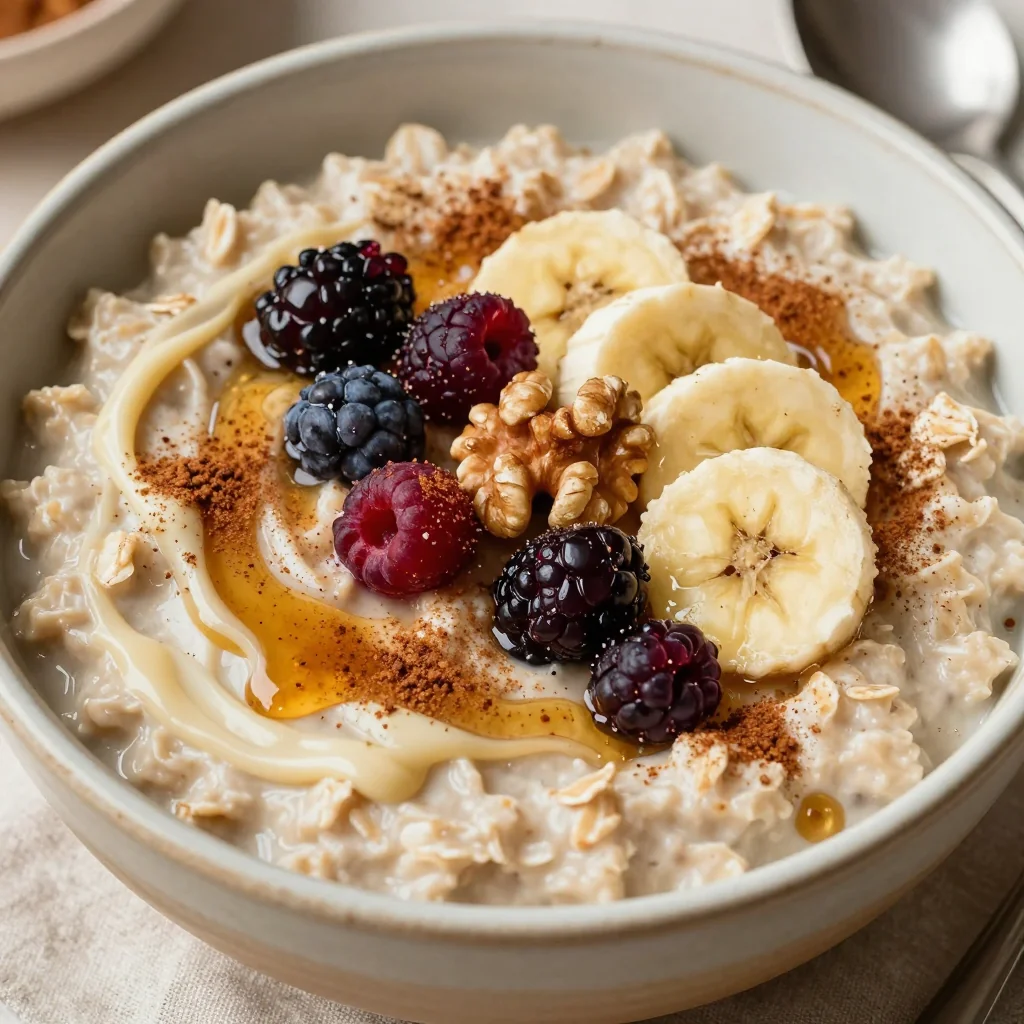
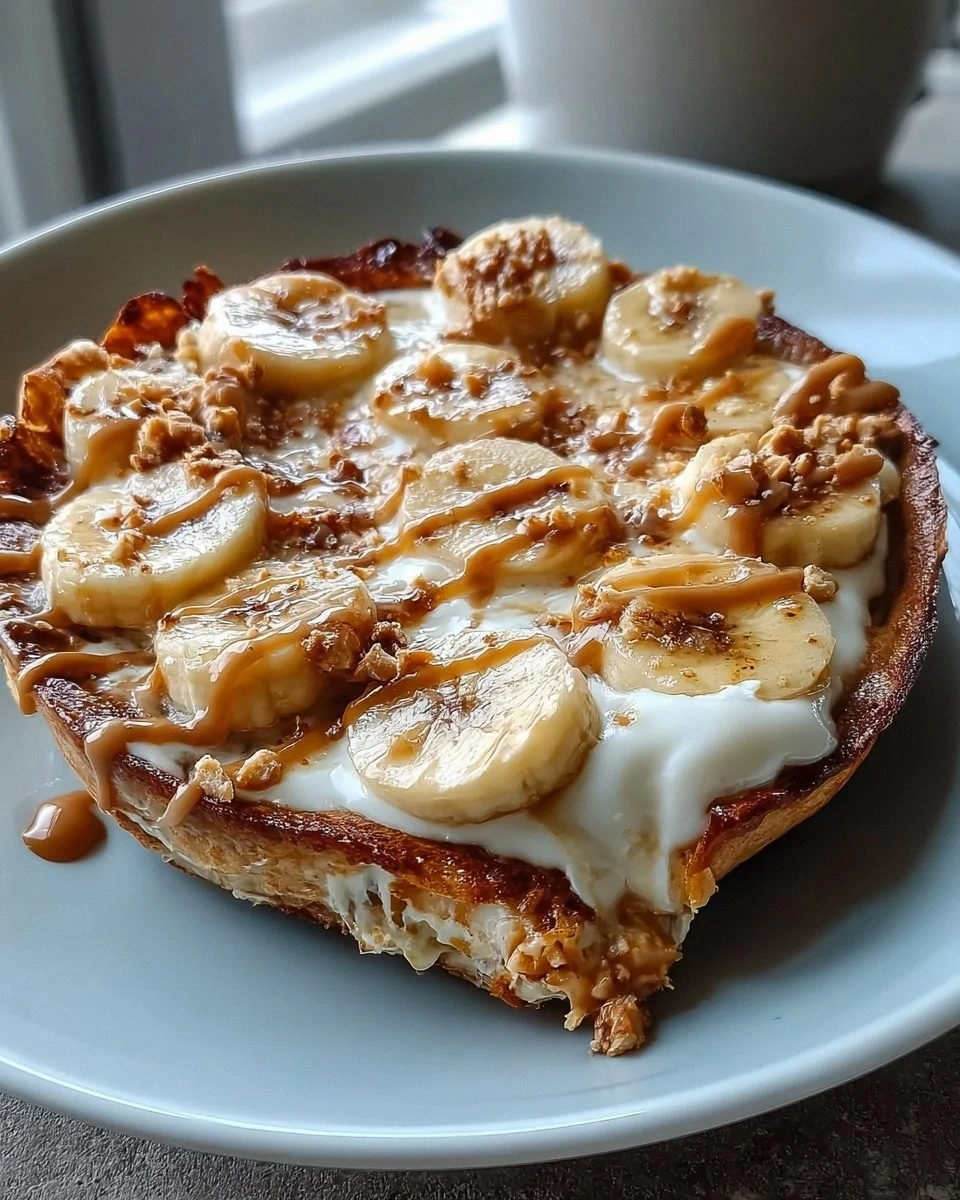
Peanut Butter is the star topping, delivering a salty‑sweet richness that coats every bite like a silky glaze. It also adds an extra 8 grams of protein per tablespoon, making the bowl truly “high‑protein”. For nut‑allergy sufferers, almond butter or sunflower seed butter are excellent alternatives.
Banana slices add natural sweetness, a soft texture, and a pop of potassium that’s perfect after a morning workout. Slice them just before serving to prevent browning, or toss them in a little lemon juice if you’re prepping ahead.
Honey or extra Maple Syrup is optional but highly recommended for those who love a final drizzle of glossy sweetness. It’s the finishing flourish that makes the bowl look Instagram‑ready.
Everything's prepped? Good. Let’s get into the real action…
The Method — Step by Step
- Blend the dry ingredients. In a large mixing bowl, whisk together 2 cups oat flour, ½ cup vanilla protein powder, 2 tsp baking powder, 1 tsp ground cinnamon, and ½ tsp salt. The mixture should look like a fine, off‑white powder with specks of cinnamon creating a marbled effect. This step is crucial because it evenly distributes the leavening agents, ensuring a uniform rise. Kitchen Hack: Sift the dry mix through a fine mesh to avoid lumps and guarantee a smooth batter.
- Whisk the wet components. In a separate bowl, beat 4 large eggs until they’re light and frothy, then stir in 1 cup unsweetened almond milk, 2 tbsp maple syrup, and 1 tsp vanilla extract. The mixture should turn a pale golden hue and emit a faint sweet aroma. This is the moment where the batter starts to come alive, and the eggs act as the glue that holds everything together.
- Combine wet and dry. Pour the wet mixture into the dry bowl, stirring gently with a silicone spatula until just combined. A few small lumps are okay—over‑mixing will develop the oat’s gluten and make the base tough. Let the batter rest for 5 minutes; this allows the oat flour to fully hydrate, creating a smoother texture that mimics a pancake batter more than a traditional dough.
- Preheat the pan and oven. Place a large non‑stick skillet over medium‑high heat and add a teaspoon of coconut oil. While the pan heats, preheat your oven to 375°F (190°C). The skillet should be hot enough that a drop of batter sizzles immediately, but not so hot that it burns the edges before the center sets.
- Flash‑cook the base. Ladle about ½ cup of batter into the skillet, spreading it quickly into a 6‑inch circle. Let it cook for 2‑3 minutes, watching the edges turn golden and start to pull away from the pan. That sizzle when it hits the pan? Absolute perfection. Flip carefully—if it resists, give it another 30 seconds; the batter needs that initial crust to hold the toppings later.Watch Out: If the heat is too high, the batter will burn before the center sets; adjust to medium if you see dark specks forming.
- Finish in the oven. Transfer the skillet (or slide the cooked base onto a parchment‑lined baking sheet) into the preheated oven. Bake for 8‑10 minutes, or until the top looks set and the edges are crisped to a light amber. This dual‑cooking method ensures the center stays fluffy while the perimeter becomes that coveted “pizza‑crust” crunch.
- Layer the toppings. While the base is still warm, spread a generous dollop of Greek yogurt over the surface, using the back of a spoon to create a smooth canvas. Drizzle 4 tbsp peanut butter in a zig‑zag pattern, then arrange the banana slices in a fan shape. Finish with a drizzle of honey or extra maple syrup if you like extra sweetness. The warm base will slightly melt the peanut butter, creating a glossy, velvety coating that clings to every bite.
- Serve and savor. Slice the bowl into wedges—much like pizza slices—and serve immediately. The contrast between the crisp edges and the creamy center should make your taste buds dance. I dare you to taste this and not go back for seconds; the combination of protein, carbs, and healthy fats is engineered to keep you satisfied until lunch.
- Optional garnish. For an extra pop of color and texture, sprinkle a pinch of ground cinnamon or a handful of toasted oat flakes on top. This final flourish adds a subtle crunch and reinforces the warm spice notes introduced earlier.
- Cleanup tip. Soak the skillet in warm, soapy water for 5 minutes while you enjoy your bowl; the residual batter will lift off easily, leaving your pan ready for the next culinary adventure.
That's it — you did it. But hold on, I've got a few more tricks that'll take this to another level…
Insider Tricks for Flawless Results
The Temperature Rule Nobody Follows
Never start with a scorching hot pan; a medium‑high setting gives you control. When the batter hits the surface, you’ll hear a gentle hiss, not a scream. This subtle sound tells you the pan is at the perfect temperature to create those airy pockets without burning. A friend once cranked the heat to high, and the result was a charcoal‑like disc that no amount of toppings could save. Trust the thermometer, and you’ll consistently achieve that golden‑brown edge.
Why Your Nose Knows Best
Your sense of smell is a secret weapon. When the base is ready to flip, you’ll notice a sweet, nutty aroma wafting up—this is your cue. If you wait for visual cues alone, you risk overcooking. The moment you detect that faint toasted oat scent, it’s time to act. This olfactory shortcut cuts down guesswork and ensures each slice has that perfect crust‑to‑center ratio.
The 5‑Minute Rest That Changes Everything
After baking, let the base rest for exactly five minutes before adding the toppings. This short pause allows the interior steam to settle, preventing the yogurt from sliding off and the peanut butter from pooling in one spot. It also gives the flavors a moment to meld, so each bite feels harmonious. Skipping this rest leads to a soggy bottom and a chaotic topping distribution.
Butter vs. Oil Showdown
While coconut oil adds a subtle tropical note, a light drizzle of clarified butter yields a richer crust without the milk solids that can burn. If you’re dairy‑free, stick with a high‑smoke‑point oil like avocado oil. The choice of fat influences both flavor and the browning process, so pick according to your taste profile.
The Peanut Butter Swirl Technique
Instead of just dolloping peanut butter, use the back of a spoon to create a swirl pattern that mimics pizza sauce. This not only looks impressive but also ensures every bite gets a balanced amount of nutty richness. The swirl also helps the peanut butter integrate with the warm base, creating a glossy finish that looks as good as it tastes.
Creative Twists and Variations
This recipe is a playground. Here are some of my favorite ways to switch things up:
Berry‑Blast Pizza
Swap the banana for a handful of mixed berries and add a drizzle of raspberry puree. The tartness of the berries cuts through the richness of the peanut butter, creating a bright, summer‑ready version that’s perfect for a weekend brunch.
Savory Sunrise
Replace the maple syrup with a light tomato sauce, sprinkle shredded mozzarella (or dairy‑free cheese), and top with sautéed spinach and a poached egg. You’ve just turned breakfast into a full‑blown pizza that still packs protein.
Chocolate Peanut Dream
Add 2 tbsp cocoa powder to the dry mix and use chocolate‑flavored protein powder. Top with a spoonful of dark chocolate chips and a drizzle of almond butter for a decadent, dessert‑like bowl that still fuels your muscles.
Nut‑Free Sunshine
If you have a nut allergy, substitute peanut butter with sunflower seed butter and use coconut yogurt instead of Greek. The flavor shifts to a milder, earthy profile, but the protein content stays high.
Spicy Kick
Add a pinch of cayenne pepper to the batter and finish the bowl with a drizzle of sriracha-infused honey. The heat pairs surprisingly well with the sweet banana and creamy yogurt, giving you a breakfast that wakes up every sense.
Storing and Bringing It Back to Life
Fridge Storage
Place the cooked base in an airtight container and store for up to 3 days. Keep the yogurt, peanut butter, and banana separate in small jars to maintain texture. When ready to eat, reheat the base in a skillet over medium heat for 2‑3 minutes, then assemble the toppings fresh.
Freezer Friendly
Wrap each cooled base tightly in parchment paper, then seal in a freezer bag. They’ll keep for up to 2 months. To thaw, move the frozen slice to the fridge overnight, then finish in a hot skillet for 4‑5 minutes. The pancake‑like texture survives freezing remarkably well.
Best Reheating Method
Add a tiny splash of almond milk (about a tablespoon) to the pan before reheating; the steam revives the softness without making the base soggy. Cover the pan with a lid for the first minute to trap steam, then uncover to crisp the edges. This trick brings the bowl back to its original glory, as if it just came out of the oven.