I remember the night I tried to recreate the dessert that my friend swore was the “sweetest, most guilt‑free treat” she’d ever tasted. The kitchen was a battlefield: melted butter, a handful of berries, and a bowl of heavy cream that seemed to have a mind of its own. The moment the mixture hit the blender, I felt a rush of anticipation—and a faint whiff of burnt sugar that sent me scrambling for the fridge. I was determined to turn that chaotic mess into a silky, low‑carb masterpiece that would make my taste buds sing and my friends beg for seconds.
Picture the scene: a countertop cluttered with almond flour, gelatin, and a jar of unsweetened almond milk. The air is thick with the scent of vanilla and citrus, while the berries crackle softly in the blender’s hum. Every ingredient is a character, each with a distinct personality: the heavy cream’s rich, velvety presence, the gelatin’s quiet, firming promise, the berries’ bright, tart sparkle. My hands, a bit clumsy, whisk, stir, and measure—each motion a step toward a dessert that feels both indulgent and responsible. The anticipation builds until the final splash of lemon zest turns the mixture into a glossy, almost liquid gold.
What makes this version stand out? It’s not just the low‑carb profile or the fresh berries—it’s the balance of textures, the depth of flavor, and the way the recipe invites you to experiment. The heavy cream provides that classic, decadent mouthfeel that melts on the tongue, while the gelatin keeps the ice cream firm without the need for dairy‑based thickeners. The berries are not merely a garnish; they’re the star, their natural sweetness cutting through the richness. The lemon zest adds a citrusy lift that brightens the palate, and the vanilla extract ties everything together into a cohesive, aromatic harmony. I dare you to taste this and not go back for seconds. The result is a dessert that’s hands down the best version you’ll ever make at home.
If you’ve ever struggled to find a low‑carb dessert that doesn’t taste like a compromise, you’re not alone. I’ve been there—trying to satisfy a sweet tooth while staying on track. This recipe solves that dilemma by marrying indulgence with healthiness, all in a single bowl. The technique I’ll reveal—a simple yet game‑changing method to achieve the perfect custard base—will leave you wondering why you ever settled for anything else. So, let’s walk through each step, and by the end, you’ll wonder how you ever made it any other way.
What Makes This Version Stand Out
- Richness: The heavy cream gives the ice cream a luxuriously silky texture that feels like a dessert on a spoon, not a diet snack. It’s the kind of richness that melts in your mouth and lingers with a hint of buttery aftertaste.
- Freshness: Fresh berries are the heart of this dessert, providing bright, natural sweetness that cuts through the cream’s density. The berries stay juicy, not mushy, because the gelatin locks them in place.
- Low Carb: By replacing high‑carb sugars with erythritol or another sugar substitute, the recipe stays under 30 grams of net carbs per serving while still delivering a satisfying sweet hit.
- Texture: Gelatin gives the ice cream a firm, scoop‑able consistency that resists melting, even on a sunny day. It’s a texture that feels indulgent but isn’t sticky or overly dense.
- Flavor Complexity: Vanilla and lemon zest intertwine to create a layered flavor profile—sweet, citrusy, and aromatic—without overpowering the berries.
- Make‑Ahead Friendly: This dessert can be made a day ahead and stored in the freezer without losing quality, making it perfect for parties or a quick treat.
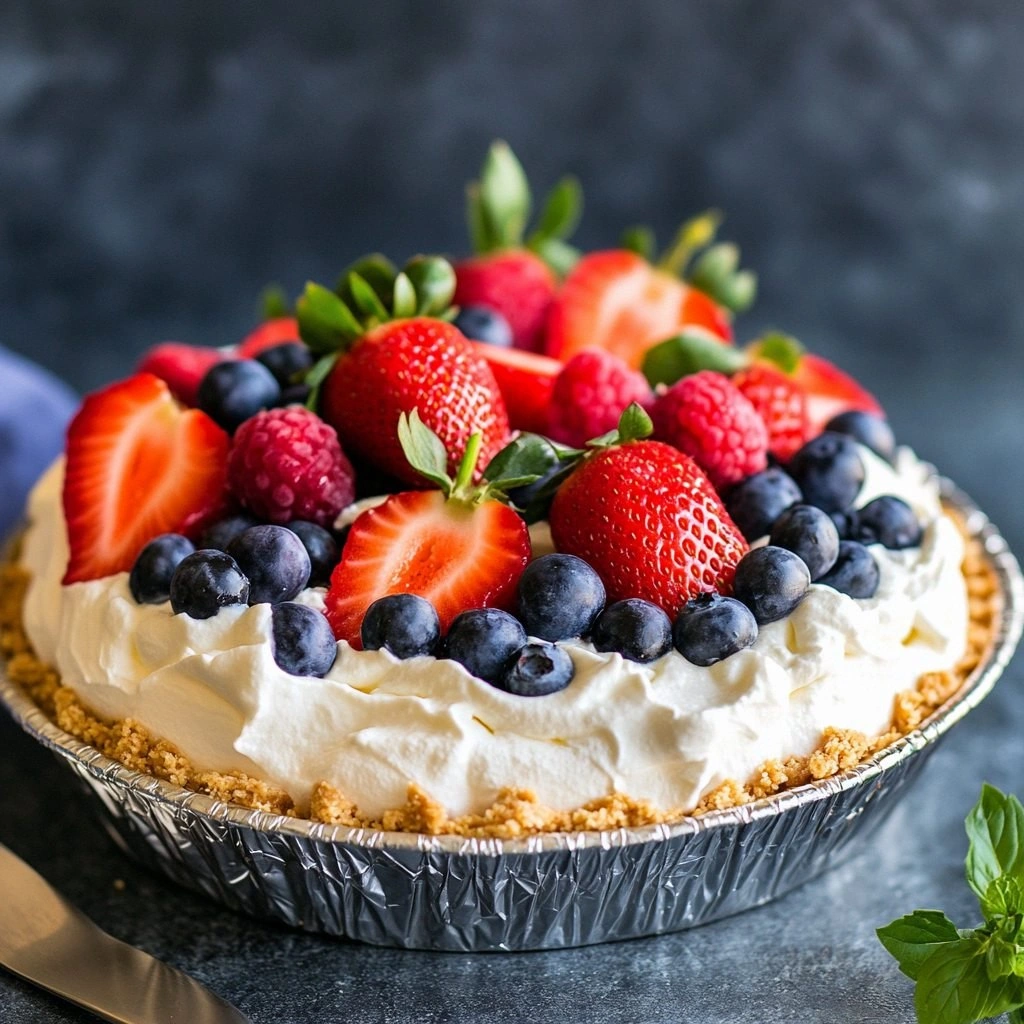
- Visual Appeal: The contrast of creamy white ice cream with vibrant berries creates a striking plate that’s as pleasing to the eye as it is to the palate.
Alright, let’s break down exactly what goes into this masterpiece. The next section will dive into each ingredient, explaining why it matters and how it contributes to the final experience.
Inside the Ingredient List
The Flavor Base
Heavy cream is the backbone of this dessert. It delivers the classic dairy richness that melts on the tongue, providing a creamy mouthfeel that’s essential for any indulgent ice cream. Skipping the cream would turn the texture into a watery, insipid mess that fails to satisfy. If you’re looking for a lower fat option, you can swap in a half‑and‑half blend of coconut milk and heavy cream, but the result will be slightly lighter and less luscious.
The Sweetener
Erythritol is the star sweetener in this recipe. It’s a zero‑calorie sugar substitute that offers a clean, almost sugar‑like sweetness without the aftertaste of other sweeteners. The key is to use it in the right amount—too little and the dessert will taste bland; too much and it becomes overly sweet. If you’re allergic to erythritol or prefer a different sweetener, you can use stevia or monk fruit, but you’ll need to adjust the quantity to taste.
The Texture Crew
Gelatin is the unsung hero that gives the ice cream its firm, scoopable consistency. It works by forming a delicate network that traps air and keeps the mixture from melting too quickly. If you’re vegan or have a gelatin allergy, you can replace it with agar‑agar or carrageenan, but the texture will be slightly different—more gelatinous and less elastic. The gelatin must be fully dissolved in a small amount of warm liquid before being mixed into the cream; otherwise, it will form clumps that ruin the texture.
The Unexpected Star
Lemon zest adds a bright, citrusy lift that cuts through the richness of the cream. Its aromatic oils give a fresh zing that balances the sweetness of the berries and the sweetness of the erythritol. Skipping the zest will make the dessert taste flat and overly sweet; including it brings a subtle complexity that elevates the overall flavor profile. If you’re not a fan of citrus, you can use orange zest for a sweeter, sweeter note.
The Final Flourish
Fresh berries are the final flourish that turns this dessert into a vibrant, Instagram‑worthy treat. They add natural sweetness, color, and a burst of juiciness that contrasts with the silky ice cream. If you’re in the off‑season, frozen berries work well—just thaw them and pat dry to avoid excess water. The berries should be added after the ice cream has set to preserve their texture; otherwise, they’ll break down and make the ice cream soggy.
Everything’s prepped? Good. Let’s get into the real action.
The Method — Step by Step
- Prepare the gelatin: In a small saucepan, sprinkle 1 tablespoon of powdered gelatin over 1/4 cup of cold water. Let it bloom for 5 minutes. Then, gently heat it over low heat until the gelatin dissolves completely, stirring continuously. This step ensures a smooth, clump‑free base for the ice cream. Once dissolved, set the mixture aside to cool slightly.
- Blend the berries: Place 1 cup of fresh mixed berries into a blender or food processor. Add 1 tablespoon of lemon zest and 1 teaspoon of vanilla extract. Pulse until the berries are pureed but still slightly chunky for texture. The berries should be bright, fragrant, and slightly glossy. If you prefer a smoother texture, blend until fully smooth.
- Combine liquids: In a large mixing bowl, whisk together 2 cups of heavy cream, 1 cup of unsweetened almond milk, and 1/2 cup of erythritol. Stir until the erythritol is completely dissolved, creating a sweet, creamy mixture. This step is crucial—any undissolved sweetener will result in a gritty texture.
- Integrate the gelatin: Slowly pour the cooled gelatin mixture into the cream mixture, whisking constantly to ensure even distribution. The gelatin will thicken the mixture, giving it a custard‑like consistency. If you notice any lumps, strain the mixture through a fine sieve.
- Fold in the berry puree: Gently fold the berry puree into the cream mixture, using a spatula to keep the mixture airy. The berries should be evenly dispersed, creating a beautiful marbled effect. This is the moment when the dessert’s visual appeal starts to shine. If you prefer a uniform color, you can blend the berries until smooth before folding.
- Chill the base: Cover the mixture and refrigerate for at least 1 hour, or until it’s cold enough to churn. The chilling step is vital for a smooth, creamy final product; a warm base will result in ice crystals.
- Churn the ice cream: Pour the chilled mixture into an ice cream maker and churn according to the manufacturer’s instructions, usually about 20–25 minutes. The churned mixture should have a soft, creamy consistency, not icy or grainy. If your machine has a “soft serve” setting, use it for a lighter texture.
- Freeze the ice cream: Transfer the churned ice cream to an airtight container and smooth the surface with a spatula. Place it in the freezer for at least 4 hours, or until firm. The longer it freezes, the easier it will be to scoop. When ready to serve, let the ice cream sit at room temperature for 5 minutes to soften slightly.
- Serve: Scoop the ice cream into bowls or glasses, and top with 1/2 cup of fresh berries and a drizzle of extra heavy cream if desired. Garnish with a sprinkle of chopped nuts for added crunch. Present it with a small spoon and a smile; the aroma alone will tempt anyone to indulge.
That’s it—you did it. But hold on, I’ve got a few more tricks that will take this to another level. These insider tips will help you avoid common pitfalls and elevate the flavor profile even further.
Insider Tricks for Flawless Results
The Temperature Rule Nobody Follows
The key to silky ice cream is temperature control. The base should be chilled to 35°F before churning; if it’s too warm, the ice crystals will grow large and the texture will become icy. Use a kitchen thermometer to monitor the mixture’s temperature. If you’re short on time, place the mixture in the freezer for 20 minutes and then whisk it vigorously to cool it faster.
Why Your Nose Knows Best
Smell is your best ally when cooking. When the berries are pureed, they should emit a bright, fruity aroma. If the scent is muted, the berries are over‑blended or not fresh. A strong citrus scent from the lemon zest indicates the zest is fresh and will add a bright lift to the ice cream.
The 5-Minute Rest That Changes Everything
After churning, let the ice cream rest for 5 minutes before freezing. This short rest allows the mixture to set slightly, making it easier to scoop later. It also helps the flavors meld together, creating a more cohesive taste. A friend tried skipping this step once, and the result was a crumbly mess that didn’t hold together.
The Sweet Spot for Erythritol
Erythritol can be slightly grainy if not fully dissolved. Dissolve it in the almond milk before adding the cream to ensure a smooth texture. If you notice a gritty bite, add a splash more almond milk and whisk vigorously. The extra liquid helps the erythritol dissolve completely.
The Perfect Garnish
A drizzle of extra heavy cream and a sprinkle of toasted nuts can turn a simple dessert into a showstopper. Toast the nuts in a dry pan until golden, then let them cool before sprinkling. The crunch adds a delightful contrast to the creamy ice cream.
Creative Twists and Variations
This recipe is a playground. Here are some of my favorite ways to switch things up:
Berry‑Berry Bliss
Swap the mixed berries for a single variety—such as pure blueberries or ripe strawberries—for a more focused flavor. The result is a dessert that showcases the berry’s natural sweetness and aroma, making it perfect for berry lovers.
Chocolate‑Berry Fusion
Add 1 tablespoon of unsweetened cocoa powder to the cream mixture for a chocolate undertone that pairs beautifully with the berries. The cocoa adds depth and a slightly bitter counterpoint to the sweet berries.
Minty Fresh
Incorporate 1 teaspoon of fresh mint leaves into the berry puree for a cool, refreshing twist. The mint’s bright flavor will cut through the richness, making this dessert ideal for hot summer afternoons.
Spiced Berry Delight
Add a pinch of ground cinnamon or nutmeg to the cream mixture for a warm, aromatic flavor profile. The spices will enhance the berries’ natural sweetness and add a cozy feel.
Coconut Cream Variation
Replace the heavy cream with full‑fat coconut milk for a tropical twist. The coconut’s natural sweetness and creamy texture will complement the berries while keeping the dessert low in carbs.
Vegan Delight
Use a plant‑based milk, a vegan sweetener, and agar‑agar instead of gelatin. This version maintains the same silky texture and sweet flavor while being completely dairy‑free.
Storing and Bringing It Back to Life
Fridge Storage
Store the ice cream in an airtight container in the refrigerator for up to 3 days. Before serving, let it sit at room temperature for 5–10 minutes to soften. If the surface has formed a thin film, simply scrape it off with a knife before scooping.
Freezer Friendly
For longer storage, keep the ice cream in the freezer for up to 2 weeks. Use a freezer‑safe container with a lid to prevent freezer burn. When you’re ready to enjoy, let it thaw for 5–10 minutes for easier scooping.
Best Reheating Method
If the ice cream has become too hard, reheat it gently in a microwave at 20% power for 10–15 seconds. Add a tiny splash of water or milk to steam the mixture back to a creamy consistency. Stir well before serving.