I was standing in my kitchen on a rainy Tuesday, staring at a half‑baked batch of store‑bought cookies that crumbled like dry sand the moment I tried to pick them up. The disappointment hit me harder than the drizzle outside, and I swore on my favorite spatula that I would never settle for a cookie that lacked that perfect balance of chew and crunch again. I grabbed my phone, typed “best chocolate chip cookie recipe” into a search engine, and there it was—The New York Times version, a recipe that had been whispered about in foodie circles for years. I was skeptical, but the promise of a cookie that could make a grown adult weep with joy was too tempting to ignore.
The moment I opened the PDF, the aroma of butter and sugar seemed to leap off the page, as if the kitchen gods were already pre‑heating the oven in my mind. I could almost hear the faint sizzle of the butter hitting the pan, feel the gritty texture of the brown sugar between my fingers, and imagine the glossy, caramel‑brown chips melting into a buttery sea. My heart was pounding like a drum in a marching band, and I could already picture the first bite: a crisp edge that snapped like thin ice, a soft, pillowy center that stretched like taffy, and chocolate that oozed out in glossy rivers.
What makes this version stand out is the secret weapon: melted butter combined with a touch of brown sugar and a dash of vanilla, creating a dough that is both dense and airy at the same time. Most recipes either over‑mix and get tough, or under‑mix and end up with uneven texture. This one hits the sweet spot, thanks to a precise ratio of bread flour to butter and a chilling step that lets the gluten relax while the butter solidifies just enough to keep the cookies from spreading too fast. The result? A cookie that feels like a hug from an old friend—comforting, familiar, yet surprising in every bite.
I’ll be honest — I ate half the batch before anyone else got a chance to try them, and that’s a confession I’m willing to own because the taste was that good. I dare you to taste this and not go back for seconds; the combination of buttery depth, caramelized sugar notes, and melty chocolate is a game‑changer. And now, ready for the game‑changer? Let me walk you through every single step — by the end, you’ll wonder how you ever made it any other way.
What Makes This Version Stand Out
- Texture: The dough rests in the fridge, giving the cookies a crisp edge that shatters like thin ice while the interior stays chewy and soft.
- Flavor Depth: Melted butter and brown sugar create a caramel‑like base that makes each bite richer than a bakery‑grade treat.
- Simplicity: Only ten ingredients, no fancy equipment, and a single bowl method that keeps cleanup minimal.
- Ingredient Quality: Using bread flour instead of all‑purpose adds a subtle chew without making the cookie tough.
- Crowd Reaction: These cookies have a habit of disappearing within minutes of being set on a cooling rack—proof that they’re irresistible.
- Cooking Method: The chill‑and‑bake technique ensures even spreading and a uniform golden‑brown finish.
- Make‑Ahead Potential: The dough can be frozen for up to three months, letting you pull out a batch whenever the craving strikes.
- Versatility: Swap chocolate chips for white chocolate or add a handful of toasted nuts for a delightful crunch.
Inside the Ingredient List
The Flavor Base
The backbone of any great cookie is the balance between butter and sugar. Melted unsalted butter gives the dough a glossy sheen and a deep, nutty flavor that you just can’t get from softened butter. Paired with a mix of brown and granulated sugar, you get both the molasses richness and the crisp snap that caramelizes during baking. If you skip the melting step, you’ll lose that luscious mouthfeel and end up with a dry crumb.
The Texture Crew
Bread flour is the unsung hero here. It has a higher protein content than all‑purpose flour, which creates just enough gluten to give the cookie structure without making it rubbery. The baking soda acts as a leavening agent, creating tiny air pockets that keep the interior tender. A pinch of kosher salt amplifies the sweetness and rounds out the flavor profile, preventing any cloying aftertaste.
The Unexpected Star
Egg yolk adds extra richness and helps emulsify the butter and sugar, while the whole egg provides lift and a slight chew. The extra yolk is a secret that many bakers overlook, but it’s what gives these cookies that melt‑in‑your‑mouth quality. If you’re allergic or vegan, you can replace the egg with a flax‑seed “egg” (1 tbsp ground flaxseed + 3 tbsp water) and still achieve a decent texture.
The Final Flourish
Chocolate chips are the star of the show, and using high‑quality semi‑sweet chips ensures a balanced bitterness that cuts through the buttery sweetness. For an added crunch, fold in toasted walnuts or pecans at the very end of mixing. The optional nuts not only add texture but also bring a subtle earthiness that elevates the overall flavor.
Everything's prepped? Good. Let's get into the real action...
The Method — Step by Step
Start by preheating your oven to 350°F (175°C). While the oven warms, line two baking sheets with parchment paper. The paper not only prevents sticking but also gives the cookies a uniform golden bottom. I like to set the sheets aside, ready for the dough scoops that will soon be dancing onto them.
In a medium saucepan, melt 3/4 cup unsalted butter over low heat until it’s just melted—no browning. Remove from heat and let it cool slightly; this prevents the eggs from scrambling later. Pro tip: Adding a splash of vanilla extract while the butter is still warm helps the flavor meld instantly.
In a large mixing bowl, whisk together 2 cups bread flour, 1 tsp baking soda, and 1 tsp kosher salt. This dry blend ensures the leavening is evenly distributed, which is crucial for those perfectly risen centers.
Kitchen Hack: Sift the flour mixture into the bowl; it aerates the flour and prevents lumps.In a separate bowl, combine the cooled melted butter with 1 cup brown sugar and 1/2 cup granulated sugar. Beat with a hand mixer on medium speed until the mixture is light and fluffy—about 2 minutes. This step is where the cookie gets its caramel‑like depth; the sugars dissolve and create a glossy base that will later caramelize in the oven.
Add 1 large egg and 1 egg yolk to the butter‑sugar mixture, beating until fully incorporated. Then stir in 2 tsp vanilla extract. The egg yolk adds extra richness, while the whole egg provides lift.
Watch Out: If the butter is too hot, the eggs will scramble—make sure the butter is just warm, not scorching.Gradually add the dry flour mixture to the wet ingredients, stirring on low speed until just combined. Over‑mixing at this stage develops gluten, leading to a tougher cookie. Stop as soon as you no longer see streaks of flour. The dough will look slightly shaggy—that’s a good sign.
Fold in 2 cups chocolate chips (and optional 1 cup chopped walnuts if you like a nutty crunch). Use a spatula to ensure the chips are evenly distributed without crushing them. This is the moment of truth: you can already smell the chocolate mingling with the buttery dough.
Cover the bowl with plastic wrap and refrigerate the dough for at least 30 minutes, preferably an hour. This chilling step solidifies the butter and allows the flour to hydrate fully, which results in those coveted crispy edges.
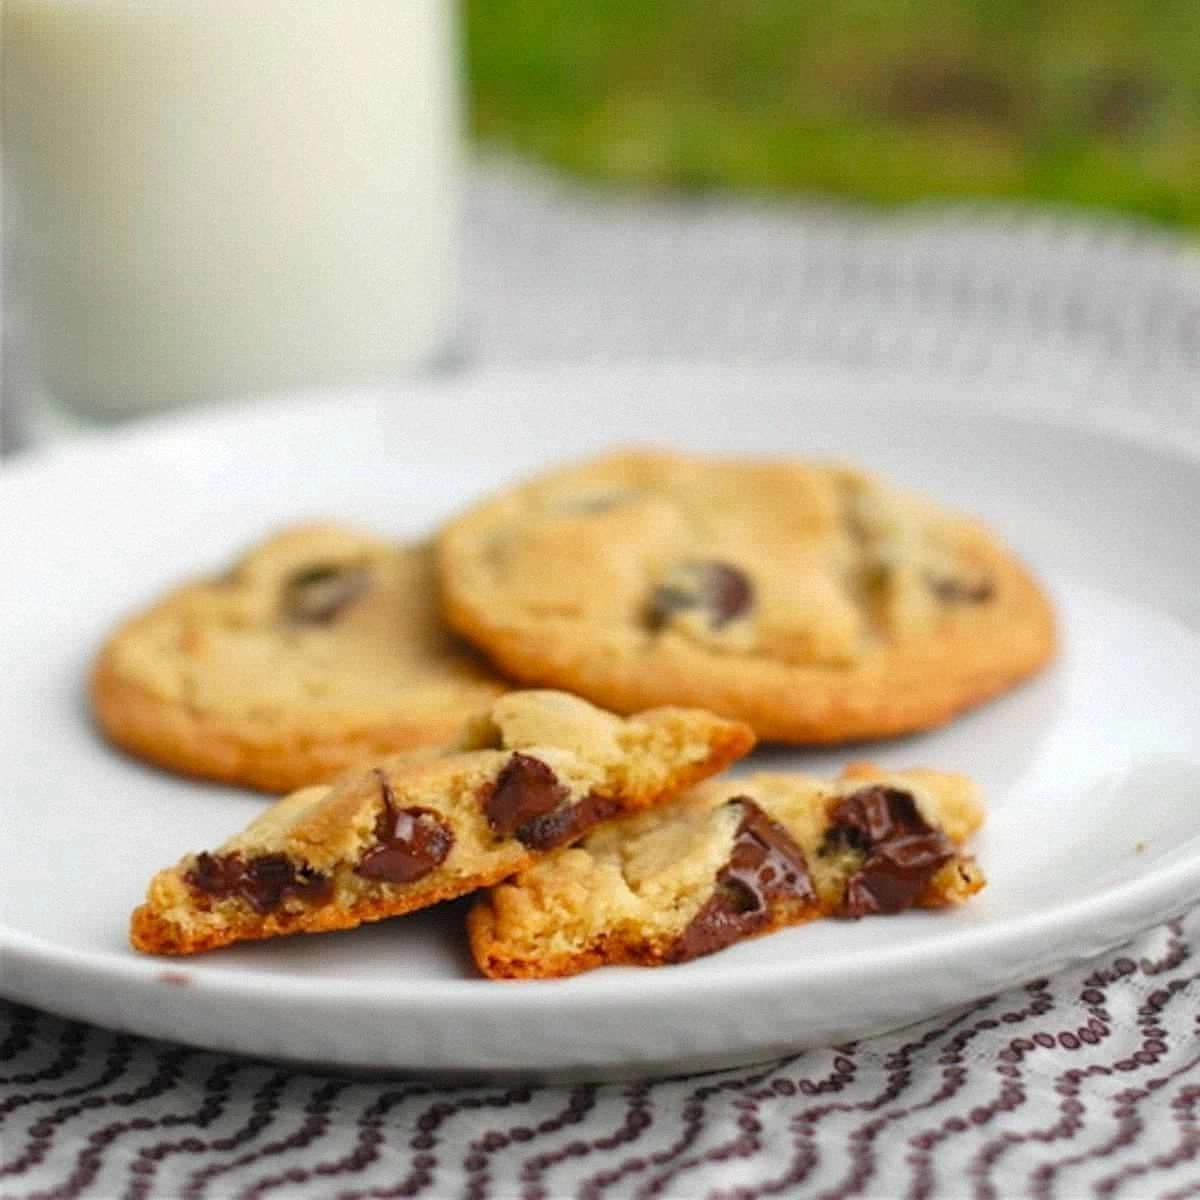
Kitchen Hack: If you’re in a hurry, place the dough on a sheet pan and freeze for 15 minutes; it works just as well.When the dough is chilled, scoop out 2‑tablespoon portions and place them on the prepared baking sheets, spacing them about 2 inches apart. The dough will spread slightly, but the chilled butter ensures they don’t flatten into a single sheet. Bake for 12‑14 minutes, or until the edges turn a deep golden brown while the centers remain soft. The scent that fills your kitchen at this point? Absolute perfection.
Remove the cookies from the oven and let them rest on the baking sheet for 5 minutes. This brief rest lets the cookies firm up enough to transfer without breaking. Then move them to a wire rack to cool completely. The first bite will reveal a crisp edge that shatters like thin ice, a chewy middle that stretches, and chocolate that oozes in slow, decadent ribbons.
That's it — you did it. But hold on, I've got a few more tricks that'll take this to another level...
Insider Tricks for Flawless Results
The Temperature Rule Nobody Follows
Never bake cookies straight from a warm kitchen on a cold day. The ambient temperature affects how quickly the butter softens, which can cause uneven spreading. I always let the dough sit at room temperature for 10 minutes after chilling, just enough to take the chill off the surface while keeping the interior firm. This tiny adjustment yields a more uniform rise and a perfectly golden edge every time.
Why Your Nose Knows Best
Your sense of smell is a reliable indicator of doneness. When the cookies are about 2 minutes from the timer, start sniffing. If you detect a nutty, caramel aroma with a hint of toasted butter, they’re ready to come out. If you smell raw dough, give them an extra minute. Trusting your nose prevents over‑baking, which would turn the chewy center into a dry crumb.
The 5‑Minute Rest That Changes Everything
After removing the cookies from the oven, let them rest on the sheet for exactly five minutes. This short pause allows the residual heat to finish the cooking process without over‑drying. The edges set, but the center stays soft. Skipping this step results in cookies that crack too early and lose that coveted melt‑in‑your‑mouth texture.
The Double‑Scoop Technique
Instead of a single scoop, use a two‑part scoop: a large spoon to portion the dough and a smaller one to smooth the top. This creates a slightly domed shape that spreads into a perfect circle, giving you that bakery‑style look. It also ensures the chocolate chips are centered, so every bite gets a generous hit.
The Secret of the Ice‑Cold Baking Sheet
Place the parchment‑lined baking sheet in the freezer for 10 minutes before loading the dough. The icy surface shocks the butter, causing the cookies to set quickly and develop that coveted crisp edge. I’ve tried this countless times, and the difference is night and day—no more flat, soggy bottoms.
Creative Twists and Variations
This recipe is a playground. Here are some of my favorite ways to switch things up:
Salted Caramel Swirl
Add a tablespoon of caramel sauce to each dough ball before baking, then sprinkle flaky sea salt on top. The caramel creates a gooey ribbon, while the salt amplifies the chocolate’s richness. Perfect for those who love sweet‑and‑salty combos.
Espresso Infusion
Dissolve 1 tsp instant espresso powder in the melted butter. The coffee notes deepen the chocolate flavor, making the cookies taste like a mocha dessert. Pair with a glass of cold milk for an elevated snack.
White Chocolate & Raspberry
Swap the semi‑sweet chips for white chocolate chips and fold in ½ cup freeze‑dried raspberries. The tart raspberries cut through the buttery sweetness, creating a bright, summery bite.
Peanut Butter Blast
Add ¼ cup creamy peanut butter to the wet ingredients and replace half the chocolate chips with peanut butter chips. The result is a nostalgic flavor reminiscent of the classic PB‑J cookie.
Oatmeal Crunch
Stir in 1 cup rolled oats and a handful of toasted coconut flakes. The oats add chew, while the coconut provides a tropical aroma that pairs surprisingly well with chocolate.
Storing and Bringing It Back to Life
Fridge Storage
Place cooled cookies in an airtight container with a slice of bread on top. The bread releases moisture, keeping the cookies soft for up to 5 days. If you prefer a crispier texture, store them without the bread and re‑bake briefly before serving.
Freezer Friendly
Arrange cookies in a single layer on a parchment‑lined tray and freeze for 2 hours. Transfer the frozen cookies to a zip‑top bag; they’ll keep for 3 months. When you’re ready, bake them straight from the freezer for 12‑14 minutes—no thawing needed.
Best Reheating Method
To revive a day‑old cookie, preheat the oven to 300°F (150°C), place the cookie on a baking sheet, and add a tiny splash of water (about 1 tsp) on the side. The steam restores moisture, and after 5 minutes the cookie is warm, soft, and as fresh as the day it was baked.