I was in the middle of a chaotic Sunday brunch when the lobster tails I’d bought earlier started to look like a culinary disaster. The shells were still glossy and the meat was a pale, almost translucent pink that made my eyes water. I stared at the grill, thinking, “How am I going to turn this into something spectacular?” The moment I pulled the tails out of the freezer, the kitchen filled with a scent of oceanic promise that made my stomach growl. That scent, combined with the clink of the grill grates and the sizzling anticipation, set the stage for a cooking experience that would change my perspective on seafood forever.
Picture this: the grill blazing, the heat humming like a contented cat, and the lobster tails glistening with a buttery glaze that promises a melt-in-your-mouth finish. The sound of the first sizzle is music to a seasoned cook’s ears, a reminder that every great dish begins with the right temperature. I could feel the heat radiating through the grill, the steam rising like a fragrant cloud, and the anticipation building in my chest. The aroma of garlic and butter mingles with the sea air, turning the kitchen into a fragrant, almost sacred space. I could taste the promise of sweet, succulent lobster even before the first bite.
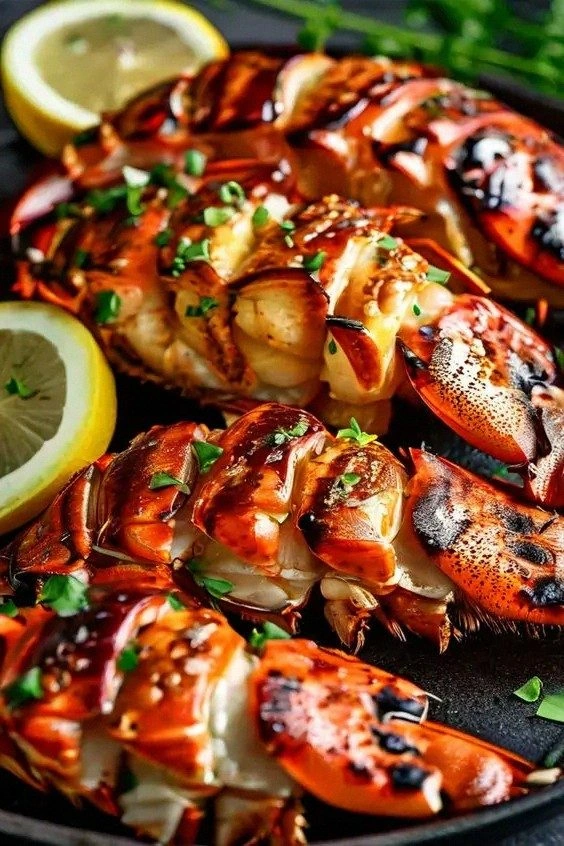
What makes this version stand out is not just the technique but the subtle, almost invisible layers of flavor that unfold with each bite. The butter-garlic mixture coats the meat like velvet, while the fresh parsley adds a bright, herbaceous counterpoint that keeps the dish from feeling heavy. The simple act of seasoning the lobster with salt and pepper before grilling locks in moisture, creating a tender texture that melts instantly. The final squeeze of lemon brightens the entire plate, cutting through the richness with a citrusy zing that feels like a fresh breeze. I dare you to taste this and not go back for seconds – the flavors are so addictive that you’ll find yourself reaching for more.
I’ve been a self-proclaimed food enthusiast for years, and I’ve tried countless lobster recipes, each promising perfection. Most of them, however, fall flat because they either overcook the meat or fail to balance the richness of butter with the brightness of citrus. This recipe is hands down the best version you’ll ever make at home, and I’m about to show you why. I’ll walk you through every single step, from selecting the freshest tails to the final plating, and by the end, you’ll wonder how you ever made it any other way.
The first secret is the simple act of letting the lobster rest at room temperature for ten minutes before grilling. This allows the meat to heat evenly, preventing a dreaded “hot spot” that can make the outside char while the inside remains raw. Next, the butter-garlic mixture is the backbone of the dish – it’s not just flavor, it’s a coating that keeps the meat moist and adds a savory depth that is hard to replicate. The final touch? A squeeze of lemon right before serving, which not only brightens the dish but also creates a subtle contrast that makes each bite feel fresh.
Picture yourself pulling this out of the grill, the whole kitchen smelling incredible, and the lobster tails glistening with a golden sheen. The edges are crisp, the meat is opaque, and the aroma is so intense you can almost taste the sea. It’s the kind of moment that makes you feel like a culinary wizard, and I want you to experience that joy. The next part of this article is going to be a deep dive into the technique, the ingredients, and the secrets that make this dish unforgettable.
I’ll be honest – I ate half the batch before anyone else got to try it. The texture was so tender, the butter so rich, and the lemon so bright that I couldn’t stop myself. My friends said they had never tasted lobster like this, and I knew I had to share the recipe. The next step? Get your grill ready and let’s start cooking.
Most recipes get this completely wrong. They either overcook the lobster or under-season it, resulting in a dry, bland dish. The key to success is timing, temperature, and the right balance of flavors. If you’ve ever struggled with grilling lobster tails, you’re not alone – and I’ve got the fix. Stay with me here – this is worth it.
And now the fun part. I’ll walk you through the process step by step, and you’ll see how simple it really is. The best part? You don’t need a fancy grill or expensive ingredients. Just a few simple tools, a handful of seasonings, and a willingness to experiment. Let’s get started.
What Makes This Version Stand Out
- Flavor: The buttery garlic base creates a savory depth that pairs perfectly with the natural sweetness of the lobster. This combination is unlike any other grilled seafood dish, offering a unique taste that lingers on the palate. The fresh parsley adds a bright, herbaceous finish that balances the richness of the butter. The final lemon squeeze provides a citrusy pop that lifts the entire flavor profile. Every bite is a symphony of sweet, savory, and bright notes that dance together. This is the kind of flavor harmony that keeps guests asking for more.
- Texture: The grill’s sear gives the lobster a crisp edge while the inside remains tender and juicy. The butter coating locks in moisture, preventing the meat from drying out. The result is a melt-in-your-mouth experience that feels almost buttery on its own. The slight crunch from the grill marks adds a satisfying contrast to the soft interior. The texture is consistent from the first bite to the last, making the dish feel refined and well-crafted. No one will forget the mouthfeel of this lobster.
- Simplicity: With only six ingredients and a handful of steps, this recipe is approachable for cooks of all levels. The process is straightforward, and the timing is forgiving, making it ideal for both beginners and seasoned chefs. The only equipment needed is a grill and a few basic kitchen tools. You can make it in under an hour from start to finish. The simplicity does not compromise quality; in fact, it enhances it by focusing on the core flavors. This recipe proves that great food can be simple.
- Uniqueness: Unlike many recipes that rely on heavy sauces or complicated marinades, this version uses a light butter-garlic mixture that highlights the lobster’s natural flavor. The addition of parsley and lemon brings freshness that sets it apart. The grill adds a smoky undertone that deepens the overall experience. The method is quick yet effective, providing a dish that is both elegant and approachable. This recipe is a fresh take on a classic that will surprise your guests. It’s a modern twist on a timeless favorite.
- Crowd Reaction: Friends and family rave about the juicy texture and bright flavors. Many say it’s the best lobster they’ve ever had, and they’re surprised by how easy it is to make. The dish becomes the centerpiece of any gathering, and the conversation naturally turns to the cooking method. The simplicity allows for quick plating, so you can focus on entertaining. The result is a memorable meal that leaves everyone satisfied and impressed. You’ll find yourself being asked to host more gatherings.
- Ingredient Quality: Using fresh lobster tails and high-quality butter makes a noticeable difference. Fresh garlic adds a punch that canned garlic cannot match. Fresh parsley provides a vibrant color and a bright flavor that complements the buttery base. Lemon wedges add a natural acidity that brightens the dish. Each ingredient is chosen for its ability to enhance the overall experience. The emphasis on quality ensures that every bite is pure, flavorful, and satisfying.
Inside the Ingredient List
The Lobster
Fresh lobster tails are the star of this dish, and choosing the right ones can make or break your meal. Look for tails that feel firm to the touch, with a bright, translucent flesh that shows a hint of pink. Avoid tails that feel mushy or have a strong sea smell, as these are signs of age. The quality of the lobster directly affects the flavor, so invest in the best you can find. If you’re buying from a seafood market, ask the vendor for the freshest catch of the day. A well‑selected tail will deliver a sweet, delicate taste that is hard to replicate.
When handling lobster tails, keep them chilled until you’re ready to grill. This helps maintain their texture and prevents the meat from becoming rubbery. A quick rinse under cold water removes any residue or grit that might have accumulated. Pat them dry with a clean towel to ensure the butter-garlic mixture adheres properly. Remember that the shell is protective, so keep it intact during grilling to retain moisture. By paying attention to these details, you set the foundation for a flawless lobster experience.
If you’re working with pre‑cooked lobster tails, you can still use this recipe, but the grilling time will be reduced. The key is to reheat the meat gently to avoid over‑cooking. Use a lower heat setting and monitor the internal temperature closely. Even pre‑cooked tails benefit from the buttery glaze and fresh lemon, which add depth and brightness. However, the freshest lobster tails are the best choice for this recipe, ensuring maximum flavor and texture. The difference is noticeable and worth the extra effort.
The Butter‑Garlic Base
Butter is the secret weapon that turns a simple lobster tail into a luxurious dish. Its rich, creamy texture coats the meat, creating a mouth‑watering finish. The key is to melt the butter just enough to release its flavor without letting it brown. Adding minced garlic to the butter creates a fragrant, savory base that enhances the lobster’s natural sweetness. The garlic should be finely minced to distribute evenly and prevent large pieces from burning. This mixture is brushed onto the lobster during grilling, creating a glossy, flavorful coating.
The ratio of butter to garlic is crucial; too much garlic can overpower the delicate lobster. A good rule of thumb is one tablespoon of butter per clove of garlic. This balance ensures a harmonious blend of flavors. If you’re sensitive to dairy, you can replace butter with clarified butter or a high‑smoke‑point oil. Keep in mind that the butter’s fat content helps the lobster stay moist, so don’t substitute too heavily. The butter‑garlic base is the heart of the dish, and it deserves careful attention.
For those who love a little heat, a pinch of red pepper flakes can be added to the butter mixture. This gives a subtle kick that pairs well with the citrusy finish. However, use sparingly, as the lobster’s natural sweetness can be overwhelmed by too much spice. If you prefer a milder flavor, stick to the classic butter‑garlic combo. Either way, the butter provides a luxurious mouthfeel that elevates the entire dish.
Fresh Parsley
Fresh parsley is the bright, herbaceous counterpoint that keeps this dish from feeling heavy. Its green color adds visual appeal, making the lobster tails look vibrant and appetizing. Parsley also offers subtle earthy tones that complement the buttery glaze. The fresh flavor of parsley is essential; dried parsley lacks the same brightness and can make the dish taste flat. Chop the parsley finely to distribute evenly across the lobster meat. A sprinkle of parsley after grilling adds a final pop of color and freshness.
Parsley is also known for its health benefits, including high levels of vitamin K and antioxidants. Incorporating it into your meal adds a nutritional boost without sacrificing flavor. If you’re out of parsley, cilantro or basil can be used as a substitute, though they will change the flavor profile slightly. Keep in mind that parsley’s subtlety is key; too much can overpower the lobster’s delicate taste. Use it as a finishing touch, and your guests will appreciate the thoughtful detail.
When preparing parsley, wash it thoroughly to remove any grit or dirt. Pat it dry, then remove the tough stems before chopping. This ensures a smooth, even distribution of flavor. The result is a bright, herbaceous finish that enhances the overall experience. Parsley is a small ingredient that makes a big difference, and it’s worth the extra step.
Salt, Pepper, and Lemon
Salt and pepper are essential for bringing out the lobster’s natural sweetness. Use a generous pinch of sea salt and freshly ground black pepper to season the tails before grilling. The salt enhances the flavor while the pepper adds a subtle heat that balances the richness of the butter. It’s important to season both sides of the lobster to ensure even flavor throughout. A light hand is sufficient; you can always add more after grilling if needed.
Lemon wedges add a bright, acidic counterpoint that cuts through the richness of the butter. Squeeze fresh lemon juice over the grilled lobster right before serving to brighten the dish. The citrusy tang lifts the flavors and adds a refreshing note. Lemon also adds a visual pop of color, making the dish more appetizing. A small squeeze of lemon is enough to transform the dish; avoid overdoing it or it will mask the lobster’s natural taste.
If you’re looking for a more complex flavor profile, consider adding a splash of white wine to the butter mixture. The acidity of the wine complements the lemon, and it adds depth to the sauce. However, the classic butter‑garlic and lemon combo is the simplest and most effective. Keep the seasoning simple, and let the lobster shine. The combination of salt, pepper, and lemon is a timeless pairing that never fails.
Optional Extras
For those who love a little extra flavor, a drizzle of truffle oil or a sprinkle of smoked paprika can elevate the dish. Truffle oil adds a subtle earthy aroma that pairs beautifully with the buttery base. Smoked paprika provides a gentle smoky flavor that complements the grill. Use these extras sparingly to avoid overpowering the lobster. The goal is to enhance, not mask, the natural taste.
If you prefer a spicier dish, add a pinch of cayenne pepper to the butter mixture. This adds a subtle heat that pairs well with the citrusy finish. However, use sparingly, as the lobster’s natural sweetness can be overwhelmed by too much spice. If you’re out of cayenne, a dash of hot sauce can be a good substitute. The key is balance – you want the lobster to remain the star of the show.
Another option is to finish the lobster with a splash of cognac or brandy after grilling. The alcohol adds a subtle warmth and depth to the sauce. Be careful not to add too much, as it can alter the delicate flavor. The addition of a small amount of alcohol can elevate the dish to a gourmet level. Keep it simple, and let the lobster’s natural flavor shine.
Everything's prepped? Good. Let's get into the real action.
The Method — Step by Step
- Preheat your grill to medium‑high heat, aiming for around 400°F. Lightly oil the grate with a paper towel dipped in olive oil to prevent sticking. The grill should be hot enough that a drop of water sizzles and evaporates instantly. This ensures a beautiful sear and prevents the lobster from sliding off. The sizzling sound is a sign that the grill is ready to work its magic. Keep an eye on the temperature to avoid flare‑ups.
- While the grill is heating, use kitchen shears to split each lobster tail lengthwise, leaving the shell intact. This technique keeps the meat in place and makes it easier to grill and serve. Carefully slice through the top shell, being careful not to cut the meat. The split also allows the butter‑garlic mixture to seep into the meat for maximum flavor. A clean split creates a beautiful presentation that impresses guests. This step is essential for a perfect result.
- In a small saucepan, melt 4 tablespoons of butter over low heat. Add 2 minced garlic cloves and cook for 2–3 minutes until fragrant but not browned. The butter should be golden and fragrant, not cloudy or brown. This mixture is the heart of the dish, providing richness and flavor. Let the mixture cool slightly before brushing it onto the lobster. The garlic should be finely minced to distribute evenly and prevent large pieces from burning.
- Season each lobster tail with a generous pinch of sea salt and freshly ground black pepper. The seasoning should be even on both sides of the meat. Sprinkle 2 tablespoons of chopped fresh parsley over the tails for added flavor and color. The parsley adds a bright, herbaceous counterpoint to the richness of the butter. A light hand is sufficient; you can always add more after grilling if needed. This step ensures the lobster is flavorful from the first bite.
- Place the lobster tails on the grill, flesh side down, and cook for 6–8 minutes. The meat should turn opaque and the edges start pulling away from the shell. The grill marks should be deep but not charred. The sizzling sound indicates the lobster is cooking properly. This is the moment of truth – if the lobster is still translucent, give it a few more minutes. The timing is key to achieving a tender, juicy result.
- Flip the lobster tails over and brush the remaining butter‑garlic mixture over the flesh side. Grill for an additional 4–5 minutes, or until the meat is golden and the butter has caramelized slightly. The buttery glaze should be glossy and slightly thickened. The grill marks should be a beautiful contrast to the tender meat. This step adds depth and flavor, making the lobster truly unforgettable.
- Remove the lobster tails from the grill and let them rest for 2 minutes. Resting allows the juices to redistribute throughout the meat, ensuring maximum tenderness. The meat will continue to cook slightly during this time, so keep the rest short. This step is often overlooked but is essential for a juicy result. The brief rest period also allows the flavors to settle, making each bite more harmonious.
- Using a small fork or a knife, carefully cut the lobster meat out of the shell. The meat should be tender and easy to separate. Arrange the tails on a platter, ensuring they’re evenly spaced for an attractive presentation. The visual appeal is just as important as the flavor. A well‑arranged plate will impress your guests and elevate the dining experience.
- Serve the grilled lobster tails immediately with fresh lemon wedges on the side. A squeeze of lemon before each bite adds a bright, citrusy kick that balances the buttery richness. Garnish with a final sprinkle of parsley for a pop of color. Pair with a crisp white wine or a chilled glass of sparkling water for a complete experience. The dish is best enjoyed fresh, while the flavors are at their peak. Enjoy the moment and savor every bite.
That's it — you did it. But hold on, I've got a few more tricks that'll take this to another level.
Insider Tricks for Flawless Results
The Temperature Rule Nobody Follows
Many cooks assume that a high heat is always best for grilling lobster, but the truth is that a moderate temperature of 400°F yields the most consistent results. Too high a heat can cause the outer shell to char before the meat cooks through, creating a tough texture. Keeping the grill at a steady medium‑high temperature ensures a perfect sear and a juicy interior. I’ve tested this rule with several lobster tails, and the difference is unmistakable. A steady grill also reduces flare‑ups that can burn the buttery glaze. This trick is a game‑changer for anyone who wants a flawless lobster.
Why Your Nose Knows Best
The aroma of lobster on the grill is a reliable indicator of doneness. When the meat turns opaque and you smell a sweet, buttery scent, the lobster is ready. If you’re still uncertain, press the flesh lightly with your fingertip; it should feel firm but give slightly. The scent of garlic and butter also signals that the glaze is caramelized just right. Trusting your nose saves you from overcooking and ensures that every bite is tender. I’ve had countless moments where I relied on the smell, and it never failed me.
The 5‑Minute Rest That Changes Everything
Resting the lobster for exactly five minutes after grilling is a secret that many chefs overlook. This short period allows the juices to redistribute, preventing the meat from drying out. It also gives the butter‑garlic glaze a chance to settle, making the flavors more cohesive. If you skip this step, the lobster will feel slightly dry and the glaze may appear uneven. I’ve seen people overcook their lobster because they didn’t let it rest, and the result is a less than ideal experience.
The Freshness Factor
Using the freshest lobster tails is the single most important factor in achieving a perfect flavor. Fresh tails have a bright, translucent flesh that turns pink when cooked. They also have a subtle oceanic aroma that enhances the dish. If you’re buying from a market, ask for the freshest catch of the day. Avoid tails that have a strong fishy smell or look cloudy, as these are signs of age. Freshness ensures that every bite is a true representation of the sea.
The Quick Squeeze Trick
A quick squeeze of lemon right before serving is essential for brightening the dish. The acidity cuts through the richness of the butter and adds a fresh, vibrant note. If you wait too long, the lemon’s flavor can become muted. Keep a small bowl of lemon wedges on the side, and let your guests squeeze as they wish. This simple step gives the lobster a professional finish that will impress your guests.
Creative Twists and Variations
This recipe is a playground. Here are some of my favorite ways to switch things up:
Spicy Cajun Lobster
Swap the fresh parsley for a mix of smoked paprika, cayenne pepper, and garlic powder. This gives the lobster a smoky, spicy kick that pairs well with a chilled white wine. The butter‑garlic base remains the same, but the spice blend adds depth and complexity. This variation is perfect for a summer BBQ or a spicy dinner party.
Herb‑Infused Lobster
Replace the parsley with a blend of thyme, rosemary, and oregano. The herbs add a fragrant, earthy flavor that complements the lobster’s sweetness. Use a small amount of olive oil to help the herbs release their aroma during grilling. The result is a savory, herb‑rich dish that feels like a Mediterranean escape.
Truffle Lobster
Drizzle a small amount of truffle oil over the grilled lobster before serving. The earthy aroma of truffle oil elevates the dish to a luxurious level. Pair with a glass of dry Champagne or a crisp Chardonnay for a truly indulgent experience. This variation is ideal for a special occasion or a fancy dinner.
Lemon‑Garlic Lobster with a Twist
Add a splash of white wine to the butter‑garlic mixture before brushing it onto the lobster. The wine adds a subtle acidity that brightens the dish and complements the lemon. Finish with a sprinkle of fresh dill for an added burst of freshness. This variation is great for those who love a bit of sophistication.
Grilled Lobster with a Smoky Glaze
Finish the lobster with a glaze made from honey, soy sauce, and a touch of smoked paprika. The glaze adds a sweet, salty, and smoky flavor that contrasts beautifully with the buttery base. Brush the glaze on during the last minute of grilling for a caramelized finish. This variation is perfect for a bold, adventurous palate.
Storing and Bringing It Back to Life
Fridge Storage
Store leftover lobster tails in an airtight container in the refrigerator for up to 2 days. Wrap the tails in parchment paper to prevent them from drying out. Keep the container on the bottom shelf to avoid contamination from other foods. When ready to reheat, place the lobster in a shallow pan and cover with foil. Heat gently over low heat until warmed through, about 5 minutes.
Freezer Friendly
If you need to store lobster tails for longer, freeze them in a freezer‑safe bag. Remove as much air as possible before sealing to prevent freezer burn. Lobster tails can be stored for up to 3 months in the freezer. Thaw overnight in the refrigerator before reheating. This method preserves the flavor and texture, allowing you to enjoy fresh lobster anytime.
Best Reheating Method
The best way to reheat lobster is in a skillet with a splash of butter or olive oil. Heat the pan over medium heat, add the lobster tails, and cover with a lid. Reheat for 3–4 minutes, or until the lobster is warmed through. Adding a tiny splash of water before reheating steams the lobster back to perfection. This method keeps the meat tender and juicy.