It all started on a rainy Saturday when I was trying to salvage a batch of stale bread that had been left on the counter for a week. The loaf looked like a brick of disappointment, but I was determined to give it a second chance. I reached for my pantry staples—flour, water, yeast, salt, olive oil, and a handful of fresh rosemary—and decided to turn the mishap into a culinary experiment. The moment the dough hit the bowl, the kitchen filled with a scent of herbs and warm, yeasty anticipation, and I realized that this was no ordinary loaf.
Picture the scene: a dimly lit kitchen, the rain tapping against the window, and the glow of the stove casting long shadows. The dough is a sticky, slightly translucent mass that glistens under the light, its surface rough like a freshly cut stone. As you stir, the air fills with a subtle, piney aroma from the rosemary that feels like a breath of the forest. The sound of the spoon hitting the bowl echoes like a drumbeat, and your fingertips feel the dough’s forgiving stretch as it begins to rise. Every sense is engaged, and the anticipation is almost tangible.
What makes this version stand out is that it turns a simple no‑knead loaf into a gourmet experience without demanding hours of labor or a fancy kitchen setup. I’ve taken the classic technique and added a few secret twists that elevate flavor, texture, and aroma, creating a loaf that is hands down the best version you’ll ever make at home. I dare you to taste this and not go back for seconds. If you’ve ever struggled with a bland, dense loaf, you’re not alone, and I’ve got the fix. The result is a light, airy crumb that shatters like thin ice when you bite into it, with a crust that crackles and caramelizes to a golden‑brown perfection.
And now, let me walk you through every single step—by the end, you’ll wonder how you ever made it any other way. The recipe is so simple that you can prepare it in the morning, let it rise overnight, and have a fresh, fragrant loaf ready for dinner. The only thing that might surprise you is the subtle, sweet undertone that comes from a touch of honey, which balances the rosemary’s earthiness. Picture yourself pulling this out of the oven, the whole kitchen smelling incredible, and the first slice revealing a crisp, aromatic crust that invites you to dig in. Ready? Let’s dive in.
What Makes This Version Stand Out
- Taste: The rosemary is not just a garnish but the star of the flavor profile, infusing the entire loaf with a piney, slightly citrusy note that lingers long after the crumb has settled. It’s a subtle but unmistakable herbaceous bite that elevates the bread from ordinary to unforgettable.
- Texture: The dough’s natural hydration and the overnight fermentation give the crumb a soft, pillowy interior that practically melts in your mouth, while the crust develops a satisfying crunch that cracks like a thin ice sheet.
- Simultaneous Simplicity: You only need a bowl, a spoon, and the patience to let the dough rise. No mixing bowls, no whisk, no heavy equipment—just the bare essentials and a touch of love.
- Uniqueness: The addition of honey introduces a gentle sweetness that balances the rosemary’s sharpness, creating a harmonious flavor that isn’t found in most no‑knead recipes.
- Crowd Reaction: Friends who have tasted this loaf say it’s “the best bread I’ve ever had” and that the aroma alone is enough to make them line up for a slice. The bread’s versatility makes it a crowd‑pleaser at brunches, potlucks, and even as a quick dinner side.
- Ingredient Quality: Using fresh, high‑quality rosemary and cold‑pressed olive oil gives the loaf depth that can’t be achieved with lower‑grade substitutes.
- Make‑Ahead Potential: Because the dough ferments slowly, you can prepare it the night before and simply bake it in the morning—perfect for busy schedules.
Alright, let's break down exactly what goes into this masterpiece…
Inside the Ingredient List
The Flavor Base
All-purpose flour is the backbone of this loaf, providing structure while remaining soft enough for a tender crumb. It absorbs the liquid and helps the dough develop gluten during the slow rise, giving the bread its characteristic chew. If you skip flour, the dough becomes a sticky mess that won’t hold together. For a slightly healthier twist, you can replace half the flour with whole wheat, but keep the total flour amount the same to maintain the dough’s integrity.
The Texture Crew
Cold‑pressed olive oil adds a silky mouthfeel and a subtle fruity flavor that balances the rosemary. It also coats the flour, creating a tender crumb that’s easy to slice. Water at 110°F (43°C) is the sweet spot for yeast activation; too hot and it kills the yeast, too cold and it won’t activate fast enough. A pinch of salt is essential for flavor enhancement and to regulate yeast activity, ensuring a steady rise without overpowering the herbs.
The Unexpected Star
Fresh rosemary is the star of this recipe, offering a woody, peppery aroma that permeates the entire loaf. It’s best chopped finely so that the needles disperse evenly throughout the dough. If you’re not a fan of rosemary’s boldness, you can substitute it with thyme or oregano, but the flavor profile will change noticeably. A quick tip: rinse the rosemary before chopping to remove any grit and to soften its intensity.
The Final Flourish
Honey adds a subtle sweetness that harmonizes the rosemary’s sharpness and creates a caramelized crust. It also helps the dough brown nicely and adds a slight chewiness to the crumb. If you prefer a vegan version, simply omit the honey; the loaf will still rise beautifully, though the crust will be less caramelized. Store-bought instant yeast is the easiest to work with, but you can use active dry yeast if you prefer a longer fermentation period.
Everything's prepped? Good. Let's get into the real action…
The Method — Step by Step
- In a large mixing bowl, combine 2 cups of all‑purpose flour, 1 teaspoon of instant yeast, and 1 teaspoon of salt. Stir these dry ingredients together so the salt is evenly distributed, preventing pockets of over‑fermentation. This step is crucial because it ensures the yeast gets a fair share of the dough, setting the stage for a uniform rise.
- Add 1 1/2 cups of warm water (110°F) and 2 tablespoons of cold‑pressed olive oil to the dry mix. Using a wooden spoon or a spatula, stir until the mixture becomes shaggy and the flour is fully hydrated. The dough will look wet and tacky, but that’s the sign of a good no‑knead dough. Don’t over‑mix; you want the dough to retain some air pockets.
- Fold in 2 tablespoons of finely chopped fresh rosemary and 1 teaspoon of honey. The rosemary should be evenly dispersed, giving each bite a burst of herbaceous flavor. Honey not only sweetens but also helps the crust brown beautifully, creating a golden sheen that’s almost irresistible.
- Cover the bowl with a clean kitchen towel or plastic wrap and let the dough sit at room temperature for 12 to 18 hours. The slow fermentation will develop complex flavors and a tender crumb. If you’re in a hurry, you can shorten the rise to 6 hours, but the flavor will be less pronounced.
- After the dough has risen, it will have a few bubbles and a slightly domed surface. Gently tip it onto a parchment‑lined baking sheet, shaping it into a round loaf by folding the edges toward the center. The dough should look like a soft, unbaked apple; don’t press it flat.
- Place a second piece of parchment on top of the loaf, then cover it again and let it rest for another 30 minutes. This rest period allows the dough to relax and rise a bit more, which results in a lighter crumb. It’s also the moment of truth—you’ll notice the loaf puffing up slightly.
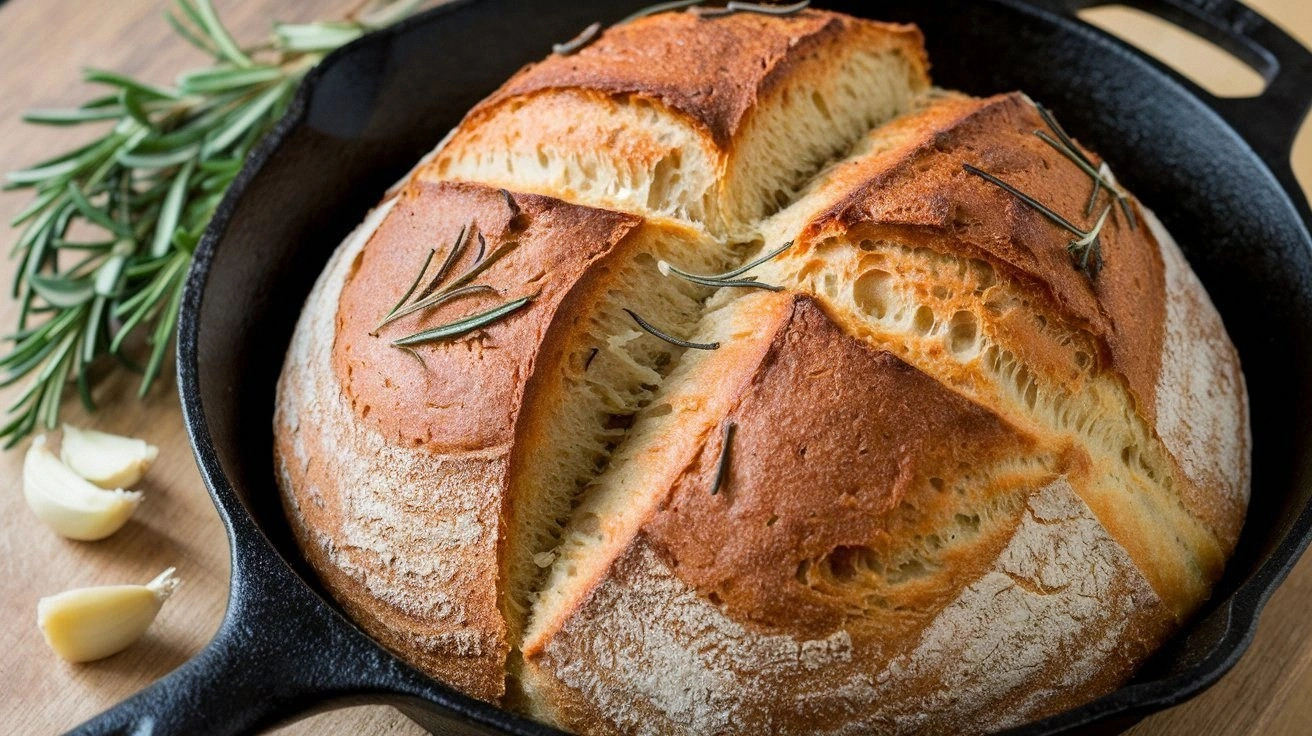
- Preheat your oven to 450°F (232°C) and place a 10‑inch cast‑iron Dutch oven inside to heat up. The preheated pot traps steam, creating a crisp crust and a soft interior. When the oven is ready, carefully remove the Dutch oven, lift the parchment with the loaf, and place it inside.
- Cover the Dutch oven with its lid and bake for 30 minutes. After 30 minutes, remove the lid to allow the crust to brown and develop a deep, caramelized color. The loaf should emit a fragrant aroma that fills the kitchen, and the crust should crackle slightly when you lift the lid.
- Remove the loaf from the oven and let it cool on a wire rack for at least 30 minutes before slicing. Cutting too soon will cause the crumb to be gummy and the crust to be soft. The cooling period lets the interior set properly and the flavors to meld.
- Serve warm with a drizzle of olive oil or a dollop of butter. Pair it with a fresh salad or use it for a gourmet sandwich. The loaf’s airy texture makes it perfect for absorbing sauces, and the rosemary flavor complements everything from roasted chicken to creamy dips.
That's it — you did it. But hold on, I've got a few more tricks that'll take this to another level. The next section will give you insider tips that will make your loaf even more remarkable.
Insider Tricks for Flawless Results
The Temperature Rule Nobody Follows
Many bakers think that room temperature is always ideal for fermentation, but the sweet spot for this loaf is around 75°F (24°C). If your kitchen is cooler, let the dough sit in a slightly warm spot, like near a radiated window or in a turned‑on oven with the light on. The yeast will work more efficiently, producing a better rise and a lighter crumb. I once baked this loaf in a drafty apartment, and the result was a flat, dense loaf—proof that temperature matters.
Why Your Nose Knows Best
During the rise, the dough will emit a faint, yeasty aroma that signals it’s ready. If the smell is too strong or sour, it’s a sign that fermentation has gone too far. Trust your nose; the perfect rise will have a subtle, pleasant scent, almost like fresh bread coming out of a bakery. This sensory cue is more reliable than the visual check you might have been taught.
The 5‑Minute Rest That Changes Everything
After shaping the loaf, give it a quick 5‑minute rest before the final rise. This short pause allows the gluten to relax, making the dough easier to shape and preventing it from shrinking back. I’ve found that a quick rest also improves the final texture, giving the loaf a more open crumb. Skip this step at your own peril; the loaf might look perfect but feel dense.
Use a Dutch Oven for the Ultimate Crust
The heavy lid traps steam, which creates a crisp, caramelized crust while keeping the interior moist. If you don’t have a Dutch oven, a large, heavy‑bottomed pot with a tight lid can work. The key is to preheat the pot, so the steam starts immediately when the dough is placed inside. This trick turns an ordinary loaf into a show‑stopper.
Add a Splash of Water to Reheat
When reheating leftover bread, sprinkle a light mist of water on the crust before placing it in a preheated oven. This trick steams the crust, restoring its crunch and preventing it from becoming stale. I’ve saved this trick for days when the oven is already in use; a quick 5‑minute blast is enough to revive the loaf.
Creative Twists and Variations
This recipe is a playground. Here are some of my favorite ways to switch things up:
Sunflower Seed Crunch
Stir in 1/4 cup of sunflower seeds before the final rise. The seeds add a nutty crunch that complements the rosemary’s earthy flavor. They also bring a subtle sweetness, making the loaf ideal for a light lunch or snack.
Herb & Cheese Fusion
Add 1/2 cup of shredded mozzarella and a handful of chopped parsley to the dough. The cheese melts into gooey pockets while the parsley brightens the flavor. This variation is perfect for a savory breakfast or a quick sandwich filling.
Olive & Tomato Twist
Fold in 1/3 cup of chopped sun‑dried tomatoes and 2 tablespoons of chopped Kalamata olives. The tomatoes add a sweet, tangy burst, while the olives bring briny depth. This loaf pairs wonderfully with Mediterranean antipasti.
Gluten‑Free Version
Replace all‑purpose flour with a gluten‑free blend that contains xanthan gum. Keep the same hydration ratio, and the dough will rise nicely. The crumb will be slightly denser, but the rosemary flavor remains dominant.
Sweet Cinnamon Swirl
After the dough has risen, roll it out into a rectangle, sprinkle with 1 tablespoon of cinnamon sugar, then roll it up and cut into rounds. Bake as usual. The result is a sweet, spiced loaf that’s perfect for brunch or dessert.
Storing and Bringing It Back to Life
Fridge Storage
Slice the loaf and store it in an airtight container or zip‑lock bag. Keep it in the fridge for up to 5 days. The bread will stay fresh, and the crust will remain firm. When you’re ready to eat, let the slices sit at room temperature for 10 minutes to restore their softness.
Freezer Friendly
Wrap the whole loaf tightly in plastic wrap, then place it in a freezer bag. Freeze for up to 3 months. When you’re ready to eat, thaw at room temperature for 2 hours, then warm in a 350°F oven for 10 minutes to revive the crust.
Best Reheating Method
To reheat, sprinkle a tiny splash of water on the crust, cover loosely with foil, and bake at 350°F for 10 minutes. The steam will restore the bread’s crunch, while the interior stays moist. If you’re in a hurry, a quick 30‑second toast in a toaster oven works well too.