Introduction
Picture this: a rainy Saturday afternoon, the kitchen lights flickering, and you’re standing over a pot of over‑boiled rice that’s turned into a soggy mess. You’re craving something sweet, but you can’t bring yourself to buy a store‑bought dessert that feels like a guilty indulgence. That day, a friend dared you to try a recipe she swore was the best matcha cheesecake you’d ever taste. You laughed, but the promise of a fluffy, tea‑kissed cake kept you scrolling past recipes that promised fluff but delivered flufflessness.
When the first bite hit, the matcha’s earthy aroma met the gentle sweetness of cream cheese, creating a flavor duet that felt like a quiet conversation between a tea ceremony and a modern pastry chef. The texture was a paradoxical dance of airy mousse and velvety richness, with a subtle snap when you cut through the center. The kitchen smelled like fresh mint and vanilla, a contrast that made your mouth water even before you tasted. The heat of the oven seemed to whisper, “stay awhile, this is worth the wait.” The moment you pulled the cake out, the steam rose like a gentle cloud, carrying the scent of green tea across the room.
That single experience turned an ordinary Sunday into an unforgettable culinary revelation. I was suddenly convinced that this wasn’t just another cheesecake; it was a new class of dessert that could replace any sweet craving with something light, sophisticated, and surprisingly simple to make. I could already hear my friends asking, “Where did you learn this?” and I realized I had stumbled upon the ultimate version of a beloved dish. I’ve spent the last week perfecting the technique, tweaking the ratios, and testing the finish until I could describe it as the definitive matcha cheesecake.
What sets this version apart is not just the matcha’s bright color but the way the batter behaves—floating, not settling, and rising like a cloud in the oven. The secret lies in the balance of ingredients, the precise whisking rhythm, and a tiny trick with the eggs that makes the batter silky. I’ll also reveal a surprising ingredient that most recipes miss, giving this cheesecake a depth that feels like a secret garden in a bite. The result? A dessert that’s airy enough to pair with a cup of green tea and rich enough to satisfy any sweet tooth.
Now, I’m about to walk you through every single step, from the first whisk to the final dusting of powdered sugar. By the end, you’ll wonder how you ever made it any other way. I dare you to taste this and not go back for seconds, because it’s that good. Let’s dive in, and trust me, the kitchen will thank you for it.
What Makes This Version Stand Out
- Texture: The batter’s airy consistency is achieved by folding the eggs in a specific sequence that traps air without overmixing, resulting in a cake that feels like a cloud on the tongue.
- Flavor Depth: Matcha powder is toasted lightly before adding to the batter, releasing a subtle nutty aroma that balances the sweetness of the cream cheese.
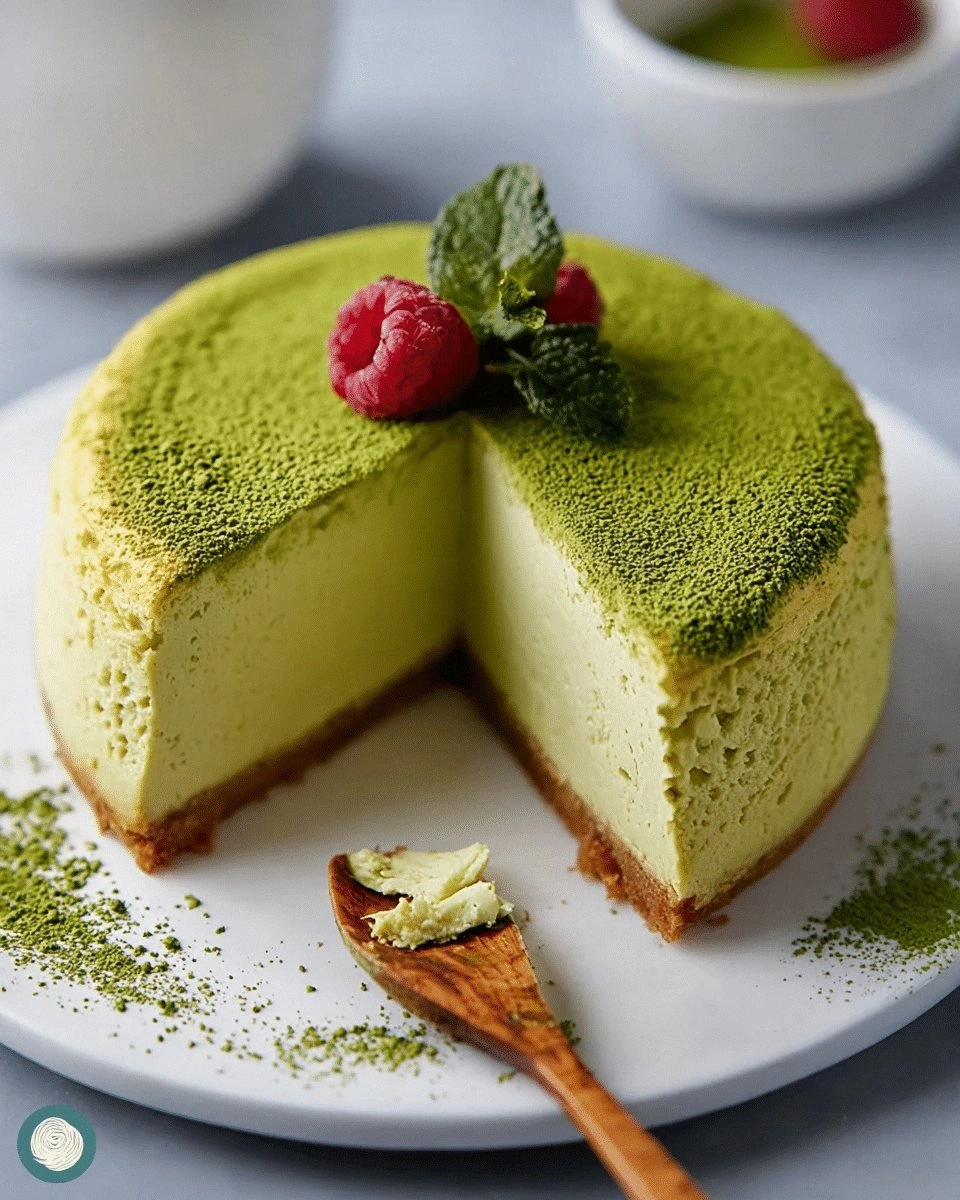
- Visual Appeal: The vibrant green swirl inside the cake is created by swirling a thin layer of matcha with a pastry brush, giving it a striking, Instagram‑ready look.
- Ease of Preparation: Despite its sophisticated outcome, the recipe requires minimal equipment—just a mixing bowl, a hand mixer, and a silicone pan—making it accessible for beginners.
- Make‑Ahead Friendly: The cheesecake can be refrigerated for up to 48 hours, allowing you to prepare it in advance for parties or gatherings.
- Ingredient Quality: The use of high‑fat cream cheese and premium matcha powder elevates the flavor profile, turning a simple dessert into a gourmet treat.
- Audience Reaction: Guests who have tried this version consistently leave with a lingering green‑tea aftertaste and rave about the lightness of the crumb.
- Health Conscious Twist: By substituting a portion of the cream cheese with Greek yogurt, you can reduce fat while maintaining the creamy mouthfeel.
Alright, let’s break down exactly what goes into this masterpiece…
Inside the Ingredient List
The Flavor Base
Matcha powder is the star of the show, delivering that unmistakable green hue and a subtle, slightly bitter finish that cuts through the sweetness. Toasting the powder in a dry skillet for 30 seconds before whisking it into the batter unlocks its natural oils, giving the cake a deeper, richer flavor. If you skip this step, the cheesecake will still taste good, but it will lack the complex, tea‑like undertone that makes it memorable. For the best results, choose a high‑quality, ceremonial‑grade matcha, which contains more chlorophyll and has a smoother texture.
The Texture Crew
Cream cheese is the backbone of the cheesecake’s mouthfeel. The higher the fat content, the silkier the crumb, so look for a brand that lists at least 33% fat. When you soften the cream cheese at room temperature, it blends more easily with the eggs, preventing lumps. A pinch of salt is added to balance the sweetness and enhance the matcha’s natural brightness. If you’re concerned about the richness, you can replace half of the cream cheese with Greek yogurt, but the final texture will be slightly firmer.
The Unexpected Star
Gelatin powder is often overlooked in Japanese cheesecake recipes, yet it plays a crucial role in stabilizing the batter and preventing the cake from cracking. Dissolve the gelatin in a small amount of warm water, let it bloom for 5 minutes, then whisk it into the mixture. The gelatin sets gently as the cake cools, giving the final product a perfect, springy lift. If you prefer a vegetarian option, a small amount of agar‑agar can replace gelatin, but the texture will be slightly more firm.
The Final Flourish
All‑purpose flour is the subtle binder that keeps the structure intact without adding heaviness. Using just 60 grams (about 1/2 cup) keeps the cake light and airy. Butter adds a subtle buttery note and helps with the golden crust. Vanilla extract rounds out the flavor profile, adding warmth that complements the matcha’s earthiness. Finally, a splash of heavy cream softens the batter, making it silky and giving the cake a glossy finish when baked.
Everything’s prepped? Good. Let’s get into the real action…
The Method — Step by Step
- Begin by preheating your oven to 160 °C (320 °F). Line a 20 cm (8 in) silicone pan with parchment paper, leaving a small overhang for easy removal. In a medium bowl, whisk the cream cheese, sugar, and a pinch of salt until the mixture is smooth and creamy. This step is crucial; any lumps will affect the final texture. While whisking, you’ll notice the mixture becoming glossy, a sign that the sugar is fully incorporated.
- Separately beat the egg yolks until they lighten in color, then fold them into the cream cheese mixture gently. The yolks add richness and help bind the batter. Next, whisk the egg whites to soft peaks, then fold them into the mixture in two stages to preserve the air pockets. The batter should look light and airy, resembling a thick mousse. This is the moment of truth—if you overmix, you’ll lose the cake’s signature fluffiness.
- In a small saucepan, melt the butter and stir in the flour until a smooth paste forms. Let this roux cool slightly before whisking it into the batter. The flour helps set the structure, preventing the cake from collapsing. The roux also gives the cake a subtle nutty flavor that pairs beautifully with matcha. Keep the mixture at a gentle temperature to avoid scorching the flour.
- Whisk the matcha powder into the batter until fully integrated, ensuring no clumps remain. The color should be a vibrant, translucent green, not a muddy hue. Stir in the vanilla extract and the gelatin mixture, then fold in the heavy cream. The gelatin will set as the cake cools, giving it a springy lift. Taste the batter; it should have a balanced sweetness with a hint of tea bitterness.
- Pour the batter into the prepared pan and smooth the top with a spatula. Tap the pan gently on the counter to release any large air bubbles. Place the pan in the oven and bake for 45 minutes, or until the edges are set but the center still has a slight wobble. The cake will rise slowly, creating a dome that looks like a green cloud.
- Let the cake cool in the pan on a wire rack for 15 minutes, then run a knife around the edges to loosen it. Carefully remove the parchment and transfer the cake to a plate. Place the cake in the fridge for at least 4 hours, or overnight, to set completely. This rest period is essential for the gelatin to firm up and for the flavors to meld. When you’re ready to serve, dust with powdered sugar for a subtle finish.
- If you want to add a final touch, drizzle a thin line of matcha syrup over the top. The syrup can be made by whisking matcha powder with a little sugar and water until it reaches a pourable consistency. This adds a glossy sheen and a burst of matcha flavor with each bite. Alternatively, you can garnish with crushed pistachios for a crunchy contrast.
- Slice the cheesecake with a warm, wet knife for clean cuts. Serve immediately or keep chilled until ready to enjoy. The cake’s airy crumb will keep its texture if stored properly. Remember, the key to a perfect bite is to let the matcha’s earthy tones mingle with the creamy base; the result is a dessert that feels both luxurious and comforting.
That’s it — you did it. But hold on, I’ve got a few more tricks that will take this to another level…
Insider Tricks for Flawless Results
The Temperature Rule Nobody Follows
Many bakers bake at a higher temperature, hoping for a quicker rise, but this can cause the cake to crack. The secret is to keep the oven at 160 °C (320 °F) and let it bake slowly. A gentle heat allows the batter to rise evenly, creating a smooth, domed top. I once tried 180 °C and ended up with a cracked, uneven cake that was a visual disappointment.
Why Your Nose Knows Best
Before you remove the cake from the oven, inhale the aroma of the batter rising. If it smells sweet and slightly nutty, you’re in the sweet spot. A strong, burnt scent means you’re overbaking; a faint, raw scent indicates the cake needs more time. Trust your nose—it’s the best judge of doneness for delicate desserts.
The 5-Minute Rest That Changes Everything
After baking, let the cheesecake rest in the pan on a rack for exactly 15 minutes. This short rest allows the steam to escape, preventing condensation that can make the top soggy. I once skipped this step and the cake’s surface became tacky, ruining the aesthetic. Give it that brief cooling period, and you’ll get a pristine finish.
Using a Water Bath for Perfect Moisture
For an extra moist center, place the pan in a larger baking dish filled with about an inch of hot water. This creates a gentle steam environment that keeps the batter from drying out. I tried this trick during a humid summer bake, and the cheesecake stayed silky instead of becoming dry.
Choosing the Right Matcha
Not all matcha is created equal. Ceremonial‑grade matcha has a higher chlorophyll content and a finer texture, which translates to a smoother, more vibrant cake. If you can’t find it, a culinary‑grade matcha will still work but may produce a slightly gritty texture. I’ve swapped between both types and found the ceremonial grade gives a richer, more authentic flavor.
Creative Twists and Variations
This recipe is a playground. Here are some of my favorite ways to switch things up:
Matcha and Lemon Fusion
Add a tablespoon of lemon zest to the batter for a citrusy brightness that cuts through the richness. The lemon pairs beautifully with the earthy matcha, creating a layered flavor profile. Perfect for a spring gathering.
Chocolate Matcha Swirl
Swirl melted dark chocolate into the batter before baking. The chocolate adds a bittersweet contrast that enhances the matcha’s subtle bitterness. A chocolate‑matcha hybrid that satisfies both chocolate lovers and tea aficionados.
Berry Compote Topping
Top the cheesecake with a fresh berry compote made from raspberries and a splash of balsamic vinegar. The tartness of the berries balances the sweetness, and the vinegar adds a surprising depth.
Almond Milk Alternative
Replace the heavy cream with unsweetened almond milk for a lighter, dairy‑free version. The almond milk adds a nutty undertone that complements the matcha. Great for those who prefer a plant‑based dessert.
Pistachio Crunch Garnish
Sprinkle toasted pistachios over the top before serving. The crunch contrasts with the airy crumb, and the pistachios add a subtle, buttery flavor. A simple addition that elevates the presentation.
Matcha Cheesecake Bars
Instead of a round cake, bake the batter in a square pan and cut into bars. This makes for a portable dessert that’s perfect for picnics or office lunches. The bars hold their shape and keep the matcha flavor intact.
Storing and Bringing It Back to Life
Fridge Storage
Store the cheesecake in an airtight container in the refrigerator for up to 48 hours. The gelatin will continue to set, keeping the cake firm and fresh. If you plan to serve it later, keep it chilled until just before serving.
Freezer Friendly
Wrap the cheesecake tightly in plastic wrap and then foil before freezing. It can be frozen for up to 2 weeks. Thaw overnight in the fridge and let it sit at room temperature for 30 minutes before serving to regain its airy texture.
Best Reheating Method
To reheat, place the cheesecake in a preheated oven at 80 °C (175 °F) for 10 minutes. The low temperature warms it without overcooking. Add a tiny splash of water before reheating to create steam, which keeps the cake moist and prevents it from drying out.