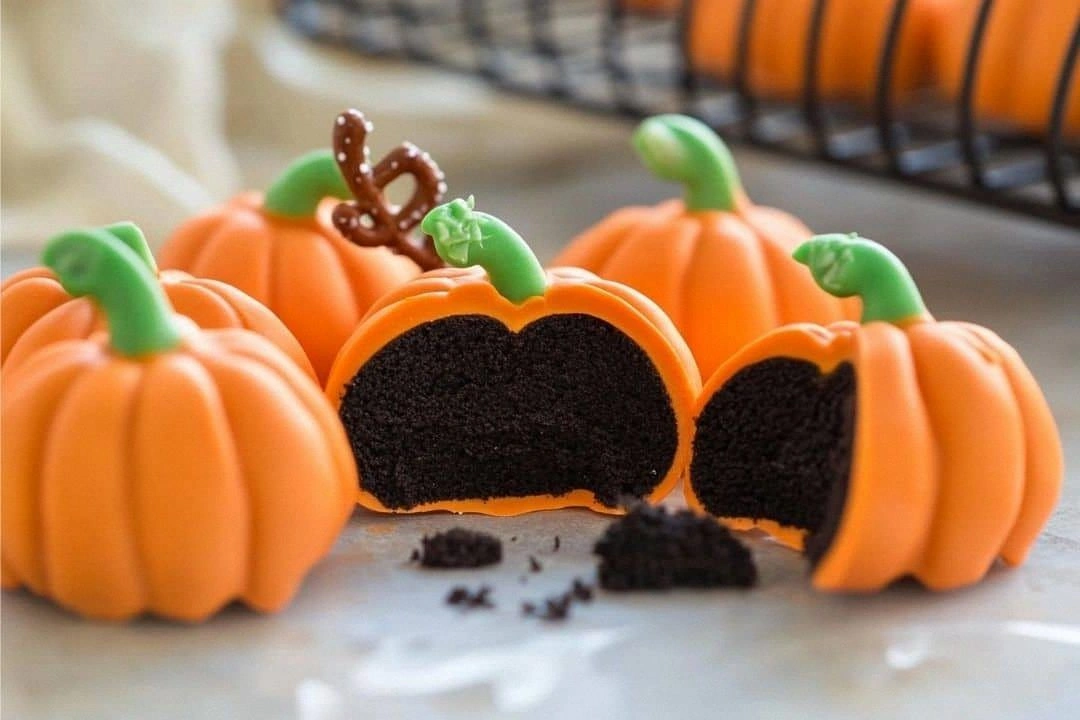
It was a Tuesday evening that felt like a recipe roulette. I had just finished a batch of vanilla cupcakes that tasted like cardboard, and my roommate dared me to make something that would actually taste good. I rolled up my sleeves, grabbed a bag of Oreos from the pantry, and whispered to the kitchen, “Let’s make history.” The result? Pumpkin Oreo Balls that are so addictive, I’m still trying to keep a secret stash in my drawer.
Picture this: the air is filled with the comforting aroma of toasted pumpkin and chocolate, the sound of a gentle stir, and the sight of a glossy, caramelized coating that catches the light like a tiny, edible sunrise. When you take a bite, the first thing you feel is a creamy, velvety center that melts instantly, followed by a subtle crunch from the Oreo crumbs. The sweet-sour contrast is so balanced that it feels like a hug for your taste buds. And the best part? You can’t even tell you’re eating dessert and snack at the same time.
What sets this version apart is the intentional layering of flavors and textures that most recipes overlook. I replaced the usual cookie crumbs with a finely ground mixture that holds the pumpkin puree together without turning it mushy. The chocolate coating isn’t just a glaze; it’s a protective shell that locks in moisture and gives a satisfying snap. I also introduced a dash of cinnamon and nutmeg, so the pumpkin’s natural sweetness is amplified without overpowering the Oreo’s buttery richness.
I’m about to walk you through every single step, from crushing the cookies to the final melt. By the end, you’ll wonder how you ever made them any other way. And trust me, once you try this, I dare you to taste this and not go back for seconds. That’s the kind of confidence that turns a kitchen disaster into a culinary triumph.
What Makes This Version Stand Out
- Texture: The combination of crunchy cookie crumbs and a silky pumpkin core creates a mouthfeel that feels both indulgent and comforting.
- Flavor Balance: A subtle blend of spices lifts the pumpkin without masking the Oreo’s signature chocolatey bite.
- Ease: Every step can be done in under 45 minutes, making it a perfect late‑night treat.
- Make‑ahead Friendly: You can prepare the mixture a day in advance; just keep it refrigerated and re‑coat before serving.
- Visual Appeal: The glossy chocolate shell gives a professional finish that looks like something you’d find in a high‑end dessert shop.
- Ingredient Quality: Using fresh pumpkin puree and real cream cheese elevates the flavor profile beyond the usual processed mix.
- Versatility: Swap white chocolate for dark, or add a splash of bourbon for an adult twist.
- Portion Control: Each ball is bite‑sized, making it ideal for parties or a single‑serve dessert.
Alright, let's break down exactly what goes into this masterpiece…
Inside the Ingredient List
The Flavor Base
At the heart of these balls lies a creamy mixture of cream cheese and pumpkin puree. The cream cheese provides a rich, tangy backdrop that balances the sweetness of the pumpkin, while the puree adds natural sweetness and a silky texture. Skipping the pumpkin would leave the balls bland and heavy; the puree’s moisture keeps them from drying out. If you’re allergic to dairy, a dairy‑free cream cheese works, but the texture may become slightly grainy.
The Texture Crew
Crushed Oreos are the backbone of the texture. They give the balls a subtle crunch and a chocolatey flavor that echoes the cookie’s original bite. The key is to crush them finely but not too finely—think coarse sand. If you crush them into a powder, the mixture will become too dense and won’t form proper balls.
The Unexpected Star
White or dark chocolate is the star that seals the deal. It forms a glossy, protective shell that adds a satisfying snap when you bite into the ball. Dark chocolate introduces a slight bitterness that cuts through the pumpkin’s sweetness, creating a more complex flavor profile. If you’re a purist, stick with white chocolate for that classic dessert feel.
The Final Flourish
Candy melts are optional but add a playful, fall‑colored finish. They melt smoothly, allowing you to drizzle or dip the balls for an extra pop of color. If you prefer a more subtle look, you can skip them or use a single color to keep the focus on the chocolate coating.
Everything's prepped? Good. Let's get into the real action…
The Method — Step by Step
- Gather all ingredients and bring them to room temperature. The cream cheese should be soft enough to mix easily but not melted; this ensures a smooth batter. If you’re in a hurry, a quick microwave burst of 15 seconds can soften it.
- Place the Oreo cookies in a zip‑lock bag and crush them with a rolling pin or a heavy skillet. Aim for a texture like coarse sand. This step is crucial; over‑crushing will create a powder that clumps.
- In a medium bowl, blend the cream cheese and pumpkin puree until fully combined. The mixture should be smooth and free of lumps. Add a pinch of salt and a teaspoon of ground cinnamon, then stir until the spices are evenly distributed. This is the moment where the flavors begin to dance.
- Fold the crushed Oreos into the cream cheese mixture. Use a spatula to stir gently, ensuring the crumbs are evenly coated. The batter should be thick but pliable; if it’s too dry, add a tablespoon of milk or pumpkin puree.
- Scoop tablespoon‑sized portions of the mixture onto a parchment‑lined tray. Roll each portion into a ball by turning it between your palms. The balls should be firm enough to hold their shape but not so tight that they crack when coated.
- Melt the chocolate in a double boiler or microwave, stirring every 30 seconds until smooth. The chocolate should be fluid enough to coat the balls but not runny. If it’s too thick, add a teaspoon of coconut oil or butter.
- Dip each ball into the melted chocolate, ensuring it’s completely covered. Use a fork to lift it, letting excess chocolate drip off. Place the coated balls back on parchment to set. If you’re using candy melts, melt them similarly and drizzle over the balls for a decorative finish.
- Let the chocolate set at room temperature or speed up the process by placing the tray in the refrigerator for 10 minutes. The balls should be firm but still slightly pliable. This step is the moment of truth; don’t rush it, or the coating will crack.
- Once set, transfer the balls to a serving dish. If you’re making a large batch, keep them in an airtight container at room temperature for up to 3 days. For longer storage, refrigerate or freeze; just re‑dip them in melted chocolate before serving.
That's it — you did it. But hold on, I've got a few more tricks that'll take this to another level…
Insider Tricks for Flawless Results
The Temperature Rule Nobody Follows
Chocolate is a temperamental beast. The secret is to keep it between 86°F (30°C) for white chocolate and 88°F (31°C) for dark chocolate. Use a candy thermometer to avoid over‑cooking. If you’re using a microwave, heat in short bursts and stir to distribute heat evenly.
Why Your Nose Knows Best
Before you dip the balls, give the chocolate a quick sniff. A fresh, slightly nutty aroma indicates optimal flavor. If it smells burnt, let it cool for a minute. Your nose is a reliable guide for chocolate quality.
The 5‑Minute Rest That Changes Everything
After coating, let the balls rest for 5 minutes before serving. This brief pause allows the chocolate to set properly, preventing the balls from sliding off the parchment. It also gives the flavors a chance to meld.
Use a Silicone Mat for Easy Removal
Silicone baking mats are a game changer. They prevent the chocolate from sticking and make cleanup a breeze. If you’re making a large batch, lay the balls on the mat in a single layer to avoid clumping.
Keep It Cool, Keep It Fresh
Store the balls in an airtight container at room temperature if you plan to eat them within 48 hours. For longer storage, refrigerate and re‑dip in chocolate to restore the shine. Avoid the fridge for more than a week, as moisture can cause the coating to soften.
Creative Twists and Variations
This recipe is a playground. Here are some of my favorite ways to switch things up:
Nutty Crunch
Add chopped pecans or walnuts to the batter for an extra crunch. The nuts pair beautifully with the pumpkin’s earthiness and add a nutty aroma that elevates the overall flavor.
Spiced Up
Swap the cinnamon and nutmeg for a pinch of allspice or ginger. This gives the balls a warm, spicy kick that’s perfect for a holiday gathering.
Boozy Delight
Stir in a tablespoon of bourbon or maple liqueur into the pumpkin mixture. The alcohol adds depth and a subtle caramel note that complements the chocolate.
Chocolate Swirl
Create a swirl effect by adding a thin ribbon of dark chocolate into the batter before rolling. When you dip the balls, the dark chocolate will peek through, adding visual intrigue.
Vegan Version
Use a plant‑based cream cheese and dairy‑free chocolate. The texture remains similar, but the flavor profile shifts slightly, making it a great option for those who avoid dairy.
Festive Color
Use candy melts in orange, red, or green to match holiday decorations. Drizzle them over the balls for a festive pop that’s Instagram‑worthy.
Storing and Bringing It Back to Life
Fridge Storage
Place the balls in an airtight container and store them in the refrigerator for up to 3 days. The chocolate will stay firm, and the pumpkin center will remain moist. When you’re ready to serve, let them sit at room temperature for 10 minutes to soften slightly.
Freezer Friendly
For longer storage, wrap each ball individually in plastic wrap and place them in a freezer bag. Freeze for up to 3 months. When you want to enjoy, thaw at room temperature and re‑dip in melted chocolate for a glossy finish.
Best Reheating Method
If the balls have hardened, gently warm them in a microwave at 30% power for 10‑15 seconds. Add a splash of water to the chocolate before melting to keep it silky. This technique restores the original texture without compromising flavor.