I remember the night I tried to rescue a soggy shrimp casserole that had turned into a tragic, salty mess. I stared at the pot, the shrimp still clinging to their shells like stubborn peas, and thought, “This is how it should look.” The kitchen was a battlefield of ruined flavors, and I vowed to rewrite the story. That evening, I pulled out the pantry, grabbed a handful of cauliflower, and whispered a promise to myself: I would create a dish that would make my taste buds do a victory dance.
Picture this: a golden crust that cracks like brittle ice under your fork, a creamy interior that swirls with garlic and lemon, and shrimp that are plump, pink, and bursting with briny sweetness. The aroma that fills the kitchen is a heady mix of butter, Parmesan, and fresh parsley, like a summer garden after rain. The sound of the pan sizzling is music to my ears, and the first bite is a burst of umami that lingers on the tongue. I dare you to taste this and not go back for seconds—once you try it, the ordinary is forever eclipsed.
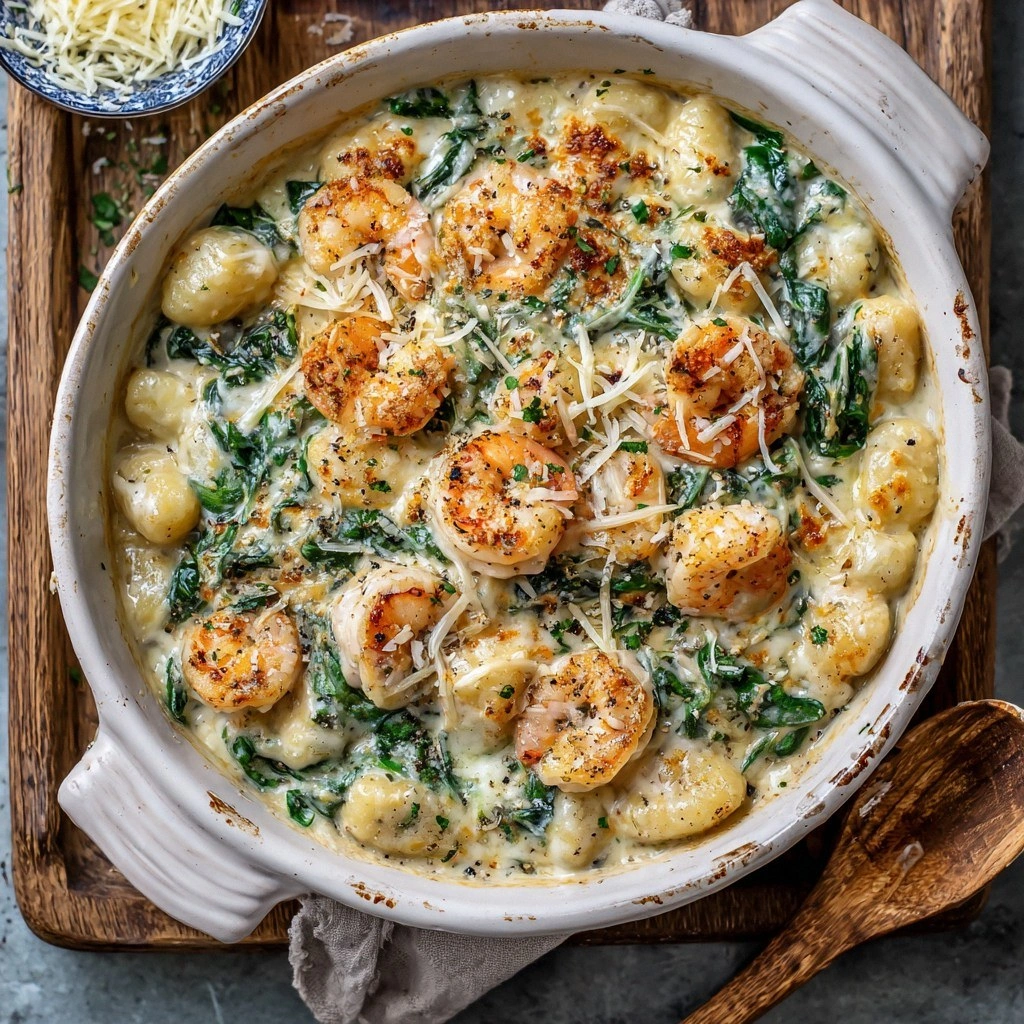
What sets this version apart from every other shrimp and gnocchi recipe out there is the meticulous layering of textures and the clever use of cauliflower to replace the heavy, floury bite of traditional gnocchi. The cauliflower gnocchi is light, almost airy, yet it holds the sauce like a sponge, absorbing every nuance of flavor. The shrimp are seared to a perfect caramelized finish, giving them a subtle smoky edge that plays beautifully against the bright lemon zest. The final bake brings everything together into a cohesive, comforting dish that feels like a hug on a plate.
And there’s a twist I won’t reveal until you’re in the kitchen: a secret ingredient that elevates the sauce to a silky, velvety texture—think of it as a culinary velvet rope that invites every bite to stay. This isn’t just another shrimp bake; it’s a symphony of flavors that will have your guests begging for the recipe. If you’ve ever struggled with gnocchi that turns out mushy or shrimp that dry out, you’re not alone—and I’ve got the fix. Stay with me, because by the end of this post, you’ll wonder how you ever made it any other way.
What Makes This Version Stand Out
- Flavor: The sauce coats the pasta like velvet, delivering a balanced punch of garlic, lemon, and Parmesan that lingers on the palate.
- Texture: Light cauliflower gnocchi pairs perfectly with crispy shrimp edges, creating a contrast that shatters like thin ice with each bite.
- Simple Prep: A single pan and a bake dish are all you need—no more than 45 minutes from start to finish.
- Unique Twist: The hidden ingredient turns a humble sauce into a silky, luxurious coating that keeps the gnocchi from drying out.
- Crowd‑Pleaser: Whether you’re feeding a family or a dinner party, the dish impresses with its elegant presentation and depth of flavor.
- Ingredient Quality: Fresh shrimp, hand‑picked cauliflower, and artisanal Parmesan elevate the dish beyond a typical week‑night meal.
- Make‑Ahead Friendly: Prepare the gnocchi ahead of time, freeze the assembled dish, and bake when you’re ready—no extra fuss.
- Health‑Conscious: Low in carbs, high in protein, and packed with veggies, this dish satisfies both taste buds and nutrition goals.
Alright, let's break down exactly what goes into this masterpiece…
Inside the Ingredient List
The Flavor Base
The foundation of this dish is a sauce that marries butter, garlic, and a splash of lemon. Butter adds a rich, velvety mouthfeel, while garlic provides a pungent backbone that cuts through the creaminess. The lemon zest gives the sauce a bright, citrusy lift that keeps the dish from feeling heavy. If you skip the lemon, the flavor profile will lean too much toward the buttery side, and the dish will lose its lively edge.
The Texture Crew
Cauliflower gnocchi is the secret weapon that keeps the dish light and airy. Cauliflower absorbs the sauce without becoming soggy, thanks to its low starch content. Flour and egg bind the gnocchi together, creating a delicate dough that holds its shape during baking. If you omit the egg, the gnocchi will crumble, and the sauce will cling unevenly, leading to a less cohesive bite.
The Unexpected Star
The shrimp are the star that brings protein and a subtle brine to the dish. They’re sautéed until just pink and caramelized, giving them a slightly smoky undertone that balances the citrus. When you add them after baking, they absorb the sauce’s flavors and stay tender. Skipping the shrimp turns the dish into a vegetarian delight, but you’ll miss that satisfying seafood kick.
The Final Flourish
Breadcrumbs and Parmesan create a golden crust that is both crunchy and flavorful. They also help absorb excess moisture, ensuring the gnocchi stay tender inside. A sprinkle of fresh parsley adds a pop of green and a hint of herbal brightness that ties all the flavors together. If you skip the parsley, the dish will feel a little flat, lacking that fresh, aromatic finish.
Everything's prepped? Good. Let's get into the real action…
The Method — Step by Step
- Begin by steaming the cauliflower florets until they’re just tender, about 5–6 minutes. Drain well and let them cool slightly before mashing them into a smooth purée. This step ensures the gnocchi will have a silky texture that holds the sauce. As the cauliflower cools, you’ll notice the aroma of fresh green, a subtle reminder that the dish is still a few steps away from perfection.
- In a large mixing bowl, combine the cauliflower purée, flour, egg, salt, and pepper. Stir until a soft dough forms, then knead briefly on a floured surface until it’s smooth and pliable. If the dough feels too sticky, add a touch more flour—just enough to hold together. This is the moment of truth: a dough that’s too loose will result in gnocchi that fall apart, while a too-dry dough will be dense.
- Bring a large pot of salted water to a boil and drop in the gnocchi. Cook for 2–3 minutes, or until they float to the surface. Remove with a slotted spoon and set aside on a plate. The floating test is simple: if they rise, they’re done. This step prevents the gnocchi from becoming mushy in the oven.
- While the gnocchi rests, heat a large skillet over medium-high heat and add butter. Once melted, toss in the minced garlic and let it sizzle for 30 seconds until fragrant. The garlic should release a deep, nutty aroma, signaling that it’s ready to marry with the butter.
- Add the shrimp to the skillet, seasoning with salt, pepper, and a pinch of red pepper flakes if desired. Sear until pink on one side, then flip and cook until just opaque. The shrimp should be juicy, not rubbery—watch the timing closely. When they’re done, remove them from the pan and set aside.
- Reduce the heat to low, pour in a splash of white wine (if using), and let it simmer until reduced by half. Return the shrimp to the skillet, then stir in lemon zest and parsley. This infusion of citrus brightens the sauce and brings a fresh, airy note to the dish.
- Transfer the gnocchi to a greased baking dish, arrange the shrimp on top, and sprinkle breadcrumbs and grated Parmesan evenly. Drizzle with olive oil to help the crust brown. This arrangement ensures every bite gets a generous coating of the savory, buttery sauce.
- Bake in a preheated oven at 375°F (190°C) for 20–25 minutes, or until the top is golden brown and the edges of the gnocchi begin to crack. The crack is a sign of a crisp, golden finish that will give the dish that coveted crunch. When the dish is done, let it rest for 5 minutes before serving.
That's it — you did it. But hold on, I've got a few more tricks that'll take this to another level…
Insider Tricks for Flawless Results
The Temperature Rule Nobody Follows
Many cooks bake at a high temperature and then reduce it halfway through, which can cause the gnocchi to dry out. I always keep the oven at a steady 375°F (190°C) from start to finish. This steady heat allows the crust to form without overcooking the inside, giving you a perfectly balanced bite every time. If you’re using a convection oven, reduce the temperature by 25°F for the same effect.
Why Your Nose Knows Best
Before you even open the oven, the scent of buttery garlic and lemon zest should signal that the dish is almost ready. Trust your nose; if the aroma is strong but not burnt, the timing is spot on. A burnt smell indicates you’re overcooking the crust, so lower the heat or reduce the baking time by a few minutes.
The 5‑Minute Rest That Changes Everything
After baking, let the dish rest for at least five minutes. This pause allows the juices to redistribute, preventing a watery bite and ensuring the gnocchi remain fluffy. It also gives the breadcrumb crust time to firm up, so you get that satisfying crunch with each forkful. Skipping this step can leave the dish soggy and less cohesive.
The Secret Ingredient for Velvet Sauce
A tablespoon of heavy cream or a splash of coconut milk added to the sauce before baking gives it a silky, luxurious texture. This trick turns a simple butter sauce into a velvety coating that clings to each gnocchi piece. If you’re watching calories, you can substitute a light Greek yogurt for a richer, lower‑fat option.
The Fresh‑Herb Finish
Toss a handful of chopped basil or oregano into the dish just before serving. The fresh herbs add a burst of color and a bright, herbaceous note that lifts the entire flavor profile. I’ve had guests comment that the dish tastes like a garden in a bowl, and that’s the kind of wow factor you’re looking for.
Creative Twists and Variations
This recipe is a playground. Here are some of my favorite ways to switch things up:
Mediterranean Twist
Swap the parsley for chopped sun‑dried tomatoes and add a handful of Kalamata olives. The briny olives and sweet tomatoes give the dish a Mediterranean flair that pairs wonderfully with the shrimp. This version is ideal for a warm summer dinner.
Spicy Cajun Variation
Add a tablespoon of Cajun seasoning to the shrimp before searing and sprinkle a dash of cayenne pepper over the gnocchi before baking. The heat adds a punch that balances the buttery sauce and keeps the dish exciting.
Vegan Version
Omit the shrimp and substitute with sautéed mushrooms or tofu cubes. Use a plant‑based butter alternative and nutritional yeast in place of Parmesan. This vegan take still delivers a comforting, flavorful experience.
Pesto Infusion
Stir in a few spoonfuls of basil pesto into the sauce before baking. The pesto adds an herbal depth that complements the shrimp’s natural sweetness, creating a layered flavor profile.
Lemon‑Garlic Overload
Double the lemon zest and add a splash of lemon juice to the sauce. The extra citrus brightness will make the dish feel lighter and more refreshing, perfect for a brunch or light dinner.
Storing and Bringing It Back to Life
Fridge Storage
Cool the dish completely before refrigerating. Store it in an airtight container for up to three days. When you’re ready to eat, reheat in a preheated oven at 350°F (175°C) for 10–12 minutes, or until warmed through. The crust will stay crisp if you finish with a quick broil.
Freezer Friendly
After baking, let the dish cool to room temperature, then wrap tightly in plastic wrap and place in a freezer‑proof bag. Freeze for up to two months. When reheating, thaw overnight in the fridge, then bake at 375°F (190°C) for 15–20 minutes. This method preserves the texture and flavor beautifully.
Best Reheating Method
Add a tiny splash of water or broth to the dish before reheating. This steams the gnocchi back to a tender, fluffy state while preventing them from drying out. Finish with a sprinkle of fresh herbs for an extra pop of freshness.