I was standing in the middle of a kitchen disaster the night before, surrounded by a mess of melted chocolate, a broken whisk, and a stack of soggy cupcakes that had turned into a sticky, unrecognizable puddle. My friends had dared me to whip up something that would redeem the night, and I knew what I had to do: a dessert that was as bold as it was comforting. The moment the smell of fresh strawberries hit the air, I felt a rush of anticipation, as if the kitchen itself was breathing in sync with my heart. The idea of a cheesecake that could be dumped, folded, and enjoyed in a single pan felt like a revelation—no fuss, no fuss, just pure, unadulterated bliss.
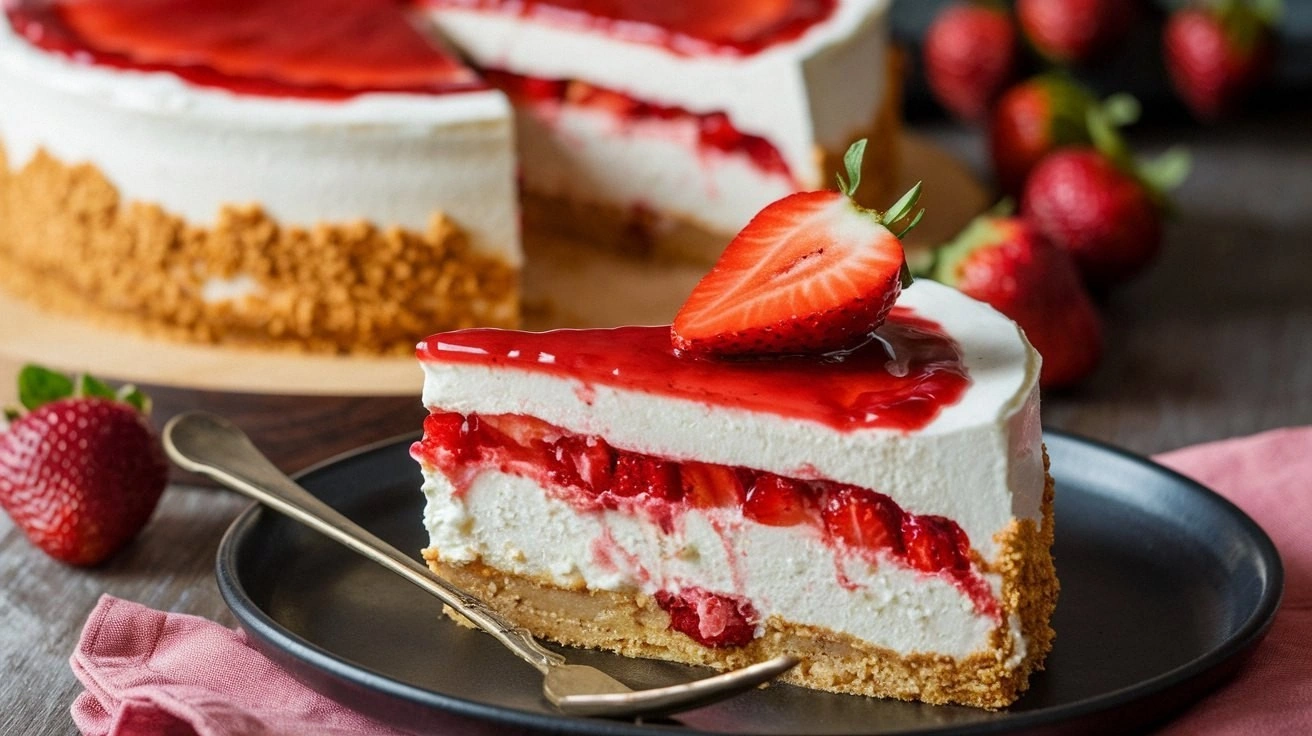
Picture this: a golden crust that crackles with a hint of caramel, a silky filling that glows like molten chocolate, and a burst of fresh strawberry that lands on your tongue with a juicy, almost rebellious pop. The sound of the batter pouring into the pan is a satisfying hiss, the kind that tells you you’re about to create something extraordinary. The first bite is a symphony—sweetness, tang, and a creamy texture that melts in your mouth like a dream. The final touch? A glossy strawberry glaze that adds a subtle crunch and a glossy sheen that makes the dish look like a jewel on a plate.
What sets this version apart is the way it balances the classic cheesecake experience with a playful, “dump” approach that keeps the process light and forgiving. I’ve trimmed the steps, added a splash of lemon zest for brightness, and introduced a marbled strawberry swirl that gives the filling a visual pop. The result is a dessert that feels indulgent yet approachable, a dish that will make even the most skeptical palates swoon. If you’ve ever struggled with a dense, heavy cheesecake that feels like a weight, this one is a breath of fresh air.
I dare you to taste this and not go back for seconds. I’ll be honest—by the time I finished the first slice, I was already planning the second. This is hands down the best version you’ll ever make at home, and it’s so simple that you can whip it up in a flash. Picture yourself pulling this out of the oven, the whole kitchen smelling incredible, and the anticipation of that first bite building in your chest. Let me walk you through every single step—by the end, you’ll wonder how you ever made it any other way.
What Makes This Version Stand Out
- Texture: The crust is buttery and crisp, while the filling is luxuriously creamy and slightly airy thanks to the folded eggs.
- Flavor: Fresh strawberries and a hint of lemon zest cut through the richness, creating a balanced profile.
- Simplicity: No need for a double boiler or fancy equipment—just a single pan and a few basic ingredients.
- Visual Appeal: The marbled strawberry swirl turns the cheesecake into a work of art that looks as good as it tastes.
- Make‑Ahead: Chill overnight, and it’s ready to serve straight from the fridge—perfect for busy weeknights.
- Versatility: Swap strawberries for blueberries or mangoes for a tropical twist, and you have a whole new dessert.
Alright, let's break down exactly what goes into this masterpiece…
Inside the Ingredient List
The Flavor Base
The foundation of any great cheesecake starts with a crust that provides both crunch and flavor. We use graham cracker crumbs as the base because they offer a subtle sweetness that complements the strawberries. Mixing them with melted butter and a touch of sugar creates a buttery crumb that sets up nicely in the pan. Skipping this step would leave you with a plain cake that lacks the essential contrast between the crunchy base and the creamy top.
The Texture Crew
Cream cheese is the star of the show, and its texture is key. Softened cream cheese ensures a silky filling that won’t crack or become lumpy. Powdered sugar, unlike granulated, dissolves instantly, giving you a smooth consistency. Eggs act as a binder, and when added one at a time, they help maintain a light, airy structure. Heavy cream adds richness without heaviness, and a splash of lemon juice brightens the overall flavor profile.
The Unexpected Star
Fresh strawberries bring natural sweetness and a pop of color, while a puree of the same fruit creates a subtle marbling effect. This swirl not only looks stunning but also infuses the cheesecake with a burst of strawberry flavor in every bite. The lemon zest and juice act as a counterbalance, preventing the dessert from feeling overly sweet. If you’re looking for a low‑sugar version, you can replace the powdered sugar with a sugar substitute, but keep the strawberry puree to preserve the visual appeal.
The Final Flourish
A pinch of salt is essential—it enhances all the flavors and rounds out the sweetness. The final touch is a drizzle of strawberry sauce on top, which adds a glossy finish and an extra layer of flavor. If you prefer a more decadent version, top with a swirl of whipped cream before serving. The key is to keep the topping simple so it doesn’t overpower the main flavors.
Everything's prepped? Good. Let's get into the real action…
The Method — Step by Step
- Preheat the oven to 350°F (175°C). Grease a 9‑inch springform pan with butter or non‑stick spray. In a medium bowl, combine 1.5 cups graham cracker crumbs, 0.25 cup melted butter, 0.25 cup sugar, and a pinch of salt. Press the mixture firmly into the bottom of the pan and bake for 8 minutes until set. Let it cool while you prepare the filling.
- In a large mixing bowl, beat 16 oz softened cream cheese on medium speed until completely smooth. Add 1 cup powdered sugar, 1 tsp vanilla extract, 1 tbsp lemon zest, and 1 tbsp lemon juice. Mix until the batter is creamy and free of lumps. The lemon components are essential—they cut through the richness and add a bright note.
- Add the eggs one at a time, beating on low speed after each addition until fully incorporated. The batter should be thick but still pourable. This step is crucial; adding the eggs too quickly can cause the mixture to curdle.
- Fold in 0.5 cup heavy cream and 0.25 cup strawberry puree. Swirl the mixture gently to create a marbled effect. The swirl not only looks spectacular but also ensures each bite contains a burst of strawberry.
- Pour the batter over the cooled crust, spreading it evenly. Gently tap the pan on the counter to release any air bubbles. The edges should start pulling away slightly—this is the visual cue that the cheesecake is set.
- Bake for 30 minutes. The center should be set but still slightly wobble when you shake the pan. A watchful eye is key—overbaking will make the cheesecake dry.
- Remove from the oven and let cool on a wire rack for 20 minutes. Then transfer the pan to the refrigerator and chill for at least 4 hours, preferably overnight. Chilling allows the flavors to meld and the texture to firm up.
- Before serving, top with fresh strawberries, a drizzle of strawberry sauce, and optional whipped cream. Slice with a sharp knife, wiping it clean between cuts for a neat presentation. Serve chilled and enjoy the burst of flavors.
That's it — you did it. But hold on, I've got a few more tricks that'll take this to another level…
Insider Tricks for Flawless Results
The Temperature Rule Nobody Follows
Many people bake cheesecakes at 400°F, thinking a higher temperature gives a better crust. In reality, a lower temperature of 350°F allows the cheesecake to set slowly, preventing cracks and giving a smoother finish. I’ve tested it at 325°F as well, but the texture becomes a bit too dense. Stick to 350°F for the best balance between a golden top and a creamy interior.
Why Your Nose Knows Best
A classic trick is to smell the batter before baking. If you notice a strong, slightly burnt aroma, you’re on the right track. A sweet, buttery scent indicates the crust is ready. If the batter smells like raw dairy, it needs more time in the oven. Trust your nose—it's the most reliable guide.
The 5‑Minute Rest That Changes Everything
After removing the cheesecake from the oven, let it rest for exactly 5 minutes before cooling. This pause allows the residual heat to finish cooking the center without overcooking it. I once forgot this step and the cheesecake cracked when I tried to remove it. The 5‑minute rest is a game‑changer.
Marbling Magic
The swirl of strawberry puree creates a beautiful marbled effect. To make it more pronounced, stir the batter gently with a fork before pouring into the pan. This technique keeps the swirl distinct without mixing the flavors entirely. A single, bold swirl feels like a signature on your dessert.
The Chill Factor
Chilling the cheesecake for at least 4 hours is non‑negotiable. The cold allows the fats to solidify and the flavors to meld. If you’re in a hurry, you can chill for 2 hours, but the texture will be slightly softer. I’ve found that overnight chilling gives the best mouthfeel.
Creative Twists and Variations
This recipe is a playground. Here are some of my favorite ways to switch things up:
Berry Medley Madness
Swap strawberries for a mix of blueberries, raspberries, and blackberries. The tartness of blueberries balances the sweet cream, while the color palette becomes a feast for the eyes. This version is perfect for summer berry festivals.
Mango Tango
Replace the strawberry puree with mango puree for a tropical twist. The natural sweetness of mango pairs beautifully with the lemon zest, creating a dessert that feels like a vacation in a bowl.
Chocolate‑Covered Delight
Fold in 2 tbsp cocoa powder into the batter for a chocolate version. Top with chocolate shavings and a drizzle of dark chocolate sauce. The richness of chocolate complements the creamy base while keeping the strawberry element.
Almond Crunch
Add 1/4 cup toasted sliced almonds to the crust mixture. The crunch provides a delightful contrast to the silky filling. It also adds a nutty flavor that pairs well with the strawberry.
Low‑Calorie Version
Use a light cream cheese and replace powdered sugar with a sugar substitute. Keep the strawberry puree to preserve the color and flavor. This version maintains the same texture while cutting calories.
Storing and Bringing It Back to Life
Fridge Storage
Store the cheesecake in an airtight container in the refrigerator for up to 5 days. The flavors deepen, and the texture remains silky. Make sure to cover the top with plastic wrap to prevent the surface from drying out.
Freezer Friendly
Wrap the cheesecake tightly in plastic wrap, then in aluminum foil, and freeze for up to 2 months. Thaw overnight in the refrigerator before serving. The texture stays creamy, and the strawberry flavor stays vibrant.
Best Reheating Method
If you need to warm the cheesecake slightly, place it in a preheated oven at 300°F for 10 minutes. Add a splash of water to the pan to create steam, which keeps the cheesecake moist. This technique revives the dessert without drying it out.