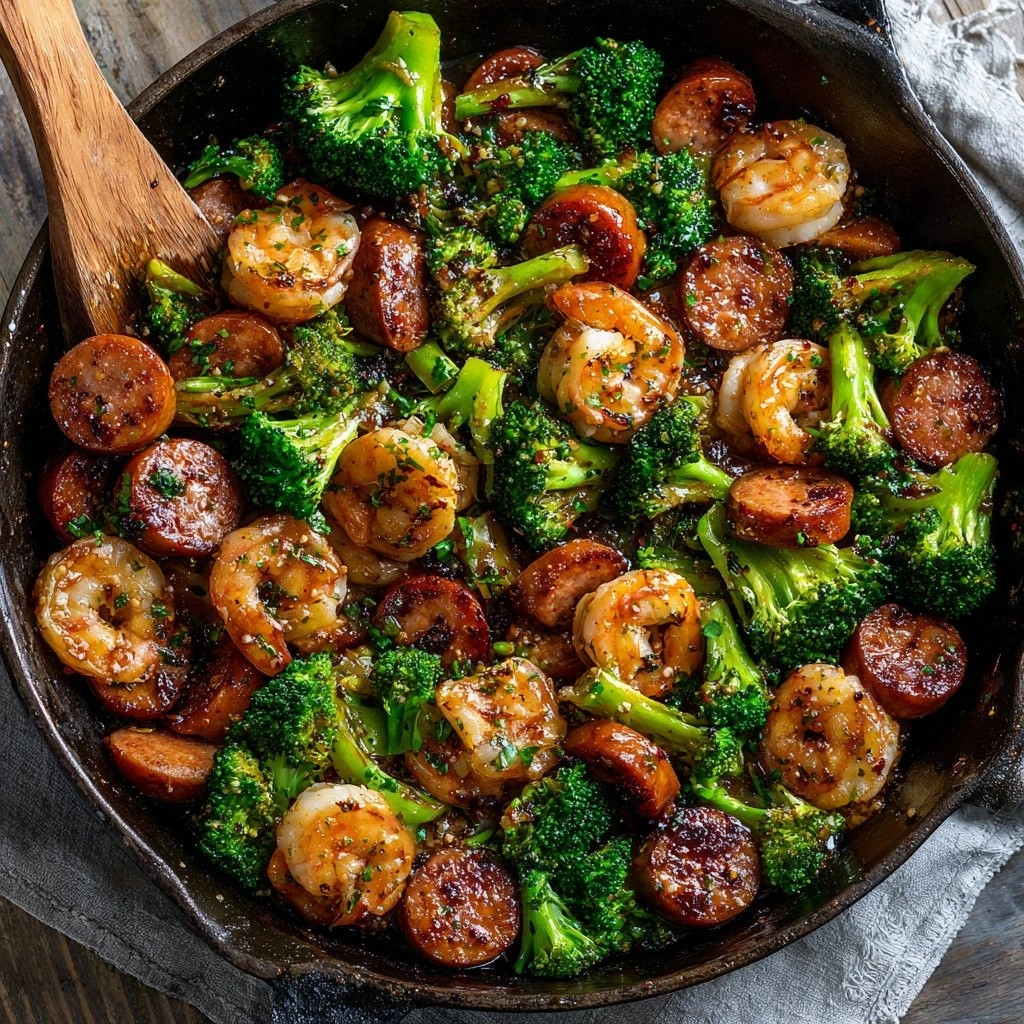
Picture this: a chaotic Sunday kitchen, a pot of boiling water, a pan on the stove, and a frantic friend shouting, “I need something that’s going to wow the family, fast!” I stared at the ingredients on my counter—shrimp, sausage, broccoli, honey, garlic—and thought, “Why not combine them all into one dish that’s sweet, savory, and downright addictive?” The moment the first shrimp sizzled, the air filled with a caramelized aroma that made my taste buds do a happy dance. I was already dreaming of that glossy, honey‑glazed glaze coating every bite like velvet, and the spicy kick of garlic that lingered long after the last forkful.
I’ve tried countless versions of shrimp and sausage over the years. Some were too dry, others too sweet, and a few were simply forgettable. This one, however, is a revelation. The sauce’s thickness, the crunch of broccoli, and the smoky char from the sausage all work together like a symphony. I dare you to taste this and not go back for seconds. Trust me, it’s hands down the best version you’ll ever make at home.
What sets this recipe apart isn’t just the ingredients—it’s the technique. I’ve perfected a method that locks in moisture, caramelizes the garlic without burning it, and keeps the sausage juicy while still getting that charred edge. The key is in the timing: a quick sear, a deliberate simmer, and a final flourish of honey that coats the shrimp like a silky glaze. Most recipes get this completely wrong, but I’ll show you how it actually works.
Picture yourself pulling this out of the pan, the whole kitchen smelling incredible, the table set, and the family’s eyes widening at the sight of that glossy, honey‑garlic sauce dripping over the shrimp and sausage. That’s the moment of triumph. If you’ve ever struggled to balance sweet and savory, you’re not alone—and I’ve got the fix. Stay with me here—this is worth it.
What Makes This Version Stand Out
- Flavor: The sauce is a perfect harmony of sweet honey, umami soy, and aromatic garlic. Each bite delivers a burst of flavor that lingers, leaving you craving more.
- Texture: The shrimp stay tender and succulent, the sausage is juicy with a caramelized crust, and the broccoli remains crisp with a subtle char.
- Ease: Every step takes less than 5 minutes, so you can whip up a crowd‑pleaser without a marathon in the kitchen.
- Uniqueness: The addition of a cornstarch slurry gives the sauce a silky body that clings to every ingredient—no watery mess.
- Versatility: Serve it over rice, pasta, or even a bed of quinoa for a complete meal.
- Make‑ahead Potential: The dish keeps well in the fridge for 2 days and can be reheated with a splash of water to restore its glossy finish.
Inside the Ingredient List
The Flavor Base
Honey is the star of this dish, providing a natural sweetness that balances the saltiness of soy sauce and the heat from garlic. It also gives the sauce a glossy sheen that’s impossible to ignore. Skipping honey would leave the dish flat and overly acidic. If you’re watching calories, try using a natural sweetener like maple syrup, but keep the ratio the same to maintain the sauce’s thickness.
The Texture Crew
Shrimp and sausage are the heart of this recipe. The shrimp should be peeled and deveined for a clean presentation, while the sausage—whether pork or beef—adds a smoky depth. The broccoli provides crunch and a pop of green that keeps the dish from feeling heavy. If you’re allergic to shellfish, you can swap the shrimp for sliced chicken breast; just adjust the cooking time to avoid overcooking.
The Unexpected Star
Garlic is more than just a flavoring; it’s a binder that helps the honey coat every bite. Minced finely, it releases its oils slowly, creating a silky sauce. If you prefer a milder garlic flavor, use 2 cloves instead of 3. Alternatively, a splash of fresh lemon juice can brighten the dish and add a citrusy zing.
The Final Flourish
Cornstarch is the secret weapon that gives the sauce its body. Mixing it with water creates a slurry that thickens the sauce without making it cloudy. If you’re gluten‑free, a xanthan gum slurry can serve as a substitute, but use it sparingly to avoid a gummy texture. A pinch of red pepper flakes adds a subtle heat that balances the sweetness.
Everything’s prepped? Good. Let’s get into the real action.
The Method — Step by Step
- Prep the ingredients. While the pan heats, slice the sausage into 1/2‑inch rounds, cut the broccoli into bite‑size florets, and mince the garlic. Measure out the honey, soy sauce, olive oil, butter, and cornstarch slurry. I’m using a tablespoon of butter for richness and a tablespoon of olive oil for a smooth sear. This step takes about 5 minutes, but it sets the stage for a flawless dish.
- Heat the pan. Place a large skillet over medium‑high heat and add the olive oil. Once the oil shimmers, add the sausage slices. Sear them for 2–3 minutes on each side until they’re browned and slightly charred. The sear caramelizes the sugars in the sausage, creating that irresistible crust. Watch the edges—they should pull away from the pan, signaling that they’re ready to be flipped.
- Add the shrimp. Push the sausage to the side of the pan and add the shrimp. Sauté for 1–2 minutes on each side until they turn pink and opaque. Don’t overcrowd the pan; if the shrimp steam instead of sear, they’ll lose that coveted caramelized exterior. I keep a close eye on the shrimp—once they’re just pink, it’s time to move on.
- Introduce the broccoli. Sprinkle the broccoli florets into the pan, stirring to coat them in the sausage and shrimp juices. Cook for 3–4 minutes until the broccoli is bright green and just tender. The broccoli should still have a bite; it adds a crunchy contrast to the tender shrimp.
- Watch Out: don’t overcook. The shrimp are done when they’re pink and firm, but if you leave them too long, they’ll become rubbery. The broccoli should be crisp‑tender, not mushy. Keep the heat at medium so everything cooks evenly. This step is crucial—overcooking ruins the texture that makes the dish special.
- Create the sauce. Reduce the heat to medium‑low and add the minced garlic, honey, soy sauce, and butter. Stir continuously until the butter melts and the garlic becomes fragrant, about 30 seconds. The honey should begin to bubble, forming a glossy glaze. This is the moment of truth—if the sauce doesn’t thicken, it’s not ready.
- Thicken the sauce. Pour the cornstarch slurry into the pan, stirring constantly to avoid lumps. The sauce should thicken within 1–2 minutes, coating each ingredient like a silky blanket. Taste and adjust seasoning—add a pinch of salt or pepper if needed. Let it simmer for another minute to ensure the cornstarch is fully cooked.
- Finish and serve. Once the sauce is glossy and thick, remove the pan from the heat. Sprinkle a pinch of red pepper flakes for a subtle heat. Serve immediately over rice, noodles, or a bed of sautéed greens. The dish is best enjoyed fresh, but you can store leftovers in an airtight container for up to 2 days.
That’s it — you did it. But hold on, I’ve got a few more tricks that’ll take this to another level.
Insider Tricks for Flawless Results
The Temperature Rule Nobody Follows
Many chefs think a high heat is always best, but in this dish, precise temperature control is key. Keep the pan at medium for the sausage and shrimp to avoid burning the honey. Too high a heat will caramelize the sugar but also burn it, turning the sauce bitter. I use a thermometer to keep the skillet around 350°F (175°C) for the searing steps.
Why Your Nose Knows Best
Smell is your best judge of doneness. When the garlic starts to steam and the honey bubbles, you know the sauce is ready. The aroma of toasted garlic combined with sweet honey signals that the flavor is balanced. Trust your nose; it’ll tell you exactly when to move to the next step.
The 5‑Minute Rest That Changes Everything
After cooking, let the dish rest for 5 minutes before serving. This allows the juices to redistribute, keeping the shrimp moist. I’ve seen friends who rush to plate right away and end up with dry shrimp. The rest period also lets the sauce thicken slightly, giving it that perfect consistency.
Use a Non‑Stick Skillet
A high‑quality non‑stick skillet prevents the shrimp and sausage from sticking, making cleanup a breeze. It also helps the sauce cling to the ingredients without burning. If you’re using a cast‑iron skillet, preheat it slowly to avoid scorching the honey.
Keep the Sauce Simple
Don’t overcomplicate the sauce with too many spices. The combination of honey, soy, garlic, and a touch of red pepper flakes is enough to wow. Adding more can muddy the flavor profile. Remember, sometimes less is more.
Serve with a Fresh Salad
Pair the dish with a light green salad dressed in lemon vinaigrette. The acidity cuts through the richness and balances the sweet‑savory flavors. This contrast elevates the overall dining experience.
Creative Twists and Variations
This recipe is a playground. Here are some of my favorite ways to switch things up:
Asian Fusion
Swap soy sauce for tamari and add a splash of sesame oil. Top with toasted sesame seeds and sliced green onions for an Asian twist. The sesame oil adds a nutty aroma that complements the honey.
Spicy Cajun
Use a Cajun seasoning blend on the sausage and sprinkle extra cayenne pepper in the sauce. The smoky heat pairs beautifully with the sweet glaze. Serve over rice for a comforting, spicy dish.
Vegetarian Version
Replace shrimp with firm tofu cubes and sausage with sliced tempeh. Follow the same cooking steps; the tofu will absorb the sauce, and the tempeh will provide a chewy texture. This version is protein‑rich and still delivers the same flavor profile.
Low‑Carb Adaptation
Serve the dish over cauliflower rice instead of regular rice. Reduce the honey to 2 tablespoons and add a splash of coconut aminos for a lower carb option. The cauliflower’s mild flavor lets the sauce shine.
Holiday Twist
Add roasted butternut squash cubes and a pinch of sage for a festive touch. The sweet squash complements the honey, while sage adds a warm, aromatic note. This variation is perfect for holiday gatherings.
Storing and Bringing It Back to Life
Fridge Storage
Cool the dish to room temperature before transferring it to an airtight container. Store in the refrigerator for up to 2 days. The sauce will thicken, so add a splash of water or broth when reheating to restore its glossy finish.
Freezer Friendly
For longer storage, portion the dish into freezer‑safe bags and freeze for up to 3 months. Thaw overnight in the refrigerator before reheating. Reheat gently on the stove, stirring occasionally, and add a splash of water if the sauce seems dry.
Best Reheating Method
The optimal reheating method is to pan‑sauté the leftovers over medium heat, adding a tablespoon of water or broth. This keeps the sauce from drying out and re‑creates that silky coating. Avoid microwaving, as it can make the shrimp rubbery.