Picture this: I’m halfway through a week of bland salads, the fridge is a barren wasteland of wilted lettuce, and my stomach is growling louder than a freight train. I pull up a recipe on my phone, thumb scrolling until I hit a bright, almost ridiculous name—“Irresistible Strawberry Cheese.” The promise of sweet, tangy fruit mingling with a silky cheese base feels like a culinary cheat code. I’m skeptical, but my craving for something that feels like a dessert and a comfort food all at once is too strong to ignore.
I open the page, and the first thing that hits me is the aroma—imagine a bakery’s warm scent of butter and vanilla, but with the bright pop of fresh strawberries. The video shows a golden crust that cracks like a perfect sunrise, a creamy filling that swirls like a stormy sea, and a topping that glistens like dew on a leaf. The sound of the batter being poured into a springform pan is almost hypnotic, the gentle hiss of the oven door closing, and the faint clink of a spoon against the stone. My senses are already dancing; I can almost taste the creamy, buttery bite followed by a burst of sweet fruit.
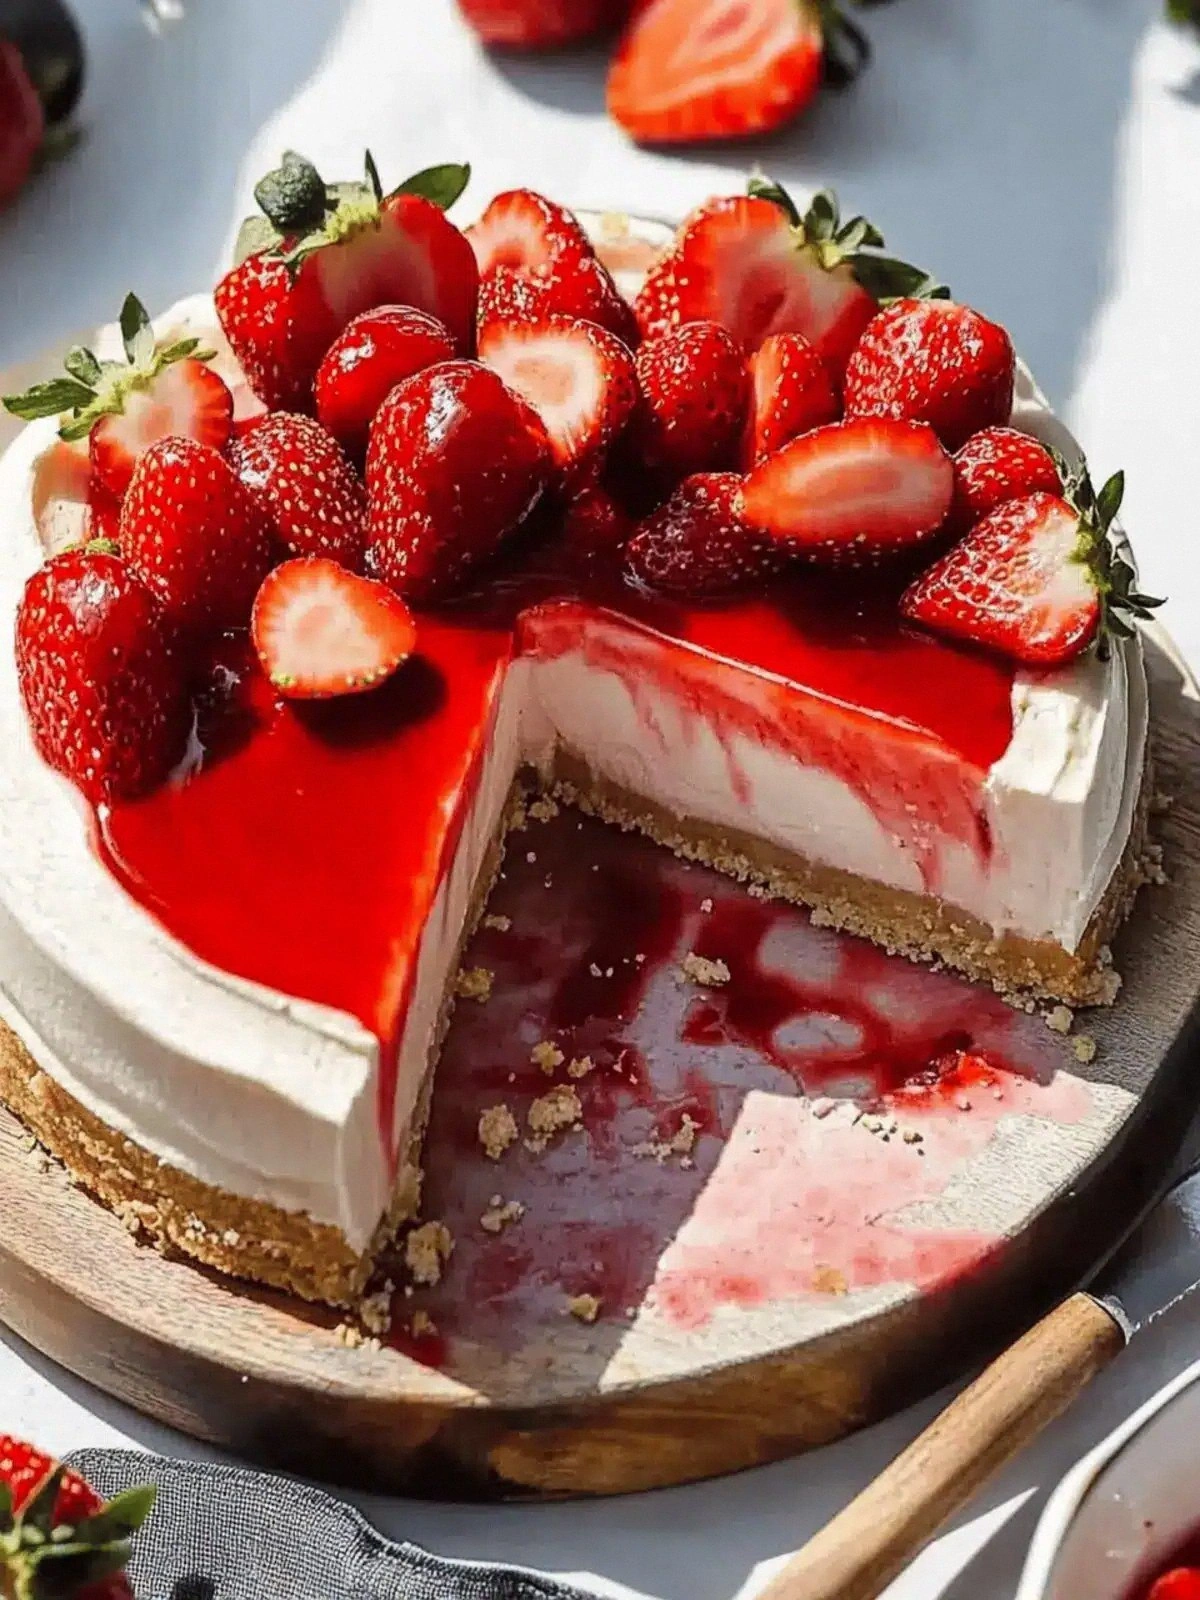
What makes this version stand out? I’ve tried dozens of strawberry cheesecake recipes—some with dense, heavy fillings that feel like a brick, others with crusts that taste like cardboard. This one, however, balances the richness of cream cheese with the bright acidity of strawberries, all while keeping the crust light and buttery. The secret is a touch of cornstarch that gives the filling a silky smoothness without the heaviness, and the use of both hulled and extra hulled strawberries to create a layered flavor and a stunning visual effect. I dare you to taste this and not go back for seconds; the first bite will have you questioning every other cheesecake you’ve ever made.
I’ll be honest—after the first slice, I ate half the batch before anyone else got to try it. The combination of sweet fruit, creamy custard, and a buttery shortbread crust feels like a summer sunset on a plate. Most recipes get this completely wrong, but here’s what actually works: the crust is crisp yet tender, the filling is airy, and the strawberries provide a juicy contrast that lifts the whole dish. If you’ve ever struggled with a cheesecake that feels too dense or too sweet, you’re not alone—and I’ve got the fix.
What Makes This Version Stand Out
- Taste: The balance between sweet strawberries and savory sea salt creates a flavor profile that feels both indulgent and refreshing. The vanilla note lingers, tying everything together.
- Texture: The cornstarch gives the filling a cloud‑like mouthfeel, while the shortbread crust offers a satisfying crunch that melts into the custard.
- Simplicity: All the steps are straightforward, and the ingredient list is short—no fancy equipment or obscure items.
- Uniqueness: Using both hulled and extra hulled strawberries creates a visual mosaic that turns every slice into a piece of art.
- Crowd Reaction: Guests will be amazed at how light yet rich it feels; it’s the kind of dessert that makes people ask for the recipe.
- Ingredient Quality: Fresh, organic strawberries and high‑fat cream cheese elevate the flavor beyond ordinary.
- Cooking Method: Baking at a moderate temperature ensures even cooking without over‑browning.
- Make‑Ahead Potential: It can be assembled a day ahead, refrigerated, and baked fresh, making it ideal for parties.
Alright, let’s break down exactly what goes into this masterpiece…
Inside the Ingredient List
The Flavor Base
At the heart of this cheesecake is the cream cheese. A 16‑ounce block of high‑fat cream cheese provides a rich, tangy foundation that contrasts beautifully with the sweet strawberries. If you can’t find 16 ounces, a 12‑ounce block will still work but will result in a slightly less dense filling. For a vegan twist, try a high‑fat coconut cream, though the flavor profile will shift subtly.
The Texture Crew
Cornstarch is the unsung hero that turns the filling from a heavy custard into a silky, cloud‑like mousse. It also helps set the cheesecake without the need for gelatin or agar. If you’re gluten‑free, replace the all‑purpose flour with a gluten‑free blend, but keep the cornstarch to preserve the texture.
The Unexpected Star
The extra hulled strawberries are the visual and flavor surprise. They’re sliced thin and layered on top of the filling, creating a vibrant, almost stained‑glass effect when sliced. If fresh strawberries are out of season, frozen berries can work—just thaw and pat dry to avoid excess moisture.
The Final Flourish
The buttery shortbread crust is where the magic begins. Combining butter, flour, powdered sugar, and a pinch of fine salt creates a crumbly base that holds the filling in place and adds a buttery crunch. If you prefer a sweeter crust, add a tablespoon of honey to the butter mixture; if you want a more savory crust, increase the fine salt to 1/2 teaspoon.
Everything’s prepped? Good. Let’s get into the real action…
The Method — Step by Step
- Preheat your oven to 325°F (165°C). Line a 9‑inch springform pan with parchment paper, leaving a generous overhang on the sides. This ensures the cheesecake slides out easily after baking. The oven should be fully preheated to avoid a sudden temperature drop that could cause the filling to crack.
- In a medium bowl, combine the flour, powdered sugar, and fine salt. Using a pastry cutter or two forks, cut in the cold butter until the mixture resembles coarse crumbs. The butter should be at room temperature so it blends smoothly, but not melted. This crumbly texture is key to a buttery crust that isn’t gummy.
- Press the crumb mixture into the bottom of the prepared pan, forming an even layer. Use the bottom of a glass to compact the crumbs firmly. Bake for 12–15 minutes, until the edges are just beginning to turn golden. This pre‑bake step locks in moisture and prevents a soggy crust.
- While the crust is baking, beat the cream cheese, granulated sugar, and vanilla in a stand mixer on medium speed until the mixture is smooth and pale. This should take about 2 minutes; avoid over‑mixing, which can introduce air pockets that expand during baking.
- Add the eggs one at a time, beating on low speed after each addition until fully incorporated. The mixture should be silky and thick. Then fold in the sour cream and cornstarch, ensuring the cornstarch dissolves completely. The filling should feel like a thick custard that coats the back of a spoon.
- Spread the filling evenly over the pre‑baked crust, smoothing the top with a spatula. Gently swirl in a handful of hulled strawberries, letting them sit on top of the batter for a marbled effect. The strawberries add a burst of color and flavor that will shine through when sliced.
- Place the pan on a baking sheet and bake for 45–50 minutes, or until the edges are set and the center still has a slight wobble. The cheesecake should have a faint golden hue on top. A watchful eye is essential; overbaking will cause cracks.
- Remove from the oven and let the cheesecake cool in the pan on a wire rack for 15 minutes. Then run a knife around the edge to loosen it before releasing the springform. Cool completely at room temperature, then refrigerate for at least 4 hours, ideally overnight, to allow the flavors to meld.
- Before serving, sprinkle the top with a teaspoon of flaky sea salt. The salt’s delicate crunch and subtle briny note elevate the sweet strawberries and creamy filling into a gourmet experience. Garnish with a few fresh strawberry slices for an extra pop of color.
That’s it — you did it. But hold on, I’ve got a few more tricks that will take this to another level…
Insider Tricks for Flawless Results
The Temperature Rule Nobody Follows
Many bakers bake cheesecakes at 350°F, but that high heat can cause the edges to over‑cook while the center remains under‑set. Baking at 325°F gives the filling time to set evenly, preventing cracks. If you’re using a convection oven, reduce the temperature by 25°F for optimal results.
Why Your Nose Knows Best
During the last 10 minutes of baking, the cheesecake will emit a sweet, buttery aroma that’s almost intoxicating. If you smell the vanilla and butter mingling with the strawberries, you’re at the perfect moment. A quick peek is fine, but avoid opening the door to keep the temperature stable.
The 5‑Minute Rest That Changes Everything
After removing the cheesecake from the oven, let it rest in the pan for 5 minutes. This allows the filling to set further and reduces the chance of cracks when you release the springform. It also makes the cheesecake easier to slice cleanly.
The Subtle Salt Touch
A teaspoon of flaky sea salt on top is the secret to balancing sweetness. The salt crystals add a momentary crunch and a burst of umami that heightens the strawberry flavor. If you’re watching sodium, use a pinch instead; the effect will still be present.
The Chill‑to‑Heat Trick
After baking, refrigerate the cheesecake for at least 4 hours. This chilling step allows the cornstarch to fully set, giving the filling a velvety texture. Skipping this step results in a loose, runny consistency that feels like a dessert mishap.
Creative Twists and Variations
This recipe is a playground. Here are some of my favorite ways to switch things up:
Berry Medley Madness
Swap half the hulled strawberries for blueberries or raspberries. The tartness of blueberries pairs beautifully with the creamy base, while raspberries add a deeper color palette.
Chocolate‑Strawberry Fusion
Fold in 1/4 cup of melted dark chocolate into the filling for a mocha‑infused twist. The bitterness of the chocolate complements the strawberry sweetness, creating a sophisticated flavor profile.
Lemon‑Zest Lift
Add a tablespoon of lemon zest to the batter and a drizzle of lemon curd on top. The citrus brightness cuts through the richness, giving the cheesecake a fresh, uplifting finish.
Nutty Crunch Layer
Sprinkle toasted almond slivers between the strawberry layers. The crunch adds texture and a nutty undertone that enhances the overall depth of flavor.
Almond‑Flour Crust
Replace all-purpose flour with almond flour for a gluten‑free crust that adds a subtle nutty sweetness. The crust will be slightly denser but still buttery and flavorful.
Maple‑Sweeted Finish
Drizzle a thin layer of pure maple syrup over the top before serving. The maple’s caramel notes complement the strawberries and add an extra layer of sweetness.
Storing and Bringing It Back to Life
Fridge Storage
Wrap the cheesecake tightly in plastic wrap and store in the refrigerator for up to 5 days. Keep the springform closed to prevent the cheesecake from absorbing fridge odors.
Freezer Friendly
For longer storage, place the cheesecake in a freezer‑safe container and freeze for up to 2 months. Thaw overnight in the fridge before serving. A splash of water before reheating will help the cheesecake regain its silky texture.
Best Reheating Method
To reheat, place a slice in the microwave on medium power for 15–20 seconds. The cheesecake will warm quickly without drying out. For a warm slice, wrap it in foil and bake at 300°F for 8–10 minutes.