When the oven door slammed shut and the kitchen filled with a smoky haze, I stared at my ruined batch of chicken wings. The batter had clumped, the sauce had caramelized into a sticky mess, and the wings were nothing more than charred, soggy disappointment. I could have sworn I was on a culinary death march, but that night, a spark of ingenuity turned the disaster into a revelation. I was determined to find the secret that would lift the wings from the ashes and turn them into a triumph of crispness and flavor.
Picture this: the air thick with the sweet scent of honey, the sharp bite of garlic, and a faint metallic tang from soy sauce. The sound of wings sizzling against a hot pan, a rhythmic hiss that builds anticipation. The texture—crackling, golden edges that crack like thin ice, while the inside remains tender and juicy. The sight of a glossy, amber glaze coating each wing like a velvet coat, and the feel of the hot oven door closing behind you, sealing in the aroma. It’s an orchestra of senses that makes you forget the chaos of the previous night.
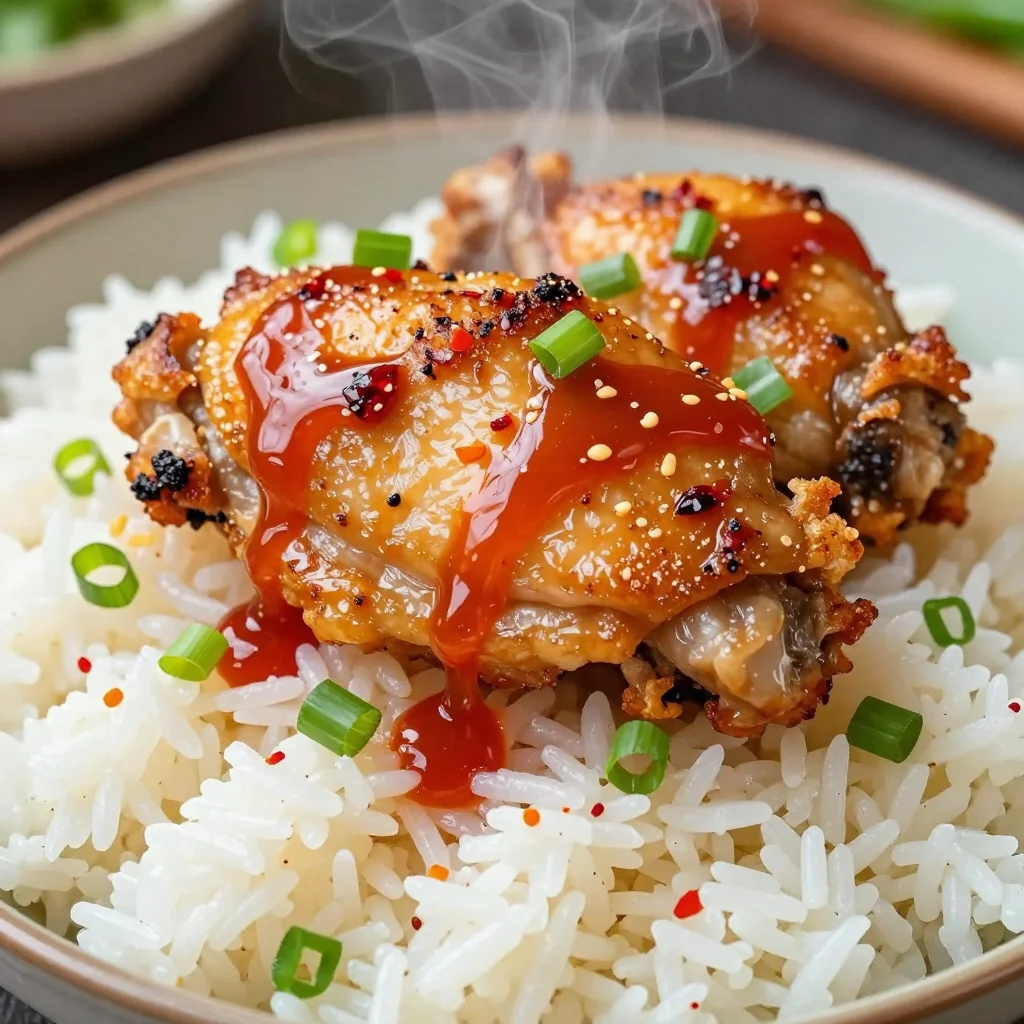
This version of the classic sticky honey garlic chicken wings is a game changer. It’s not just the blend of sweet and savory, but the meticulous balance of moisture and crunch that makes it stand out. The sauce is thickened with a starch slurry that locks in the glaze, preventing it from running off the wings. And the secret lies in the prep—coating the wings with a light dusting of flour and letting them rest before baking. That small step creates a barrier that keeps the sauce from soaking in, resulting in a crispy crust that shatters with every bite.
There’s a twist you won’t expect: a dash of crushed red pepper flakes that adds a subtle heat, and a sprinkle of sesame seeds that offers a nutty crunch. These ingredients elevate the dish from ordinary to unforgettable. I dare you to taste this and not go back for seconds, because the first bite will set a new standard for wing perfection. Let me walk you through every single step—by the end, you’ll wonder how you ever made it any other way.
What Makes This Version Stand Out
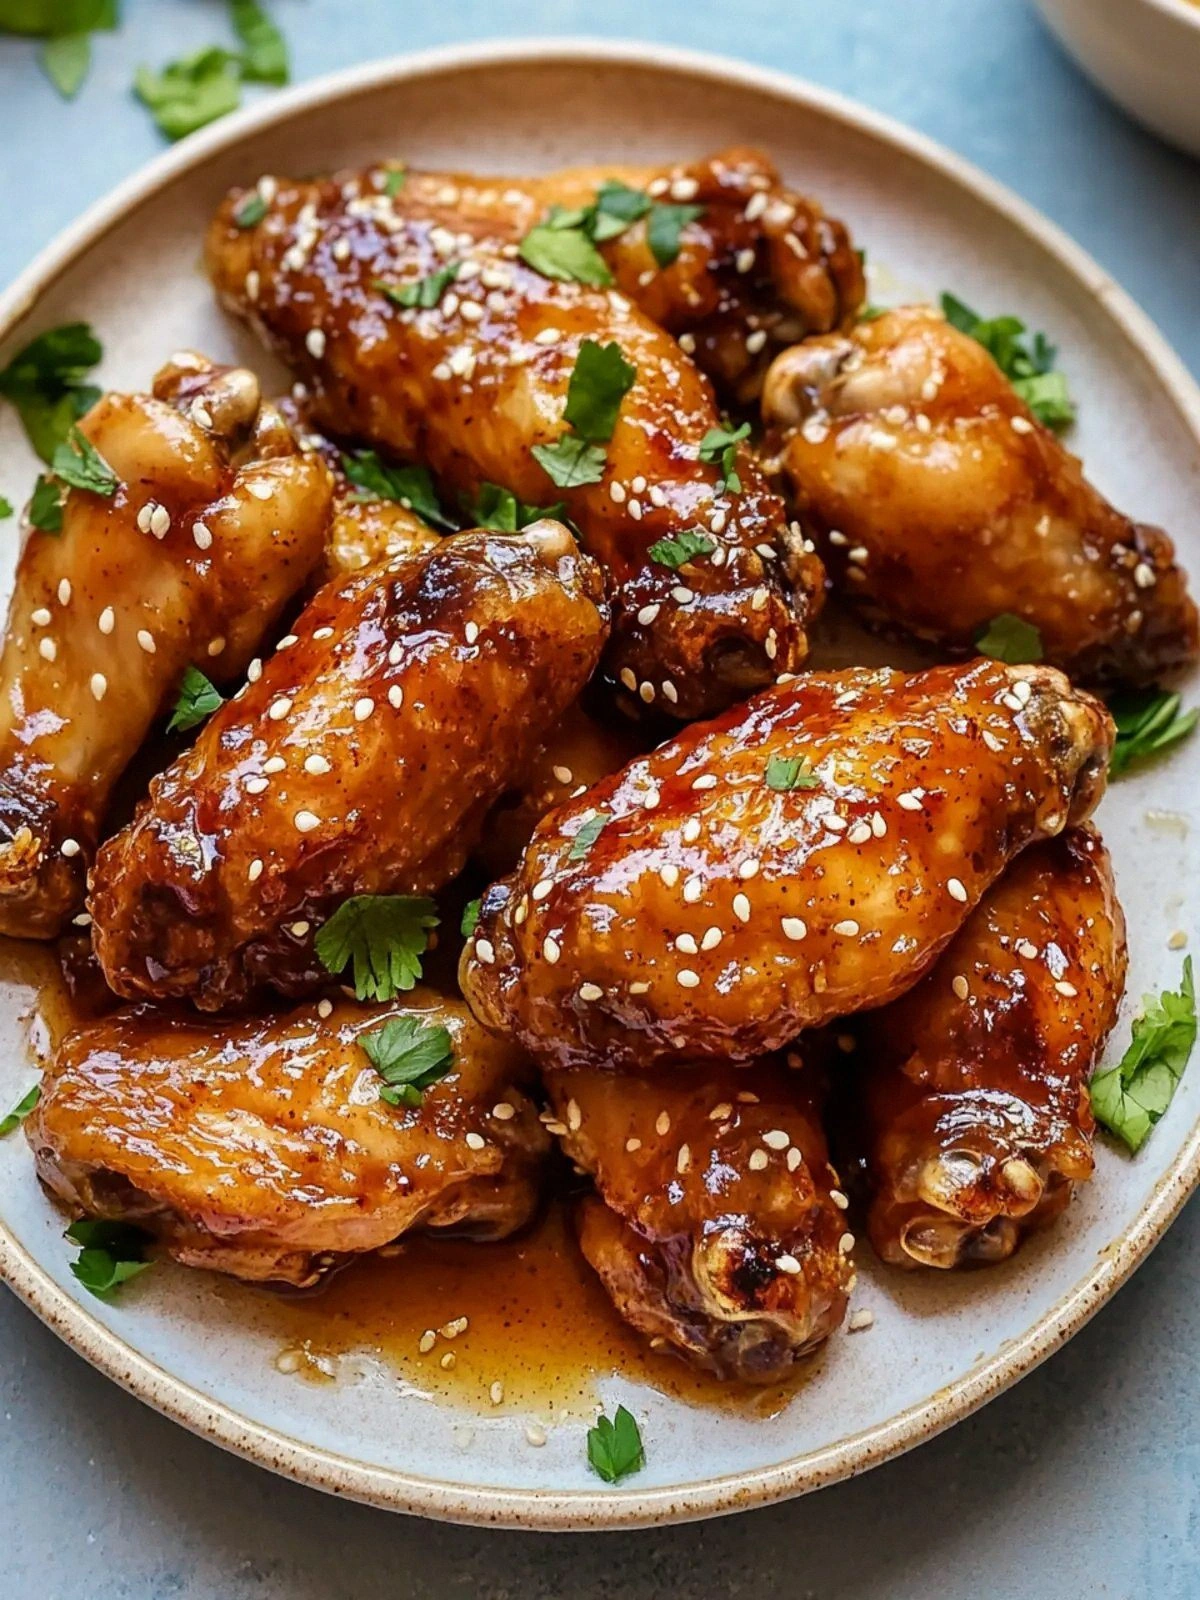
- Flavor: The marriage of honey, soy sauce, and garlic creates a glaze that is both sweet and umami-rich, with a subtle depth that lingers on the palate. Each bite delivers a burst of caramelized sweetness followed by a savory kick.
- Crispness: The flour coating combined with a brief resting period before baking traps moisture, allowing the skin to crisp to a golden, almost brittle texture that snaps like thin ice.
- Texture: The starch slurry thickens the glaze, giving it a silk-like sheen that clings to the wings without becoming sticky or gummy. The result is a harmonious contrast between crunchy exterior and juicy interior.
- Ingredient Quality: Using high-grade honey, fresh garlic, and fresh ginger ensures that every component shines, while the sesame seeds add a subtle nutty crunch.
- Cooking Method: Baking rather than frying delivers the same mouthfeel while reducing oil usage, making it a healthier option without sacrificing flavor.
- Make‑ahead Potential: The glaze can be pre‑mixed and stored, allowing you to assemble the wings just before baking and enjoy a quick, crowd‑pleasing dish.
- Versatility: The recipe can be tweaked with different sugars, sauces, or spice levels, making it suitable for any palate or dietary need.
- Presentation: The glossy glaze and bright sesame seeds make the dish visually stunning, perfect for parties or a casual family dinner.
Alright, let's break down exactly what goes into this masterpiece...
Inside the Ingredient List
The Flavor Base
The honey and soy sauce form the backbone of the glaze, providing sweetness and umami. Honey’s natural sugars caramelize at high heat, creating a glossy coating that locks in moisture. Soy sauce adds depth, saltiness, and a savory note that balances the sweetness. If you’re looking for a slightly different flavor profile, try coconut aminos for a lower-sodium, gluten-free alternative that still delivers that rich, savory punch.
The Texture Crew
Flour or gluten‑free flour is the unsung hero that creates the crisp barrier on the wings. It absorbs excess moisture, preventing the glaze from running off and ensuring a crunchy exterior. The starch slurry—made from tapioca flour, arrowroot starch, or corn starch—thickens the glaze, giving it that silky, clingy texture that doesn’t become sticky. If you skip the flour, the wings will still cook, but you’ll lose the coveted crunch that makes this dish stand out.
The Unexpected Star
Crushed red pepper flakes add a subtle heat that elevates the dish without overpowering the sweet glaze. Sesame seeds contribute a nutty crunch and a pop of color that makes the wings visually appealing. Together, they create a layered flavor profile that satisfies both sweet and savory cravings. If you’re a heat‑loving foodie, feel free to bump the flakes up to a teaspoon for an extra kick.
The Final Flourish
The garlic and ginger provide aromatic depth, cutting through the richness of honey and soy. Freshly minced garlic offers a bright, sharp note that balances the sweetness, while ginger brings a warm, slightly peppery undertone. Together, they form a fragrant base that elevates the entire dish. If you’re on a low‑sodium diet, reduce the soy sauce and compensate with a pinch of sea salt.
Everything's prepped? Good. Let's get into the real action...
The Method — Step by Step
- Prep the wings: Start by patting the wings dry with paper towels. This removes excess moisture that can prevent crisping. Toss the wings in a bowl with sea salt, black pepper, and a light dusting of flour or gluten‑free flour. Shake off any excess flour to avoid clumps. Let the wings rest in the refrigerator for 15 minutes; this step helps the coating adhere better and improves the final crispness. I dare you to taste this and not go back for seconds—your taste buds will thank you later.
- Prepare the glaze: In a small saucepan, combine honey, soy sauce, minced garlic, grated ginger, and crushed red pepper flakes. Warm over medium heat, stirring until the mixture is smooth and the garlic softens. Reduce the heat to low and let it simmer for about 3 minutes, allowing the flavors to meld. While the glaze simmers, whisk the starch slurry—tapioca flour, arrowroot starch, or corn starch mixed with a tablespoon of cold water—until smooth. This slurry will thicken the glaze during baking.
- Coat the wings with glaze: Remove the wings from the refrigerator and place them in a large zip‑lock bag. Pour the warm glaze over the wings, ensuring every piece is coated. Seal the bag, shake gently, and let the wings marinate for 10 minutes. This brief marination allows the sauce to penetrate the meat without overpowering the crispness.
- Preheat the oven: Set your oven to 425°F (220°C). Line a baking sheet with parchment paper or a silicone mat to prevent sticking. The high heat is crucial for achieving that golden, crackly exterior.
- Arrange the wings: Spread the marinated wings in a single layer on the prepared baking sheet, leaving space between each piece. This ensures even cooking and allows the air to circulate, which promotes crispness. If you have a rack, place the wings on the rack for extra airflow.
- Bake the wings: Place the sheet in the preheated oven and bake for 25 minutes. Flip the wings halfway through the cooking time, then brush them with the remaining glaze for an extra glossy finish. The wings should be golden brown, with the glaze thickening and forming a sticky, caramelized coating. If you notice the glaze burning, reduce the heat slightly or move the rack lower.
- Finish with sesame seeds: Once the wings are done, sprinkle a generous handful of sesame seeds over the hot wings. The heat will toast the seeds slightly, adding a nutty crunch that complements the glaze. Toss gently to coat evenly. This final touch turns the dish from good to unforgettable.
- Rest and serve: Let the wings rest for 5 minutes before serving. This short rest allows the juices to redistribute, ensuring every bite stays juicy. Serve immediately with a side of crisp slaw or a refreshing cucumber salad for contrast. And remember, this is hands down the best version you'll ever make at home—once you try it, there’s no going back.
That's it — you did it. But hold on, I've got a few more tricks that'll take this to another level...
Insider Tricks for Flawless Results
The Temperature Rule Nobody Follows
Many cooks bake at 400°F, but 425°F is the sweet spot for a perfect crunch. The higher temperature ensures the exterior dries out quickly, creating a crisp shell while the interior remains juicy. If your oven runs hot, reduce the temperature by 25°F and increase the baking time by 5 minutes. I once baked at 450°F and the wings were burnt on the outside while still raw inside—don’t make that mistake.
Why Your Nose Knows Best
Before you start, open the oven door and smell the honey and soy sauce mixture. A sweet, caramel aroma is a sign that the sugars are starting to brown. If the smell is too sharp, lower the heat; if it’s barely perceptible, raise it slightly. Your nose is a reliable indicator of how close you are to that perfect glaze.
The 5-Minute Rest That Changes Everything
After removing the wings from the oven, let them rest on a wire rack for five minutes. This rest period allows the steam to escape, preventing the wings from becoming soggy. It also lets the glaze set into a glossy, slightly tacky coating that’s easier to bite into. Skipping this step can leave you with a less satisfying crunch.
Use an Oil Spray for Even Coating
Instead of pouring oil, use an olive oil or avocado oil spray to coat the wings lightly. The spray ensures a thin, even layer that doesn’t overwhelm the flavor. It also helps the glaze stick to the wings, creating that luscious, caramelized finish. I’ve seen people use a full tablespoon of oil, which can make the wings greasy.
Keep the Wings Spaced Out
When arranging wings on the baking sheet, place them at least an inch apart. This spacing allows hot air to circulate around each piece, promoting even cooking and crisping. Crowded wings end up steaming, which defeats the purpose of this recipe. If you’re short on space, use a second sheet or a rack.
Creative Twists and Variations
This recipe is a playground. Here are some of my favorite ways to switch things up:
Smoky Chipotle Twist
Swap the crushed red pepper flakes for a tablespoon of chipotle powder and add a splash of adobo sauce. The smoky heat adds depth and pairs beautifully with the honey glaze. This variation is perfect for a backyard BBQ.
Maple Mustard Glaze
Replace honey with pure maple syrup and mix in a tablespoon of Dijon mustard. The mustard adds a tangy kick that balances the sweetness, while the maple syrup gives a richer, caramel flavor. This version is ideal for a cozy winter dinner.
Asian Sesame Crunch
Increase the sesame seeds to a quarter cup and add a tablespoon of toasted sesame oil. The extra sesame flavor complements the soy sauce, creating an authentic Asian-inspired taste. Serve with steamed rice for a complete meal.
Low‑Sodium Version
Use coconut aminos instead of soy sauce and reduce the amount of honey by half. Add a pinch of sea salt to compensate for flavor. This low‑sodium version still delivers the sweet‑savory balance without the sodium overload.
Vegan Chicken-Free Option
Replace the chicken wings with bite‑size pieces of tempeh or tofu. Marinate them in the same glaze and bake at 425°F for 20 minutes, flipping halfway through. The result is a crunchy, flavorful vegan wing that satisfies the cravings.
Spicy Sriracha Kick
Stir in a tablespoon of sriracha into the glaze for a bold, fiery flavor. The sriracha’s heat pairs well with the honey’s sweetness, creating a complex profile that’s both sweet and spicy. This is a hit at parties where guests love a challenge.
Storing and Bringing It Back to Life
Fridge Storage
Store leftover wings in an airtight container in the refrigerator for up to 3 days. The glaze may thicken slightly, but the wings will remain juicy when reheated. Keep the container in the coldest part of the fridge to maintain freshness.
Freezer Friendly
For longer storage, place wings in a freezer bag, squeeze out excess air, and seal tightly. Freeze for up to 2 months. When ready to eat, thaw overnight in the fridge or use the defrost setting on your microwave. The wings will keep their flavor and texture.
Best Reheating Method
Reheat frozen or refrigerated wings in a preheated oven at 350°F for 10–12 minutes, or until heated through. Add a splash of water before reheating to create steam that restores moisture. Finish with a quick broil for 2 minutes to revive the crispness.