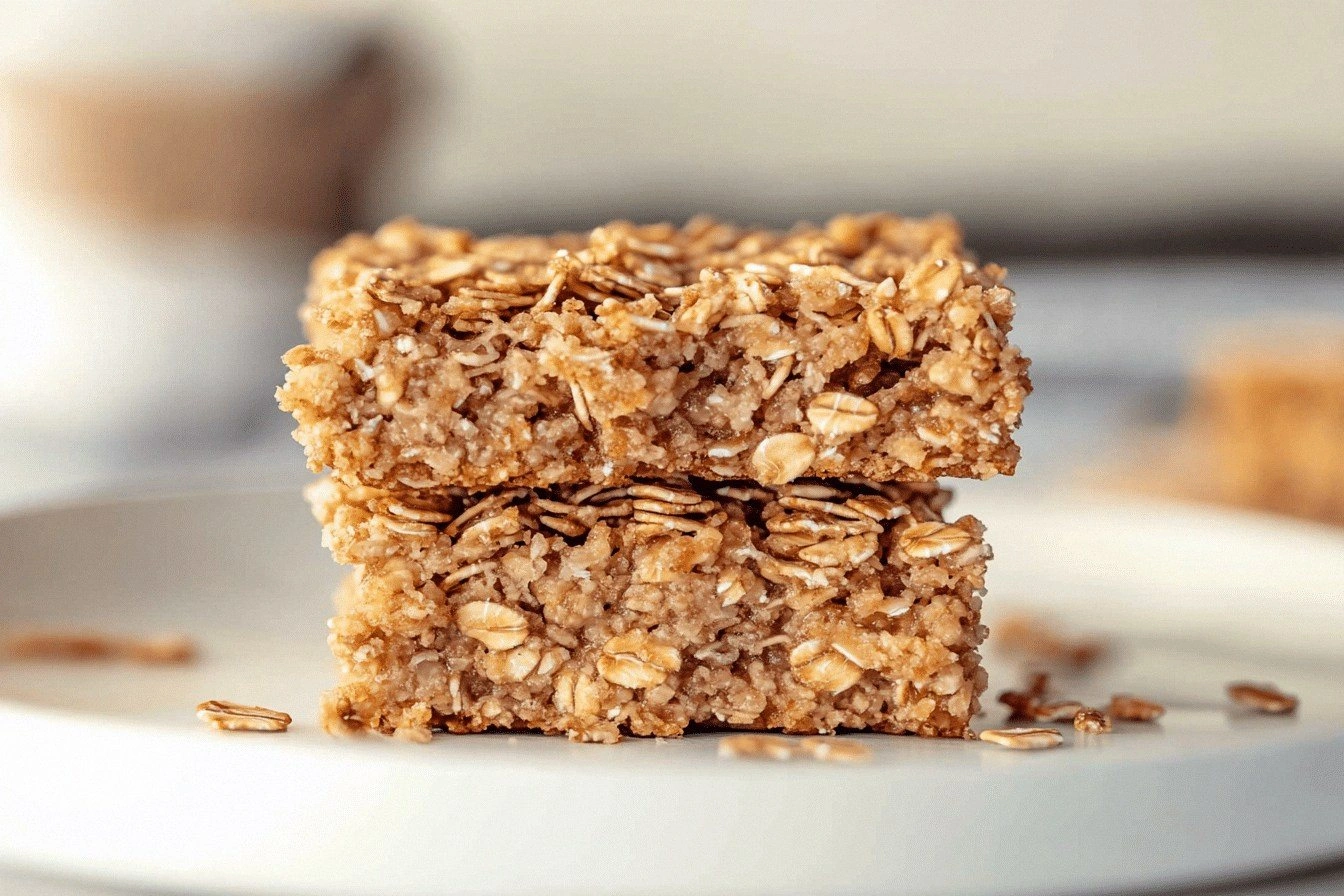
I swear, the first time I tried to make a “healthy snack” I ended up with a soggy, flavor‑less disaster that could have doubled as a paperweight. The kitchen smelled like burnt sugar and disappointment, and I was left staring at a bowl of limp oats wondering if I’d ever taste something that actually felt like a treat again. Then a friend dared me: “Make something that’s crunchy, sweet, and actually good for you. I’ll bet you can’t.” I accepted the challenge, and after a few frantic experiments, I finally cracked the code. This version of Oatmeal Crunchies is the result of that dare, a perfect marriage of texture, flavor, and nutrition that will make you forget you’re eating something wholesome.
Picture this: the kitchen is alive with the gentle hiss of coconut oil hitting a hot pan, the sweet aroma of honey rising like a warm sunrise, and the earthy whisper of rolled oats toasting to a golden hue. You can hear the faint crackle as the nuts hit the pan, and you feel the anticipation building as the mixture thickens, almost like a caramel that’s about to solidify into little crunchy jewels. The first bite? A symphony of sweet, nutty, and slightly salty notes that dance on your palate, while the texture oscillates between a satisfying crunch and a melt‑in‑your‑mouth chew. It’s the kind of snack that makes you pause whatever you’re doing, stare at the bowl, and think, “I could eat this forever.”
What sets this recipe apart from every other oatmeal snack you’ve seen on Pinterest is the secret weapon I’m about to reveal: a brief, high‑heat sear that locks in flavor before the bake, plus a strategic dash of sea salt that amplifies the sweetness without any artificial additives. Most recipes get the moisture balance wrong, leaving you with either dry, crumbly clusters or soggy, sticky clumps that stick to the pan. I’ve also swapped out the usual butter for coconut oil, which adds a subtle tropical richness while keeping the fat profile clean and heart‑healthy. And let’s not forget the optional chia or flax seeds that give you a surprise pop of crunch and a boost of omega‑3s.
I dare you to taste this and not go back for seconds. By the end of this post, you’ll have a foolproof method that feels like a kitchen hack straight out of a pro chef’s notebook, and you’ll understand why this is hands down the best version you’ll ever make at home. Let me walk you through every single step — by the end, you’ll wonder how you ever made it any other way.
What Makes This Version Stand Out
- Texture: The combination of a quick stovetop sear and a gentle bake creates a crunchy exterior that shatters like thin ice, while the interior stays chewy and satisfying.
- Flavor Depth: A pinch of sea salt intensifies the natural sweetness of honey, and the toasted nuts add a caramelized note that lingers long after the last bite.
- Simplicity: Only seven core ingredients, all pantry‑friendly, mean you can whip this up on a weeknight without a trip to the specialty store.
- Health Boost: Rolled oats bring soluble fiber, chia or flax seeds deliver omega‑3s, and the nuts contribute heart‑healthy fats and protein.
- Versatility: The base is neutral enough to pair with sweet or savory add‑ins, making it a perfect snack for any time of day.
- Make‑Ahead Magic: Store them airtight and they stay crunchy for up to a week, so you always have a guilt‑free snack on hand.
- Visual Appeal: Golden‑brown clusters speckled with toasted nuts look as good on a plate as they taste, perfect for impressing guests.
- Eco‑Friendly: Using plant‑based sweeteners and oils reduces the carbon footprint compared to traditional butter‑laden snacks.
Inside the Ingredient List
The Flavor Base
Rolled Oats are the heart of this recipe, providing a chewy texture and a fiber‑packed foundation that keeps you full longer. If you skip them, you lose the structural integrity that lets the crunch survive the bake. You can substitute quick‑cooking oats, but expect a softer bite. When buying, look for thick, whole‑grain rolled oats; they toast more evenly and give the best crunch.
Honey or Maple Syrup acts as the natural sweetener, balancing the earthiness of the oats with a mellow, floral sweetness. Using honey adds a subtle floral note, while maple syrup contributes a deep caramel undertone. If you’re vegan, stick with maple; if you want a richer flavor, drizzle a little extra honey on top before baking.
The Texture Crew
Coconut Oil adds a subtle richness and helps bind the ingredients together, ensuring each bite holds its shape. Its high smoke point means it won’t burn during the quick sear, and it imparts a faint tropical aroma that pairs beautifully with the nuts. If you’re allergic to coconut, try avocado oil – it has a neutral flavor and similar heat tolerance.
Chopped Nuts (almonds, pecans, or walnuts work great) bring crunch and a boost of healthy fats and protein. They also add a toasty, buttery flavor once they hit the hot pan. For a nut‑free version, swap in toasted pumpkin seeds or roasted chickpeas; the texture stays satisfying, and you still get a protein punch.
The Unexpected Star
Chia Seeds or Flaxseeds are optional but add extra nutrition and a slight crunchy bite. They’re tiny powerhouses of omega‑3 fatty acids, fiber, and antioxidants. If you omit them, the snack will still be delicious, but you’ll miss out on that extra nutritional boost. You can grind the seeds for a smoother texture if you’re not a fan of the tiny pop.
The Final Flourish
Vanilla Extract enhances the overall flavor with its warm, aromatic profile, turning a simple sweet snack into something that feels indulgent. A splash of real vanilla is far superior to artificial extracts, and it works like a secret handshake between the honey and the nuts. Sea Salt, though used sparingly, balances the sweetness and deepens the flavor profile, making every bite sing.
Everything's prepped? Good. Let's get into the real action...
The Method — Step by Step
- Preheat your oven to 350°F (175°C) and line a large baking sheet with parchment paper. While the oven warms, gather all your ingredients and measure them precisely; the balance of sweet to salty is what makes this snack unforgettable. This step is the calm before the storm, so take a deep breath and enjoy the anticipation.
- In a dry skillet over medium‑high heat, toss the rolled oats and chopped nuts together. Listen for that satisfying sizzle; the oats should start to turn a light golden brown within two minutes. That sizzle when it hits the pan? Absolute perfection. Once toasted, transfer them to a large mixing bowl, leaving the skillet warm for the next move.
- In a small saucepan, melt the coconut oil over low heat, then stir in the honey (or maple syrup) and sea salt until fully combined. The mixture should be glossy and slightly thickened; this is your binding elixir. As soon as it’s smooth, remove from heat and whisk in the vanilla extract and chia or flax seeds, allowing them to hydrate for a minute.
- Pour the liquid mixture over the toasted oats and nuts, using a spatula to coat every piece evenly. You’ll notice the oats start to glisten, and the seeds will begin to puff up slightly—this is the magic moment where flavor and texture start to fuse.
- Spread the coated oat mixture onto the prepared baking sheet, pressing it down gently with the back of a spoon to create an even layer about half an inch thick. The goal is a uniform thickness so every bite bakes evenly; uneven piles will result in some crunchy, some soggy pieces.
- Slide the sheet into the oven and bake for 20‑25 minutes, stirring gently halfway through to ensure even browning. You’ll hear a faint crackle as the sugars caramelize, and the aroma will fill the kitchen like a warm hug. When the top is a deep amber and the edges are crisp, remove from the oven.
- Allow the crunchies to cool completely on the sheet; they will firm up as they lose residual heat. This cooling period is crucial—if you cut them while still warm, they’ll crumble and lose their perfect bite. Once cooled, break them into clusters of your desired size.
- Store the clusters in an airtight container. They’ll stay crunchy for up to a week, and you can always pop a handful whenever a craving strikes. That’s it — you did it. But hold on, I've got a few more tricks that'll take this to another level...
Insider Tricks for Flawless Results
The Temperature Rule Nobody Follows
Always start with a hot oven; preheating ensures the initial burst of heat caramelizes the honey quickly, locking in moisture. If you lower the temperature midway, the sugars can crystallize, leading to a harder, less pleasant texture. I once tried a “low‑and‑slow” approach and ended up with chewy, under‑toasted clusters that stuck together like clumps of gum. Trust the high heat for that first 10 minutes, then you can lower it slightly if you’re worried about burning.
Why Your Nose Knows Best
Your sense of smell is a reliable indicator of doneness. When the mixture turns a fragrant, buttery caramel scent, you’re within seconds of the perfect bake. If you notice a burnt smell, pull the tray out immediately; the sugars will continue cooking from residual heat.
The 5‑Minute Rest That Changes Everything
After baking, let the sheet sit untouched for five minutes before moving the clusters. This short rest allows the sugars to set, preventing the crunchies from cracking apart when you try to separate them. Skipping this step is the reason many people end up with a crumbly mess.
Swap the Sweet, Not the Crunch
If you’re aiming for a lower‑sugar version, replace half the honey with a natural sweetener like stevia or monk fruit blend. The texture remains unchanged because the coconut oil still provides the necessary binding.
The “Double‑Coat” Trick
For an extra glossy finish, drizzle a thin layer of melted dark chocolate over the cooled clusters and let it set. The chocolate adds a luxurious mouthfeel and pairs beautifully with the nutty base. A friend tried this once and declared it “snack royalty.”
Creative Twists and Variations
This recipe is a playground. Here are some of my favorite ways to switch things up:
Cocoa‑Coconut Dream
Add 2 tablespoons of unsweetened cocoa powder to the dry oat mixture and swap half the coconut oil for melted dark chocolate. The result is a deep, chocolatey bite with a hint of tropical flair—perfect for chocolate lovers.
Spiced Autumn Harvest
Stir in ½ teaspoon of ground cinnamon, a pinch of nutmeg, and a drizzle of maple syrup instead of honey. Add toasted pumpkin seeds in place of some nuts. This variation screams cozy fall mornings.
Tropical Sunrise
Replace the nuts with dried pineapple chunks and shredded coconut, and use agave nectar for sweetness. The chewiness of dried fruit pairs with the crunch of oats for an island‑inspired snack.
Savory Herb Crunch
Omit the sweetener entirely, add a tablespoon of nutritional yeast, and toss in dried rosemary and thyme. Finish with a sprinkle of flaky sea salt. This turns the snack into a protein‑rich, savory nibble perfect for cocktail parties.
Nut‑Free Power Bites
Swap all nuts for roasted chickpeas and sunflower seeds, and use maple syrup for binding. The chickpeas add a subtle earthiness while keeping the crunch intact, making it safe for those with nut allergies.
Storing and Bringing It Back to Life
Fridge Storage
Place the cooled clusters in an airtight glass jar or a zip‑lock bag. They’ll stay crisp for up to 7 days. If you notice any soft spots, pop the jar open for a few minutes to let excess moisture escape.
Freezer Friendly
For longer shelf life, spread the clusters on a tray, freeze for 30 minutes, then transfer to a freezer‑safe container. They’ll keep for up to 3 months. When you’re ready to snack, let them sit at room temperature for 10 minutes; the texture revives beautifully.
Best Reheating Method
If the crunchiness has dulled, preheat a skillet over low heat, add a tiny splash of water (just a teaspoon), and toss the clusters for 30 seconds. The steam restores that fresh‑out‑the‑oven snap without drying them out.