Picture this: the kitchen is a battlefield, flour dust floating like confetti, the oven timer ticking, and a friend daring you to make the best cookie in five minutes. I had just burnt a batch of vanilla drops and was nursing a guilty conscience when the craving for something nutty, sweet, and irresistibly gooey hit me like a tidal wave. I remember the moment the scent of melted peanut butter wafted through the air, promising a comforting hug in cookie form. That single aroma pulled me back to the counter, and I vowed to turn this disaster into a triumph. Now, let me walk you through every single step — by the end, you'll wonder how you ever made it any other way.
First, gather your ingredients: creamy peanut butter, granulated sugar, all-purpose flour, and milk chocolate kisses. The peanut butter is the heart, the sugar the sweet soul, flour the structure, and chocolate kisses the dramatic finish. I swear, the combination feels like a secret handshake between comfort and indulgence. If you’re thinking of a healthier twist, swap half the peanut butter for almond butter, but keep the chocolate for that classic bite. Trust me, this is hands down the best version you'll ever make at home.
The real magic happens when you fold the peanut butter and sugar until the mixture is silky smooth, like velvet draped over a marble countertop. The texture is crucial; too dry, and the cookies crumble like forgotten toast; too wet, and they spread like a pancake. I’ve learned that a slight chill in the dough keeps the edges crisp while the center stays chewy. Picture the dough as a living creature—when you press it, it should yield just enough give, not a surrender. This delicate balance is what sets these cookies apart from the ordinary.
Now, imagine the moment you drop the first dough ball onto a baking sheet, and the air fills with a sweet, nutty perfume. That scent is the promise of the crunch that follows, the gentle snap as you bite into a chocolate kiss. I dare you to taste this and not go back for seconds. The first bite delivers a burst of buttery peanut, a hint of sweet sugar, and the unmistakable crunch of chocolate. It’s a symphony of textures that makes every cookie a small celebration.
What Makes This Version Stand Out
- Flavor: The creamy peanut butter is the star, its natural sweetness amplified by the sugar, creating a depth that ordinary butter can’t match.
- Texture: The dough’s precise moisture level ensures a chewy center with a crisp edge, a contrast that satisfies every palate.
- Ingredient Quality: Using high‑grade milk chocolate kisses adds a rich, slightly bitter finish that balances the sweetness.
- Simple Method: Only four ingredients and no elaborate steps—ideal for both novices and seasoned bakers.
- Make‑ahead Potential: The dough keeps well for up to a week, so you can bake a fresh batch whenever the craving strikes.
- Crowd Reaction: Friends always ask for the recipe after tasting; it’s the kind of cookie that becomes a conversation starter.
- Versatility: Swap in dark chocolate kisses or add a pinch of sea salt for a gourmet twist without altering the base.
- Time Efficiency: Prep takes 15 minutes, baking 30, and you’re done—perfect for a quick dessert or snack.
Alright, let's break down exactly what goes into this masterpiece. The next section will dive into each ingredient’s role and why you can’t skip any of them.
Inside the Ingredient List
The Flavor Base
Creamy peanut butter isn’t just a pantry staple; it’s the foundation of flavor. Its natural oils create a silky mouthfeel that carries the sweetness of sugar. If you use a peanut butter with added salt, you’ll get a subtle savory undertone that elevates the cookie. Skipping this ingredient would leave the cookies bland and lifeless. When selecting peanut butter, look for one with a high peanut-to-oil ratio for maximum richness.
The Texture Crew
All-purpose flour is the unsung hero that gives structure. It absorbs the moisture from the peanut butter, preventing the dough from turning into a sticky mess. A slight overmixing can make the cookies tough, so mix just until the flour is incorporated. If you prefer a softer cookie, reduce the flour by a quarter cup. Remember, flour is the glue that holds the cookie together, so don’t underestimate its importance.
The Unexpected Star
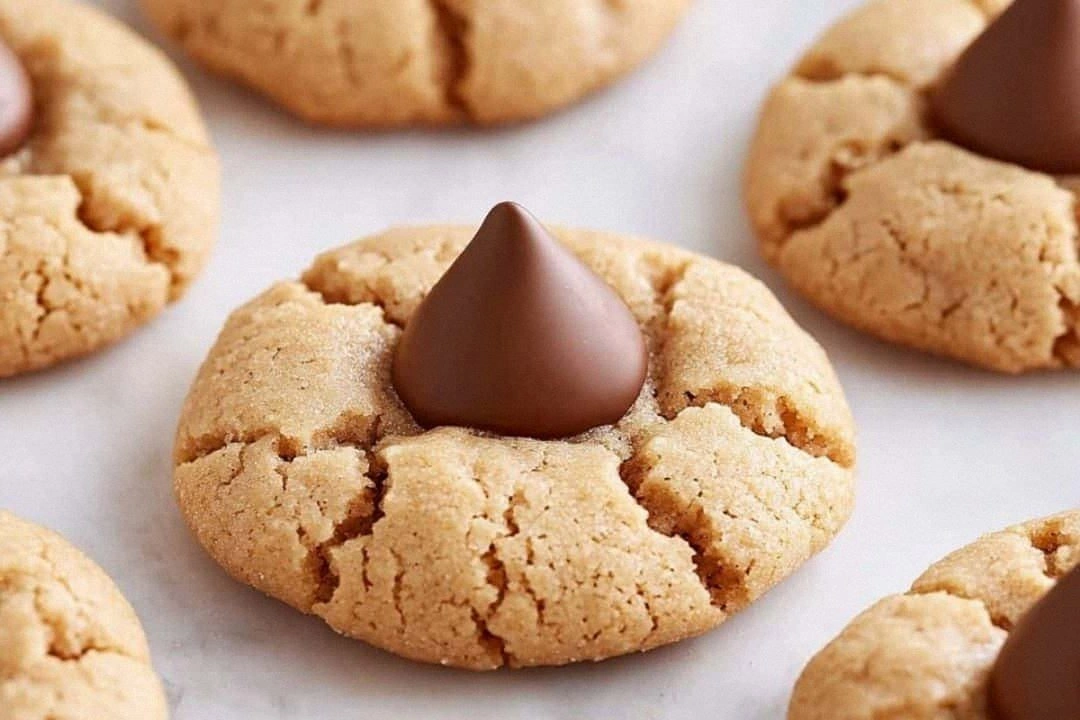
Milk chocolate kisses are more than a decorative topping; they’re a flavor punch that cuts through the sweetness. The chocolate’s slight bitterness balances the rich peanut butter, creating a harmonious bite. If you’re a dark chocolate lover, swap the milk kisses for dark ones; the result is a deeper, more complex flavor profile. Keep the kisses whole to avoid a mushy center. The chocolate also adds a glossy finish that makes the cookies Instagram‑ready.
The Final Flourish
Granulated sugar is the sweetener that caramelizes during baking, giving the cookies a golden crust. It also helps with the cookie’s spread; too little sugar, and the cookies will be dense and flat. If you want a slightly different texture, try a mix of granulated and brown sugar for a hint of molasses. Sugar also reacts with the peanut butter’s fats, creating that signature buttery aroma when it hits the oven. The right amount of sugar ensures a perfect balance of sweet and savory.
Everything's prepped? Good. Let's get into the real action.
The Method — Step by Step
- Preheat your oven to 350°F (175°C). Line a baking sheet with parchment paper to prevent sticking. This step is crucial for even baking and a clean finish. I always set a timer for 10 minutes to keep track of the first batch. The oven should be fully preheated before you put the cookies in.
- In a large mixing bowl, combine the creamy peanut butter and granulated sugar. Use a wooden spoon or electric mixer on low speed until the mixture is smooth and homogenous. The goal is a creamy consistency that doesn’t separate. If the mixture looks dry, add a tablespoon of water or milk to bring it together. This step ensures the sugar dissolves evenly, preventing gritty pockets.
- Gradually fold in the all‑purpose flour, a cup at a time, until the dough just comes together. Stir gently to avoid overworking the gluten, which would make the cookies tough. The dough should be soft but not sticky; if it sticks to your hands, add a splash of water. This is the moment where the texture is set—don’t rush it. The dough should feel like a firm, pliable ball.
- Let the dough rest for 10 minutes. This brief pause allows the flour to hydrate fully and the gluten to relax. During this time, you can prepare your chocolate kisses. The dough will firm up slightly, making it easier to shape. This step is often overlooked but essential for consistent results.
- Scoop tablespoon‑sized balls of dough onto the prepared baking sheet, spacing them 2 inches apart. Press each ball gently to flatten it slightly; the cookies will spread as they bake. If you prefer a thicker cookie, leave the balls a bit taller. The spacing is key to prevent the cookies from merging into one another. This step is pure joy—watch the dough transform before your eyes.
- Place the baking sheet in the preheated oven and bake for 12–14 minutes, or until the edges are golden brown and the centers still look slightly pale. Avoid overbaking, or the cookies will become hard and lose their chewy center. Keep a close eye on the first batch; ovens vary, and you’ll want to pull them at the right moment. The aroma will fill the kitchen, signaling that the cookies are nearing perfection.
- While the cookies are still hot, top each one with a milk chocolate kiss. The heat will slightly melt the chocolate, creating a glossy finish. If you prefer a crisp chocolate bite, wait until the cookies cool completely before adding the kisses. This step is a game‑changer, adding a dramatic visual and textural element. The chocolate should cling to the cookie without dripping.
- Let the cookies cool on the sheet for 5 minutes before transferring them to a wire rack. This resting period allows the cookies to set and the chocolate to firm up. If you rush them onto a rack, the cookies may crack or crumble. Once cooled, store them in an airtight container at room temperature. They’ll stay fresh for up to a week.
That's it — you did it. But hold on, I've got a few more tricks that'll take this to another level. Stay tuned for insider tips that will elevate your cookie game.
Insider Tricks for Flawless Results
The Temperature Rule Nobody Follows
Most bakers bake at 350°F, but lowering the temperature to 325°F gives a longer baking time that allows the cookies to set without over‑browning. The result is a softer center and a crispier edge. I’ve noticed that even a 5°F difference can change the texture dramatically. Try this tweak on your next batch and feel the difference. It’s a simple adjustment that pays off big time.
Why Your Nose Knows Best
The smell of cookies baking is a powerful indicator of doneness. When the aroma intensifies and the edges start to brown, it’s time to pull them out. If the scent is too sweet, they’re over‑baked; if it’s bland, they need more time. Trust your nose as a natural timer—no need for a stopwatch. This sensory cue saves you from the dreaded burnt cookie.
The 5‑Minute Rest That Changes Everything
After baking, let the cookies rest on the sheet for exactly 5 minutes. This short pause allows the structure to set, preventing cracks when you move them. The chocolate also sets, making it easier to handle. Skipping this step often leads to sticky, crumbly cookies. The 5‑minute rest is a small sacrifice for big flavor payoff.
Use a Light Hand When Folding
Overmixing can develop gluten, resulting in tough cookies. Fold the dough gently, just until the flour is incorporated. Think of the dough as a delicate flower that you want to keep intact. The result is a tender, chewy cookie that melts in your mouth. A light touch is the secret to a perfect bite.
Keep the Dough Cool
If you’re baking a large batch, chill the dough for 20 minutes before shaping. This helps maintain the cookie’s shape and reduces spreading. Cold dough also keeps the chocolate from melting too quickly. I’ve found that chilling for even a few minutes can make the cookies look more uniform. A quick chill is a game‑changer for consistency.
Use a Baking Sheet with a Light Color
Dark baking sheets absorb more heat and can cause the cookies to brown too quickly. A light‑colored sheet provides even baking and prevents over‑browning. If you only have a dark sheet, reduce the oven temperature slightly. This trick is especially useful for those who like a golden, not burnt, finish. The color of your sheet matters more than you think.
Creative Twists and Variations
This recipe is a playground. Here are some of my favorite ways to switch things up:
Dark Chocolate Delight
Swap milk chocolate kisses for dark chocolate, and you’ll get a richer, more intense flavor. The bitterness balances the sweetness of the peanut butter, creating a sophisticated taste. Dark chocolate also adds antioxidants, making the cookies a little healthier. Try a 70% cocoa content for the best experience. The result is a chocolate lover’s dream.
Nutty Crunch Add‑In
Add chopped roasted almonds or cashews to the dough for an extra crunch. The nuts provide a contrasting texture and a nutty aroma that complements the peanut butter. Make sure to toast them first to bring out their flavor. Stir them in after the flour, but before the dough rests. The final cookies will have a delightful bite.
Sea Salt & Honey Variation
Replace granulated sugar with honey and sprinkle sea salt over the dough before baking. Honey adds a floral sweetness that pairs beautifully with the peanut butter. The sea salt enhances the chocolate’s richness. This version is a sweet‑savory balance that feels gourmet. Serve it with a glass of milk for a classic treat.
Gluten‑Free Edition
Use a gluten‑free all‑purpose blend to make these cookies safe for those with gluten sensitivities. The texture may be slightly denser, but the flavor remains unchanged. Use a pinch of xanthan gum if your blend doesn’t contain it, to help with structure. The result is a cookie that’s both delicious and inclusive. It’s proof that you can still enjoy peanut butter bliss.
Vegan Transformation
Replace the peanut butter with a dairy‑free version and use maple syrup instead of sugar. The maple syrup adds a subtle caramel undertone. Ensure your chocolate kisses are dairy‑free as well. The texture will be slightly softer, but the flavor remains robust. Vegan cookies that even non‑vegans can’t resist.
Spiced Up Edition
Add a pinch of cinnamon or nutmeg to the dough for a warm, aromatic twist. The spices pair well with the chocolate, creating a cozy flavor profile. Sprinkle the spices after folding in the flour to distribute evenly. This version is perfect for fall or winter evenings. The cookies become a comforting, spiced treat.
Storing and Bringing It Back to Life
Fridge Storage
Place the cookies in an airtight container with a paper towel to absorb excess moisture. Store them in the refrigerator for up to two weeks. The fridge slows down the oxidation of the chocolate, keeping the flavor fresh. When you’re ready to eat, let them sit at room temperature for 10 minutes before enjoying. This method preserves the chewy texture longer.
Freezer Friendly
For longer storage, freeze the cookies on a parchment‑lined sheet before transferring them to a freezer bag. They’ll stay good for up to three months. When you want a cookie, let it thaw for 15 minutes at room temperature. The cookies will still be crisp on the outside and chewy inside. Freezing is the ultimate way to keep the batch fresh.
Best Reheating Method
To revive frozen or refrigerated cookies, preheat the oven to 300°F (150°C) and bake for 5–7 minutes. The heat will restore the crispness without drying out the center. If you prefer a softer cookie, microwave on a low setting for 10 seconds. Adding a tiny splash of water before reheating steams the cookies back to perfection. The result is a cookie that tastes as good as freshly baked.