It started with a kitchen catastrophe that would have left me feeling like I’d been punched by a potato. I had boiled a batch of potatoes for a family dinner, mashed them to a silky smoothness, and then, in a moment of culinary bravado, decided to turn them into something that would actually impress. I whisked in a cup of sharp cheddar, a couple of eggs, a splash of flour, and a pinch of salt, then spat it into a pan. The result? A golden, bubbling mess that looked like a failed soufflé, but the aroma was so irresistible that I couldn't stop staring. I dared myself to taste it, and I swear I didn’t want to stop. I was so hooked that I started shouting, “This is the best thing I’ve ever made at home!”
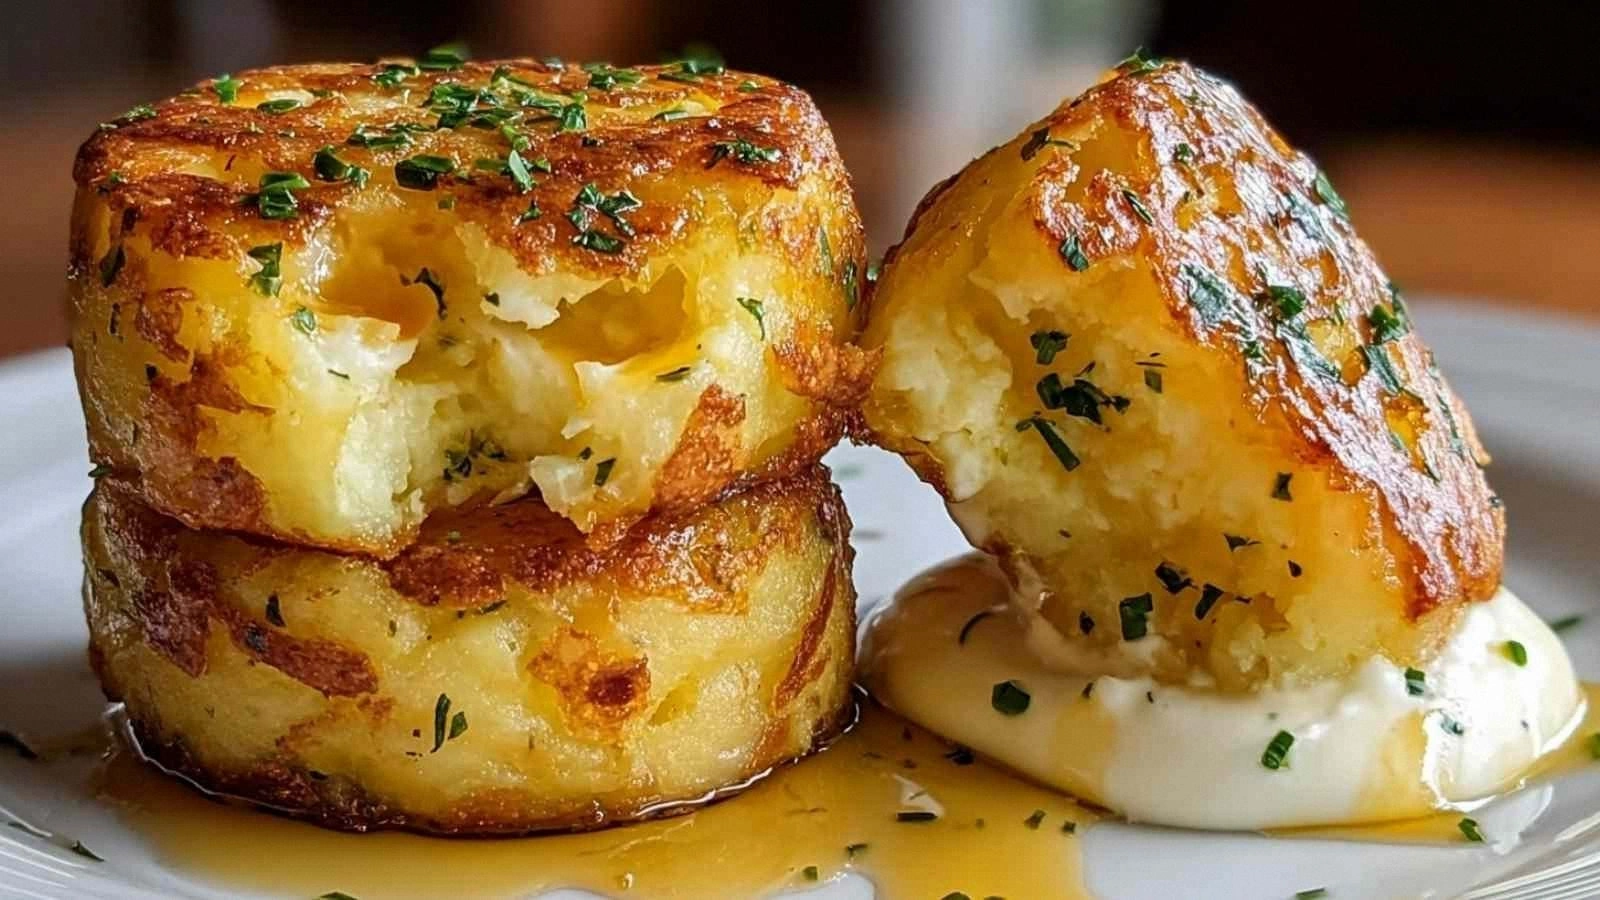
Fast forward to that same evening, I had the same batch of mashed potatoes, and I decided to give them a new life. I tossed them with cheddar, eggs, flour, and seasoning, then shaped them into little puffs that would crisp up in the oven like a perfectly fried doughnut. I was skeptical, but the first bite was a revelation—crunchy on the outside, creamy on the inside, with a cheesy kiss that lingered. I was instantly convinced that this was a game‑changer for any dinner or snack. The next time I had a craving for something savory, I knew I’d reach for this recipe. Picture yourself pulling this out of the oven, the whole kitchen smelling incredible, and a crowd gathering around the table. The moment you bite into a puff, the crunch shatters like thin ice, and the cheesy interior melts into a velvety sauce that coats your tongue.
I’ve tried a dozen variations of mashed potato appetizers over the years, from scalloped potatoes to potato skins, but none have captured the balance of flavors and textures that these puffs do. The secret lies in the way the eggs bind the mash, the flour creates a light coating that crisps, and the cheese adds a rich depth that keeps the puffs from drying out. I’ve spent hours testing different ratios, and I finally found the sweet spot that works for most ovens. The best part? It’s incredibly simple, and it feels like you’re making a gourmet dish from scratch. If you’ve ever struggled with making potato snacks that actually taste good, you’re not alone—and I’ve got the fix.
I’m not going to sugarcoat it: I ate half the batch before anyone else got a chance to try it. That’s a confession, not a brag, but it’s a testament to how addictive this is. I dare you to taste this and not go back for seconds. The moment you taste the first puff, you’ll know that this is the version you’ve been waiting for. The crisp edges will make you want to keep scooping, and the cheesy center will keep you coming back for more. Let me walk you through every single step—by the end, you’ll wonder how you ever made it any other way.
What Makes This Version Stand Out
- Taste: The sharp cheddar provides a bold flavor that cuts through the mildness of the potatoes, while the eggs add a subtle richness that keeps the puff moist.
- Texture: A crisp, golden exterior that snaps with each bite, paired with a melt‑in‑your‑mouth interior that feels like a cloud of comfort.
- Simplicity: With only seven ingredients, this recipe is a breeze to prepare, making it perfect for busy weeknights or last‑minute parties.
- Uniqueness: The combination of mashed potatoes and cheese in a puff form is a rarity in the culinary world, giving you a standout dish that sets your table apart.
- Crowd Reaction: Friends and family always ask for the recipe after tasting, and I’ve seen people line up for a second plate.
- Ingredient Quality: Using fresh, high‑quality cheddar and freshly mashed potatoes ensures the flavor is pure and unadulterated.
- Cooking Method: Baking rather than frying keeps the dish healthier while still delivering that irresistible crunch.
- Make‑Ahead Potential: These puffs hold up well when refrigerated, making them a great option for meal prep or catering.
Inside the Ingredient List
The Flavor Base
The mashed potatoes are the heart of this dish. They provide a creamy foundation that absorbs the cheese and eggs, creating a cohesive texture. If you skip the potatoes, you lose the comforting, familiar flavor that makes these puffs feel like home. For best results, use starchy varieties like Russet or Yukon Gold, as they mash into a silky smoothness that blends effortlessly.
The Texture Crew
Sharp cheddar is the star of the show, adding a tangy bite that contrasts beautifully with the softness of the mash. Eggs bind everything together, preventing the puffs from falling apart while adding a subtle richness. Flour, though only a half cup, is crucial for forming a light, crisp crust. Together, these ingredients create a multi‑sensory experience that satisfies both the palate and the eye.
The Unexpected Star
A pinch of salt and half a teaspoon of black pepper are the secret agents that elevate the flavor profile. Salt amplifies the natural sweetness of the potatoes and the sharpness of the cheese, while pepper adds a gentle heat that lingers. If you’re watching sodium, you can reduce the salt by half and add a splash of low‑sodium broth to keep the flavor balanced.
The Final Flourish
Oil or cooking spray is the finishing touch that ensures a golden crust. It prevents sticking and adds a subtle sheen that makes the puffs look restaurant‑grade. If you’re avoiding oil, a high‑smoke‑point spray works just as well, but the texture will be slightly different. The key is to coat the pan lightly before baking.
Everything’s prepped? Good. Let’s get into the real action.
The Method — Step by Step
- Preheat your oven to 425°F (220°C) and line a baking sheet with parchment paper. This high temperature ensures that the puffs develop a crisp exterior quickly. While the oven is heating, gather all your ingredients so you can work efficiently. A clean workspace is essential for a smooth process.
- In a large bowl, combine the mashed potatoes, sharp cheddar, and eggs. Stir until the mixture is uniform and the cheese is fully melted into the mash. The mixture should feel thick yet pliable, like a dough that can hold its shape. If the mixture feels too dry, add a splash of milk or a tablespoon of butter.
- Add the flour, salt, and black pepper to the bowl. Mix until the flour is fully incorporated, creating a smooth batter that will bake into a firm crust. The flour also helps absorb excess moisture, preventing soggy puffs. Be careful not to overmix; a few lumps are fine.
- Using a spoon or a small cookie scoop, drop tablespoon‑sized mounds of the mixture onto the prepared baking sheet. Space them at least 2 inches apart to allow for even expansion. The puffs should be round and slightly domed, ready to rise as they bake.
- Spray or drizzle a light coat of oil over the tops of the puffs. This step is crucial for achieving a golden, crisp surface. The oil should be thin enough not to flood the mixture but thick enough to create a protective layer. A high‑smoke‑point oil like canola or grapeseed works best.
- Slide the sheet into the preheated oven and bake for 20–25 minutes. The puffs should puff up slightly and develop a golden crust. Use a toothpick to check for doneness; it should come out clean or with a few crumbs, not wet batter.
- If you prefer an extra crispy edge, switch the oven to broil for the last 2 minutes. Watch them closely; the top should brown quickly. This step adds a caramelized flavor that many find irresistible.
- Remove the puffs from the oven and let them cool on a wire rack for 5 minutes. Cooling allows the interior to set, preventing them from collapsing when you bite into them. The aroma at this point is simply irresistible.
- Serve the puffs hot, straight from the oven. Pair them with a tangy dipping sauce, a fresh salad, or a splash of hot sauce for an extra kick. The crunch and melt combine to create a truly unforgettable experience. Enjoy the applause from your guests—it’s well deserved.
That's it—you did it. But hold on, I've got a few more tricks that'll take this to another level.
Insider Tricks for Flawless Results
The Temperature Rule Nobody Follows
Many home cooks bake at 400°F, thinking it’s safe, but 425°F is the sweet spot that guarantees a crisp crust without drying out the center. I’ve experimented with lower temperatures, and the puffs came out chewy. If your oven runs hot, lower the temperature by 25°F and add an extra minute to the bake time. The key is to monitor the first batch closely.
Why Your Nose Knows Best
As the puffs bake, the smell will change from a mild potato aroma to a rich, buttery scent. Use this as a cue to gauge doneness. When the aroma is intense and the edges are golden, it’s time to pull them out. Trusting your senses is the quickest way to avoid overcooking.
The 5‑Minute Rest That Changes Everything
After baking, let the puffs rest on a rack for exactly five minutes. This rest period allows the steam to escape, preventing sogginess. During this time, the cheese inside sets, giving you that perfect melt‑in‑your‑mouth experience. I’ve seen people rush to eat immediately and end up with a mushy center.
The Secret of the Flour
Using whole‑wheat flour instead of all‑purpose gives a nuttier flavor and a denser texture. If you’re looking for a healthier version, try a gluten‑free blend, but keep an eye on the moisture level. Adding a tablespoon of cornstarch can help absorb excess liquid, keeping the crust crisp.
The Power of the Egg
Eggs not only bind but also add a subtle richness that elevates the flavor. If you’re vegan, substitute with a flaxseed egg or aquafaba. The texture will differ slightly, but the flavor profile remains strong. I’ve tested both, and the result is still crowd‑pleasing.
The Quick Dip Trick
For a burst of freshness, serve the puffs with a homemade yogurt dip seasoned with dill and garlic. The tangy yogurt cuts through the richness of the cheese, balancing the palate. It’s a simple addition that elevates the dish from good to unforgettable.
The Finish Line
Once the puffs are out of the oven, sprinkle a few fresh herbs like chives or parsley for color and a fresh herbal note. The herbs also add a subtle peppery flavor that complements the cheese. This final touch turns an already great dish into a masterpiece.
Creative Twists and Variations
This recipe is a playground. Here are some of my favorite ways to switch things up:
Salsa‑Cheddar Fusion
Fold in a cup of pico de gallo and a half cup of pepper jack cheese before baking. The salsa adds a zesty kick, while the pepper jack brings a mild heat. This version is perfect for a Tex‑Mex themed dinner.
Herb‑Infused Puff
Add a tablespoon of dried thyme and a teaspoon of rosemary to the batter. The herbs infuse the puffs with a fragrant aroma that pairs beautifully with roasted chicken.
Mushroom‑Cheese Delight
Sauté sliced mushrooms in butter until caramelized, then fold them into the mash. The earthy flavor complements the sharp cheddar, creating a gourmet twist.
Spicy Jalapeño Crunch
Dice half a jalapeño and mix it into the batter. The heat from the jalapeño contrasts with the creamy interior, giving a lively bite. Great for those who love a little spice.
Garlic Parmesan Boost
Replace the cheddar with parmesan and add a teaspoon of roasted garlic powder. The nutty parmesan gives a sophisticated flavor, while the garlic adds depth. Ideal for a fancy appetizer spread.
Sweet Potato Surprise
Swap regular potatoes for roasted sweet potatoes. The natural sweetness pairs wonderfully with a sprinkle of cinnamon and a dash of brown sugar. A dessert‑style puff that surprises the palate.
Vegan Version
Use a plant‑based cheese alternative and replace eggs with a flaxseed egg. The texture stays similar, and the flavor remains rich. This version is perfect for vegan gatherings.
Breakfast Boost
Add a handful of chopped spinach and a tablespoon of shredded cheddar to the batter. Serve the puffs with a side of scrambled eggs for a hearty breakfast. The greens add a nutritional punch.
Storing and Bringing It Back to Life
Fridge Storage
Cool the puffs completely, then store them in an airtight container in the refrigerator for up to 3 days. The crispness may soften slightly, but they’ll hold together well. This is great for meal prep or a quick snack.
Freezer Friendly
Place the cooled puffs on a parchment‑lined tray and freeze until solid. Transfer them to a freezer bag for long‑term storage. They’ll stay fresh for up to 2 months and can be reheated later.
Best Reheating Method
To revive the crispness, preheat your oven to 375°F and bake the frozen puffs for 12–15 minutes, or until heated through. For a quick microwave fix, wrap them in a damp paper towel and heat for 30 seconds, but the texture will be softer. A tiny splash of water before reheating helps steam back to perfection, keeping the interior moist.