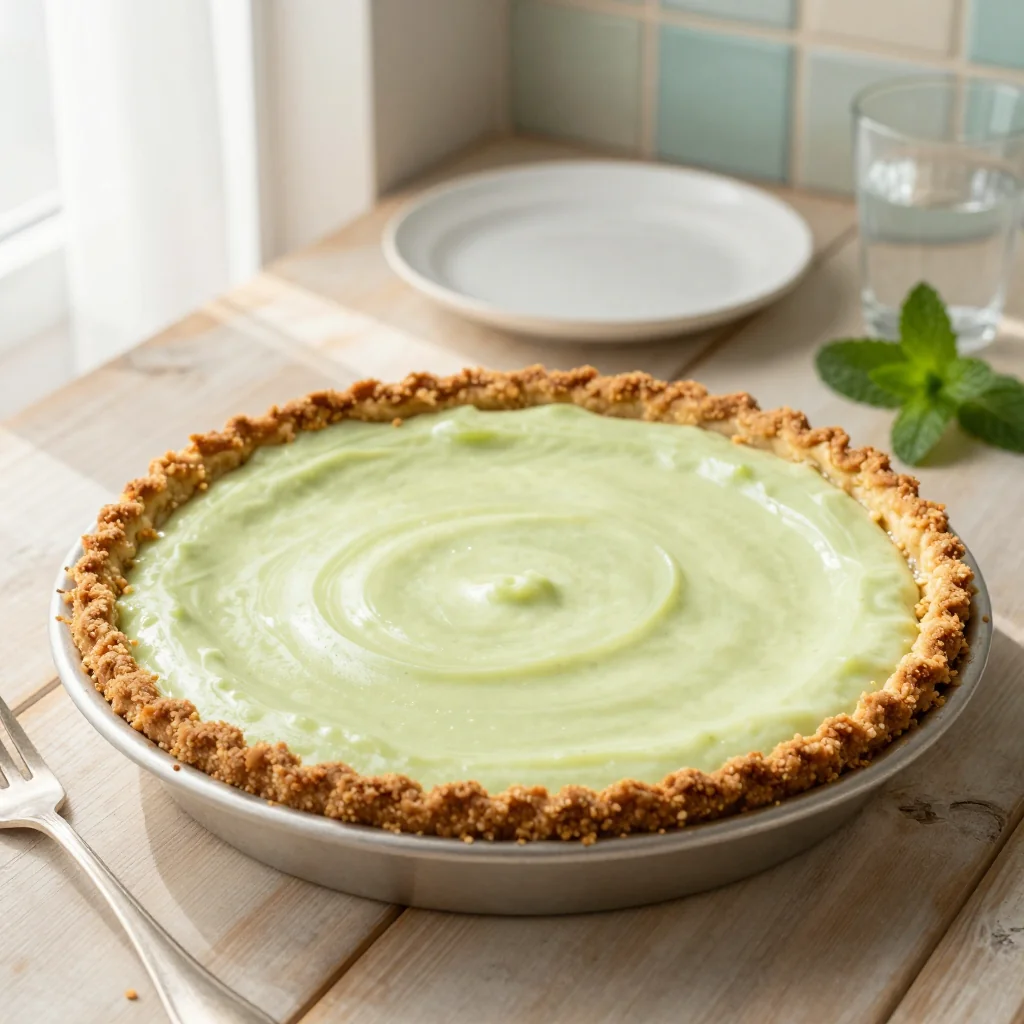
A silky, tangy key lime pie that sets in minutes and dazzles every palate.
There’s a moment in every kitchen when a scent takes you straight back to childhood—a bright, citrusy aroma that instantly lifts your spirits. I first discovered that magic on a sweltering July afternoon, when my aunt pulled out a chilled key lime pie from the freezer, its golden crust glistening under the sun. The first bite was a perfect balance of tart lime, sweetened condensed milk, and buttery graham cracker crunch, and I knew I had to recreate that experience for my own family.
Key lime pie is a classic Southern dessert, rooted in the tropical flavors of the Florida Keys. Traditionally it’s baked, but the no‑bake version I’m sharing today respects the original’s bright flavor while eliminating the oven’s heat, making it ideal for any season. The graham cracker crust adds a subtle caramelized note that pairs beautifully with the lime’s zing.
In this article you’ll learn how to assemble a flawless no‑bake key lime pie, why each step matters, and how to tweak the recipe for dietary needs or flavor twists. I’ll walk you through ingredient selection, the science behind the perfect set, and presentation tips that turn a simple slice into a show‑stopping centerpiece.
Ready to dive in? Let’s whisk together the tangy and the sweet, and create a dessert that will become a staple at every gathering.
🌟 Why This Recipe Will Captivate You
Whether you’re a seasoned baker or a kitchen novice, this no‑bake key lime pie offers a delightful blend of convenience, flavor, and visual appeal.
- ✨ Effortless Preparation: No oven required, so you can enjoy a chilled dessert even on the hottest days without heating up your kitchen.
- ✨ Bright, Balanced Flavor: The tartness of fresh key lime juice is perfectly mellowed by sweetened condensed milk, creating a silky, refreshing filling.
- ✨ Textural Contrast: A buttery graham cracker crust provides a subtle crunch that contrasts with the creamy filling.
- ✨ Adaptable to Any Occasion: Serve it at picnics, brunches, or elegant dinner parties; the pie looks impressive with minimal plating effort.
- ✨ Health‑Conscious Options: Easily transform the recipe into a vegan or low‑sugar version without sacrificing taste.
- ✨ Crowd‑Pleaser: Its bright citrus profile appeals to both kids and adults, making it a universally loved finale.
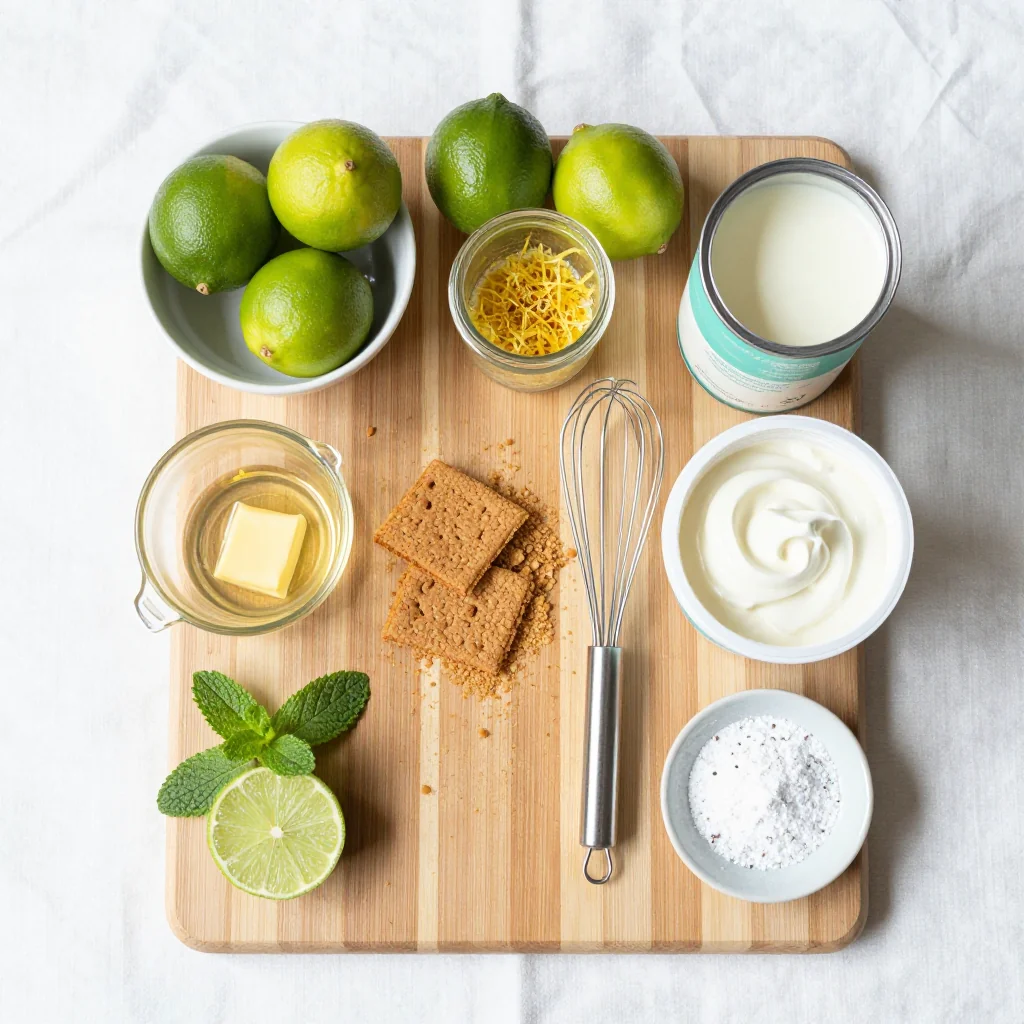
🥗 Ingredients
📝 Complete Ingredient List
For the Graham Cracker Crust:
For the Lime Filling:
For the Topping (optional):
🔍 Focus on Key Ingredients
Key Lime Juice
The heart of this pie is the key lime juice, which delivers a sharp, aromatic acidity that cuts through the sweetness of the condensed milk. When selecting limes, look for ones that are small, thin-skinned, and heavy for their size—these are the true “key” limes. Their juice is more fragrant and less bitter than regular limes, giving the filling a clean, bright finish.
Sweetened Condensed Milk
Condensed milk provides the creamy body and sweetness that balances the lime’s tartness. Because it’s already thickened and sugar‑laden, it eliminates the need for additional thickeners. Using a high‑quality brand ensures a smooth texture without graininess.
Graham Cracker Crumbs
The crust’s foundation is crushed graham crackers, which contribute a subtle caramel note and a pleasant crunch. For extra depth, lightly toast the crumbs in a dry skillet before mixing with butter; this step enhances the buttery flavor without adding extra steps.
🔄 Quick Substitutions
| If you don’t have... | Use instead... |
|---|---|
| Key lime juice | Fresh Persian lime juice + ½ tsp orange zest |
| Graham crackers | Digestive biscuits (plain) |
| Sweetened condensed milk | Homemade: 1 cup milk + 1 cup sugar, simmered until thick |
👨🍳 Step‑by‑Step Instructions
Follow these detailed steps to create a flawless no‑bake key lime pie that sets perfectly and tastes like a summer dream.
📋 Phase 1: Preparation and Mise en Place
Gather your tools and pre‑measure all ingredients before you begin.
Prepare the Crust
In a large mixing bowl, combine the graham cracker crumbs, melted butter, and granulated sugar. Stir until the mixture resembles wet sand, with every crumb lightly coated. Press the mixture firmly into the bottom and up the sides of a 9‑inch springform pan, using the back of a measuring cup to flatten evenly. Chill the crust in the refrigerator for at least 10 minutes while you work on the filling.
Mix the Lime Filling
In a separate bowl, whisk together the sweetened condensed milk, fresh key lime juice, lime zest, and vanilla extract. The mixture will thicken slightly as the acid reacts with the dairy. Whisk until smooth and glossy, ensuring no lumps remain.
🔥 Phase 2: Assembly
Combine the crust and filling, then let the pie set.
Pour the Filling
Remove the chilled crust from the refrigerator. Slowly pour the lime filling over the crust, spreading it evenly with a spatula. Tap the pan gently on the counter to release any air bubbles.
Refrigerate to Set
Cover the pie loosely with plastic wrap and refrigerate for at least 4 hours, preferably overnight. The cooling process allows the filling to firm up without any heat.
✨ Phase 3: Finishing Touches and Serving
Add the final garnish and present your masterpiece.
Whip the Cream (Optional)
In a chilled mixing bowl, beat the heavy cream with powdered sugar until soft peaks form. This takes about 2–3 minutes with an electric mixer on medium speed.
Garnish the Pie
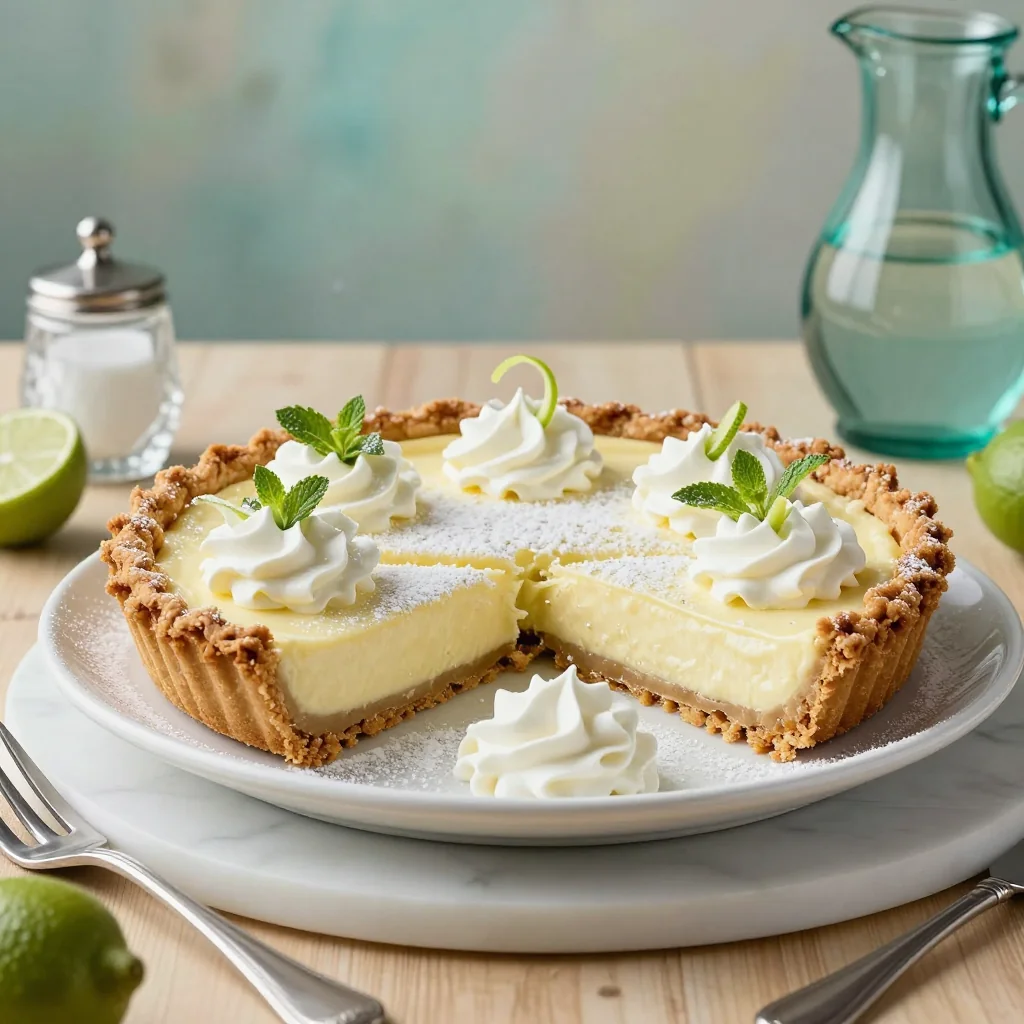
Spread a dollop of whipped cream over the chilled lime filling, or pipe decorative peaks using a pastry bag. Sprinkle additional lime zest and a few mint leaves for color contrast.
Slice and Serve
Release the springform pan, slice the pie with a hot, wet knife for clean cuts, and serve chilled. Each slice showcases a creamy yellow center framed by a golden crust.
💡 Expert Tips and Tricks
🛒 Choosing the Right Ingredients
Always opt for fresh key limes; their thin skin and high juice yield make a noticeable difference. When buying graham crackers, select the whole‑wheat variety for a slightly nuttier flavor. For the condensed milk, choose a brand with a creamy texture—avoid those that separate easily when whisked.
🔪 Preparation Techniques
Toast the graham cracker crumbs lightly in a dry skillet for 2 minutes to bring out a caramelized note. Use a food processor for an ultra‑fine crumb texture; this helps the crust bind better with butter. When zesting limes, avoid the white pith as it can introduce bitterness.
🌡️ Mastering the Set
The acid in lime juice reacts with the proteins in condensed milk, thickening the mixture without heat. Ensure the pie is refrigerated for at least 4 hours; a shorter chill may result in a runny filling. If you’re in a hurry, place the pie in an ice‑water bath for 30 minutes, but monitor closely.
🍽️ Presentation and Service
Serve the pie on a white marble slab or a pastel plate to highlight its vibrant color. Garnish with a thin lime wheel on the edge of each slice for an elegant touch. Pair with a light, citrus‑infused sparkling water for a refreshing finish.
🏆 Pro‑Level Secrets
Elevate your pie from home‑cooked to restaurant‑worthy with these professional insights.
- 🎯 Precise Acid‑Protein Balance: The key to a flawless set is the exact ratio of lime juice to condensed milk. Too much acid prevents proper thickening; too little leaves the filling loose. The 0.5 cup juice to 14 oz milk ratio used here has been calibrated for optimal firmness.
- 🎯 Temperature‑Controlled Whipping: Chill both the mixing bowl and whisk before whipping cream. Cold equipment traps air better, giving you stiffer peaks that hold up longer on the pie.
- 🎯 Crust Uniformity: Press the crust using the bottom of a glass bottle, rotating as you go. This eliminates air pockets and ensures an even edge that won’t crumble when sliced.
- 🎯 Layered Flavor Development: Sprinkle a pinch of sea salt on the crust before chilling. The salt amplifies the sweetness of the butter and adds a subtle savory contrast to the lime.
- 🎯 Micro‑Aromatics: Add a few drops of lime‑infused vodka to the filling for an adult‑only version; the alcohol evaporates during chilling, leaving a deeper citrus nuance.
- 🎯 Visual Finish: Lightly torch the lime zest garnish for a caramelized aroma and a sophisticated, slightly smoky appearance.
"A perfect key lime pie is a balance of bright acidity and creamy sweetness—like a sunset captured in a slice." — Thomas Keller
🔄 Variations and Adaptations
This versatile pie can be customized to fit dietary preferences, flavor cravings, and seasonal themes.
🥬 Vegetarian / Vegan Version
Swap the butter for coconut oil and use a plant‑based condensed milk (coconut milk reduced with sugar). Replace the heavy cream topping with whipped aquafaba (the liquid from canned chickpeas) sweetened with a touch of maple syrup.
- Vegan crust: 1.5 cups graham cracker crumbs + 0.33 cup melted coconut oil + 2 tbsp coconut sugar.
- Vegan filling: 14 oz coconut‑based sweetened condensed milk + 0.5 cup key lime juice + zest + vanilla.
🌶️ Flavor Variations
Experiment with complementary flavors to keep the pie exciting.
Spicy Kick
Add ¼ tsp finely ground cayenne pepper to the filling for a subtle heat that heightens the lime’s brightness.
Mediterranean Twist
Mix 1 tbsp finely chopped fresh mint into the crust and drizzle a light honey glaze over the top before serving.
Asian Fusion
Incorporate 1 tsp toasted sesame oil into the filling and garnish with toasted black sesame seeds for a nutty, umami edge.
⚠️ Dietary Adjustments
Gluten‑Free
Replace graham crackers with certified gluten‑free oat or almond cookies, processed into fine crumbs.
Lactose‑Free
Use lactose‑free condensed milk (available in many stores) and substitute the whipped cream with lactose‑free whipped topping.
Low‑Calorie
Reduce sugar in the crust by half, use light condensed milk (or a blend of low‑fat milk and sugar), and skip the whipped cream topping.
👶 Kid‑Friendly Version
Blend the lime juice with a splash of orange juice for a milder tartness. Top with colorful sprinkles instead of mint for visual appeal that attracts young eaters.
📦 Storage and Reheating
🧊 Conservation
Refrigerator
- Duration: 4 days
- Recommended container: airtight glass or plastic pie dish
- Tip: Cover the surface with plastic wrap to prevent a skin from forming.
Freezer
- Duration: 2 months
- Method: Wrap the entire pie tightly in foil, then place in a freezer‑safe bag.
- Defrosting: Transfer to the refrigerator overnight; avoid rapid thawing to preserve texture.
💡 For best flavor, consume within a week of preparation; the lime aroma diminishes over time.
♨️ Reheating
Oven (Recommended)
- Preheat to 150 °C (300 °F).
- Cover the pie loosely with aluminum foil.
- Heat for 5‑7 minutes to soften the topping.
- Remove foil and heat an additional 2 minutes if you desire a lightly browned crust edge.
Microwave (Quick)
- Place a microwave‑safe cover over the slice.
- Heat on medium power for 20‑30 seconds.
- Check consistency; repeat in 10‑second bursts if needed.
Stovetop
If you prefer a gentle warm‑up, place a slice in a non‑stick pan over low heat for 1‑2 minutes, covered, to melt the topping without drying the filling.
🍷 Perfect Pairings
🥗 Side Dishes
- Fresh Fruit Salad: A mix of mango, pineapple, and berries adds tropical brightness that mirrors the lime.
- Light Coconut Sorbet: Its cool creaminess balances the tangy pie without overwhelming the palate.
- Mint‑Infused Water: A subtle herbaceous sip cleanses the palate between bites.
🍷 Wine & Beverage Matches
- Riesling (off‑dry): The natural acidity and hint of sweetness echo the lime’s brightness.
- Prosecco: Its effervescence lifts the creamy texture, creating a lively mouthfeel.
- Non‑Alcoholic: Sparkling lime‑infused water with a splash of agave syrup.
🍰 Complementary Courses
Start with a crisp citrus‑herb salad, follow the pie with a light vanilla bean panna cotta, and finish the meal with a drizzle of caramel sauce over a small scoop of vanilla ice cream. The sequence maintains a refreshing rhythm while allowing the key lime pie to shine as the grand finale.
❓ Frequently Asked Questions
Q: Can I use bottled lime juice instead of fresh?
A: While bottled juice works in a pinch, it often lacks the bright aromatic oils found in fresh key limes. If you must use bottled, choose a high‑quality, unsweetened variety and add a teaspoon of lime zest to restore some of the fresh flavor.
Q: How do I prevent the crust from becoming soggy?
A: Ensure the butter is fully melted and evenly coats the crumbs; this creates a moisture barrier. Chill the crust before adding the filling, and avoid over‑filling, which can cause liquid to seep into the crust.
Q: Is it safe to freeze a no‑bake pie?
A: Yes, the pie freezes well. Wrap it tightly in foil and a freezer bag. Thaw slowly in the refrigerator to maintain texture. The whipped cream topping may separate slightly; a quick re‑whip restores its fluffiness.
Q: What if the filling doesn’t set?
A: Check the lime‑to‑condensed milk ratio; too much lime can keep the mixture fluid. Increase chilling time or add an extra tablespoon of condensed milk. In a pinch, a teaspoon of gelatin dissolved in warm water can be incorporated, though this changes the no‑bake nature.
Q: Can I substitute the graham cracker crust with a different base?
A: Absolutely. Digestive biscuits, shortbread cookies, or even crushed pretzels (for a salty twist) work well. Adjust the butter proportion slightly if the crumbs are denser.
Q: How far in advance can I prepare the pie?
A: The pie can be assembled up to 24 hours ahead and kept refrigerated. The flavors meld beautifully, and the texture remains firm. For best results, add any fresh garnish (mint, zest) just before serving.
🎉 Let’s Get Baking!
This no‑bake key lime pie combines the ease of a quick assembly with the elegance of a classic dessert. The bright lime filling, buttery graham crust, and optional whipped topping create a harmonious balance that delights every sense. Whether you’re entertaining guests or treating yourself after a long day, this recipe delivers a refreshing, crowd‑pleasing finish without turning on the oven.
Give it a try, experiment with the variations, and don’t hesitate to make it your own. Share your results, ask questions, and rate the recipe below. Your feedback helps the community grow and inspires new culinary adventures.
Have you tried this recipe?
Leave a comment and rating below! Share your photos on Instagram with #KeyLimeDream for a chance to be featured.
No Bake Key Lime Pie with Graham Cracker Crust
A quick, tangy, and creamy lime pie that sets without baking.
📝 Ingredients
Graham Cracker Crust
Lime Filling
Topping (optional)
👨🍳 Instructions
- 1 Press the graham cracker mixture into a 9‑inch springform pan and chill for 10 minutes.
- 2 Whisk together condensed milk, lime juice, zest, and vanilla until smooth.
- 3 Pour the filling over the chilled crust, smoothing the top.
- 4 Refrigerate for at least 4 hours, preferably overnight.
- 5 (Optional) Whip the cream with powdered sugar to soft peaks.
- 6 Top the pie with whipped cream, extra lime zest, and mint leaves.
- 7 Slice with a hot, wet knife for clean cuts.
- 8 Serve chilled, optionally with a side of fresh fruit.
- 9 Store leftovers in an airtight container in the fridge.
- 10 Enjoy and share your creation on social media!
🥗 Nutrition (per serving)
*Values are estimates based on standard ingredient brands.
📚 You Might Also Like
Mango Coconut Pudding
Raspberry Almond Tart
Silky Chocolate Mousse


💬 Comments & Reviews
Leave a Comment
No comments yet. Be the first to share your thoughts!